
The Apache Knox Gateway is a system that provides a single point of authentication and access for Apache Hadoop services in a cluster. The goal is to simplify Hadoop security for both users (i.e. who access the cluster data and execute jobs) and operators (i.e. who control access and manage the cluster). The gateway runs as a server (or cluster of servers) that provide centralized access to one or more Hadoop clusters. In general the goals of the gateway are as follows:
Here are the steps to have Apache Knox up and running against a Hadoop Cluster:
Java 1.8 is required for the Knox Gateway runtime. Use the command below to check the version of Java installed on the system where Knox will be running.
java -version
Knox 1.1.0 supports Hadoop 2.x and 3.x, the quick start instructions assume a Hadoop 2.x virtual machine based environment.
The quick start provides a link to download Hadoop 2.0 based Hortonworks virtual machine Sandbox. Please note Knox supports other Hadoop distributions and is configurable against a full-blown Hadoop cluster. Configuring Knox for Hadoop 2.x version, or Hadoop deployed in EC2 or a custom Hadoop cluster is documented in advance deployment guide.
Download one of the distributions below from the Apache mirrors.
Apache Knox Gateway releases are available under the Apache License, Version 2.0. See the NOTICE file contained in each release artifact for applicable copyright attribution notices.
While recommended, verification of signatures is an optional step. You can verify the integrity of any downloaded files using the PGP signatures. Please read Verifying Apache HTTP Server Releases for more information on why you should verify our releases.
The PGP signatures can be verified using PGP or GPG. First download the KEYS file as well as the .asc signature files for the relevant release packages. Make sure you get these files from the main distribution directory linked above, rather than from a mirror. Then verify the signatures using one of the methods below.
% pgpk -a KEYS
% pgpv knox-1.1.0.zip.asc
or
% pgp -ka KEYS
% pgp knox-1.1.0.zip.asc
or
% gpg --import KEYS
% gpg --verify knox-1.1.0.zip.asc
Start the Hadoop virtual machine.
The steps required to install the gateway will vary depending upon which distribution format (zip | rpm) was downloaded. In either case you will end up with a directory where the gateway is installed. This directory will be referred to as your {GATEWAY_HOME} throughout this document.
If you downloaded the Zip distribution you can simply extract the contents into a directory. The example below provides a command that can be executed to do this. Note the {VERSION} portion of the command must be replaced with an actual Apache Knox Gateway version number. This might be 1.1.0 for example.
unzip knox-{VERSION}.zip
This will create a directory knox-{VERSION} in your current directory. The directory knox-{VERSION} will considered your {GATEWAY_HOME}
Knox comes with an LDAP server for demonstration purposes. Note: If the tool used to extract the contents of the Tar or tar.gz file was not capable of making the files in the bin directory executable
cd {GATEWAY_HOME}
bin/ldap.sh start
Run the knoxcli.sh create-master command in order to persist the master secret that is used to protect the key and credential stores for the gateway instance.
cd {GATEWAY_HOME}
bin/knoxcli.sh create-master
The CLI will prompt you for the master secret (i.e. password).
The gateway can be started using the provided shell script.
The server will discover the persisted master secret during start up and complete the setup process for demo installs. A demo install will consist of a Knox gateway instance with an identity certificate for localhost. This will require clients to be on the same machine or to turn off hostname verification. For more involved deployments, See the Knox CLI section of this document for additional configuration options, including the ability to create a self-signed certificate for a specific hostname.
cd {GATEWAY_HOME}
bin/gateway.sh start
When starting the gateway this way the process will be run in the background. The log files will be written to {GATEWAY_HOME}/logs and the process ID files (PIDs) will be written to {GATEWAY_HOME}/pids.
In order to stop a gateway that was started with the script use this command:
cd {GATEWAY_HOME}
bin/gateway.sh stop
If for some reason the gateway is stopped other than by using the command above you may need to clear the tracking PID:
cd {GATEWAY_HOME}
bin/gateway.sh clean
NOTE: This command will also clear any .out and .err file from the {GATEWAY_HOME}/logs directory so use this with caution.
This will return a directory listing of the root (i.e. /) directory of HDFS.
curl -i -k -u guest:guest-password -X GET \
    'https://localhost:8443/gateway/sandbox/webhdfs/v1/?op=LISTSTATUS'
The results of the above command should result in something to along the lines of the output below. The exact information returned is subject to the content within HDFS in your Hadoop cluster. Successfully executing this command at a minimum proves that the gateway is properly configured to provide access to WebHDFS. It does not necessarily mean that any of the other services are correctly configured to be accessible. To validate that see the sections for the individual services in Service Details.
HTTP/1.1 200 OK
Content-Type: application/json
Content-Length: 760
Server: Jetty(6.1.26)

{"FileStatuses":{"FileStatus":[
{"accessTime":0,"blockSize":0,"group":"hdfs","length":0,"modificationTime":1350595859762,"owner":"hdfs","pathSuffix":"apps","permission":"755","replication":0,"type":"DIRECTORY"},
{"accessTime":0,"blockSize":0,"group":"mapred","length":0,"modificationTime":1350595874024,"owner":"mapred","pathSuffix":"mapred","permission":"755","replication":0,"type":"DIRECTORY"},
{"accessTime":0,"blockSize":0,"group":"hdfs","length":0,"modificationTime":1350596040075,"owner":"hdfs","pathSuffix":"tmp","permission":"777","replication":0,"type":"DIRECTORY"},
{"accessTime":0,"blockSize":0,"group":"hdfs","length":0,"modificationTime":1350595857178,"owner":"hdfs","pathSuffix":"user","permission":"755","replication":0,"type":"DIRECTORY"}
]}}
curl -i -k -u guest:guest-password -X PUT \
    'https://localhost:8443/gateway/sandbox/webhdfs/v1/tmp/LICENSE?op=CREATE'

curl -i -k -u guest:guest-password -T LICENSE -X PUT \
    '{Value of Location header from response above}'
curl -i -k -u guest:guest-password -X GET \
    'https://localhost:8443/gateway/sandbox/webhdfs/v1/tmp/LICENSE?op=OPEN'

curl -i -k -u guest:guest-password -X GET \
    '{Value of Location header from command response above}'
This section provides everything you need to know to get the Knox gateway up and running against a Hadoop cluster.
An existing Hadoop 2.x or 3.x cluster is required for Knox to sit in front of and protect. It is possible to use a Hadoop cluster deployed on EC2 but this will require additional configuration not covered here. It is also possible to protect access to a services of a Hadoop cluster that is secured with Kerberos. This too requires additional configuration that is described in other sections of this guide. See Supported Services for details on what is supported for this release.
The instructions that follow assume a few things:
All of the instructions and samples provided here are tailored and tested to work “out of the box” against a Hortonworks Sandbox 2.x VM.
Knox can be installed by expanding the zip/archive file.
The table below provides a brief explanation of the important files and directories within {GATEWAY_HOME}
| Directory | Purpose |
|---|---|
| conf/ | Contains configuration files that apply to the gateway globally (i.e. not cluster specific ). |
| data/ | Contains security and topology specific artifacts that require read/write access at runtime |
| conf/topologies/ | Contains topology files that represent Hadoop clusters which the gateway uses to deploy cluster proxies |
| data/security/ | Contains the persisted master secret and keystore dir |
| data/security/keystores/ | Contains the gateway identity keystore and credential stores for the gateway and each deployed cluster topology |
| data/services | Contains service behavior definitions for the services currently supported. |
| bin/ | Contains the executable shell scripts, batch files and JARs for clients and servers. |
| data/deployments/ | Contains deployed cluster topologies used to protect access to specific Hadoop clusters. |
| lib/ | Contains the JARs for all the components that make up the gateway. |
| dep/ | Contains the JARs for all of the components upon which the gateway depends. |
| ext/ | A directory where user supplied extension JARs can be placed to extends the gateways functionality. |
| pids/ | Contains the process ids for running LDAP and gateway servers |
| samples/ | Contains a number of samples that can be used to explore the functionality of the gateway. |
| templates/ | Contains default configuration files that can be copied and customized. |
| README | Provides basic information about the Apache Knox Gateway. |
| ISSUES | Describes significant know issues. |
| CHANGES | Enumerates the changes between releases. |
| LICENSE | Documents the license under which this software is provided. |
| NOTICE | Documents required attribution notices for included dependencies. |
This table enumerates the versions of various Hadoop services that have been tested to work with the Knox Gateway.
| Service | Version | Non-Secure | Secure | HA |
|---|---|---|---|---|
| WebHDFS | 2.4.0 |  |
|
|
| WebHCat/Templeton | 0.13.0 | |
|
|
| Oozie | 4.0.0 | |
|
|
| HBase | 0.98.0 | |
|
|
| Hive (via WebHCat) | 0.13.0 | |
|
|
| Hive (via JDBC/ODBC) | 0.13.0 | |
|
|
| Yarn ResourceManager | 2.5.0 | |
|
 |
| Kafka (via REST Proxy) | 0.10.0 | |
|
|
| Storm | 0.9.3 | |
|
|
| SOLR | 5.5+ and 6+ | |
|
|
These examples provide more detail about how to access various Apache Hadoop services via the Apache Knox Gateway.
The purpose of the samples within the {GATEWAY_HOME}/samples directory is to demonstrate the capabilities of the Apache Knox Gateway to provide access to the numerous APIs that are available from the service components of a Hadoop cluster.
Depending on exactly how your Knox installation was done, there will be some number of steps required in order fully install and configure the samples for use.
This section will help describe the assumptions of the samples and the steps to get them to work in a couple of different deployment scenarios.
The samples were initially written with the intent of working out of the box for the various Hadoop demo environments that are deployed as a single node cluster inside of a VM. The following assumptions were made from that context and should be understood in order to get the samples to work in other deployment scenarios:
{GATEWAY_HOME}/conf/topologies directory that is configured to point to the actual host and ports of running service components.There should be little to do if anything in a demo environment that has been provisioned with illustrating the use of Apache Knox.
However, the following items will be worth ensuring before you start:
sandbox.xml topology is configured properly for the deployed servicesApache Knox instances that are under the management of Ambari are generally assumed not to be demo instances. These instances are in place to facilitate development, testing or production Hadoop clusters.
The Knox samples can however be made to work with Ambari managed Knox instances with a few steps:
default.xml topology file can be copied to sandbox.xml in order to satisfy the topology name assumption in the samples/usr/jdk64/jdk1.7.0_67/bin/java -jar bin/shell.jar samples/ExampleWebHdfsLs.groovy
For manually installed Knox instances, there is really no way for the installer to know how to configure the topology file for you.
Essentially, these steps are identical to the Ambari deployed instance except that #3 should be replaced with the configuration of the out of the box sandbox.xml to point the configuration at the proper hosts and ports.
{GATEWAY_HOME}/conf/topologies/sandbox.xml to reflect your actual cluster service locations./usr/jdk64/jdk1.7.0_67/bin/java -jar bin/shell.jar samples/ExampleWebHdfsLs.groovy
This section describes the details of the Knox Gateway itself. Including:
gateway-site.xml and cluster specific topology filesThe gateway functions much like a reverse proxy. As such, it maintains a mapping of URLs that are exposed externally by the gateway to URLs that are provided by the Hadoop cluster.
In order to provide compatibility with the Hadoop Java client and existing CLI tools, the Knox Gateway has provided a feature called the Default Topology. This refers to a topology deployment that will be able to route URLs without the additional context that the gateway uses for differentiating from one Hadoop cluster to another. This allows the URLs to match those used by existing clients that may access WebHDFS through the Hadoop file system abstraction.
When a topology file is deployed with a file name that matches the configured default topology name, a specialized mapping for URLs is installed for that particular topology. This allows the URLs that are expected by the existing Hadoop CLIs for WebHDFS to be used in interacting with the specific Hadoop cluster that is represented by the default topology file.
The configuration for the default topology name is found in gateway-site.xml as a property called: default.app.topology.name.
The default value for this property is sandbox.
Therefore, when deploying the sandbox.xml topology, both of the following example URLs work for the same underlying Hadoop cluster:
https://{gateway-host}:{gateway-port}/webhdfs
https://{gateway-host}:{gateway-port}/{gateway-path}/{cluster-name}/webhdfs
These default topology URLs exist for all of the services in the topology.
Examples of mappings for WebHDFS, WebHCat, Oozie and HBase are shown below. These mapping are generated from the combination of the gateway configuration file (i.e. {GATEWAY_HOME}/conf/gateway-site.xml) and the cluster topology descriptors (e.g. {GATEWAY_HOME}/conf/topologies/{cluster-name}.xml). The port numbers shown for the Cluster URLs represent the default ports for these services. The actual port number may be different for a given cluster.
https://{gateway-host}:{gateway-port}/{gateway-path}/{cluster-name}/webhdfshttp://{webhdfs-host}:50070/webhdfshttps://{gateway-host}:{gateway-port}/{gateway-path}/{cluster-name}/templetonhttp://{webhcat-host}:50111/templeton}https://{gateway-host}:{gateway-port}/{gateway-path}/{cluster-name}/ooziehttp://{oozie-host}:11000/oozie}https://{gateway-host}:{gateway-port}/{gateway-path}/{cluster-name}/hbasehttp://{hbase-host}:8080jdbc:hive2://{gateway-host}:{gateway-port}/;ssl=true;sslTrustStore={gateway-trust-store-path};trustStorePassword={gateway-trust-store-password};transportMode=http;httpPath={gateway-path}/{cluster-name}/hivehttp://{hive-host}:10001/cliserviceThe values for {gateway-host}, {gateway-port}, {gateway-path} are provided via the gateway configuration file (i.e. {GATEWAY_HOME}/conf/gateway-site.xml).
The value for {cluster-name} is derived from the file name of the cluster topology descriptor (e.g. {GATEWAY_HOME}/deployments/{cluster-name}.xml).
The value for {webhdfs-host}, {webhcat-host}, {oozie-host}, {hbase-host} and {hive-host} are provided via the cluster topology descriptor (e.g. {GATEWAY_HOME}/conf/topologies/{cluster-name}.xml).
Note: The ports 50070 (9870 for Hadoop 3.x), 50111, 11000, 8080 and 10001 are the defaults for WebHDFS, WebHCat, Oozie, HBase and Hive respectively. Their values can also be provided via the cluster topology descriptor if your Hadoop cluster uses different ports.
Note: The HBase REST API uses port 8080 by default. This often clashes with other running services. In the Hortonworks Sandbox, Apache Ambari might be running on this port, so you might have to change it to a different port (e.g. 60080).
This feature allows mapping of a topology to a port, as a result one can have a specific topology listening on a configured port. This feature routes URLs to these port-mapped topologies without the additional context that the gateway uses for differentiating from one Hadoop cluster to another, just like the Default Topology URLs feature, but on a dedicated port.
The configuration for Topology Port Mapping goes in gateway-site.xml file. The configuration uses the property name and value model to configure the settings for this feature. The format for the property name is gateway.port.mapping.{topologyName} and value is the port number that this topology would listen on.
In the following example, the topology development will listen on 9443 (if the port is not already taken).
  <property>
      <name>gateway.port.mapping.development</name>
      <value>9443</value>
      <description>Topology and Port mapping</description>
  </property>
An example of how one can access WebHDFS URL using the above configuration is
 https://{gateway-host}:9443/webhdfs
 https://{gateway-host}:9443/{gateway-path}/development/webhdfs
 https://{gateway-host}:{gateway-port}/{gateway-path}/development/webhdfs
All of the above URL will be valid URLs for the above described configuration.
This feature is turned on by default, to turn it off use the property gateway.port.mapping.enabled. e.g.
 <property>
     <name>gateway.port.mapping.enabled</name>
     <value>false</value>
     <description>Enable/Disable port mapping feature.</description>
 </property>
If a topology mapped port is in use by another topology or process then an ERROR message is logged and gateway startup continues as normal.
Configuration for Apache Knox includes:
The following configuration changes must be made to your cluster to allow Apache Knox to dispatch requests to the various service components on behalf of end users.
core-site.xml on Hadoop master nodes Update core-site.xml and add the following lines towards the end of the file.
Replace FQDN_OF_KNOX_HOST with the fully qualified domain name of the host running the Knox gateway. You can usually find this by running hostname -f on that host.
You can use * for local developer testing if the Knox host does not have a static IP.
<property>
    <name>hadoop.proxyuser.knox.groups</name>
    <value>users</value>
</property>
<property>
    <name>hadoop.proxyuser.knox.hosts</name>
    <value>FQDN_OF_KNOX_HOST</value>
</property>
webhcat-site.xml on Hadoop master nodes Update webhcat-site.xml and add the following lines towards the end of the file.
Replace FQDN_OF_KNOX_HOST with the fully qualified domain name of the host running the Knox gateway. You can use * for local developer testing if the Knox host does not have a static IP.
<property>
    <name>webhcat.proxyuser.knox.groups</name>
    <value>users</value>
</property>
<property>
    <name>webhcat.proxyuser.knox.hosts</name>
    <value>FQDN_OF_KNOX_HOST</value>
</property>
oozie-site.xml on Oozie host Update oozie-site.xml and add the following lines towards the end of the file.
Replace FQDN_OF_KNOX_HOST with the fully qualified domain name of the host running the Knox gateway. You can use * for local developer testing if the Knox host does not have a static IP.
<property>
    <name>oozie.service.ProxyUserService.proxyuser.knox.groups</name>
    <value>users</value>
</property>
<property>
    <name>oozie.service.ProxyUserService.proxyuser.knox.hosts</name>
    <value>FQDN_OF_KNOX_HOST</value>
</property>
Update hive-site.xml and set the following properties on HiveServer2 hosts. Some of the properties may already be in the hive-site.xml. Ensure that the values match the ones below.
<property>
    <name>hive.server2.allow.user.substitution</name>
    <value>true</value>
</property>

<property>
    <name>hive.server2.transport.mode</name>
    <value>http</value>
    <description>Server transport mode. "binary" or "http".</description>
</property>

<property>
    <name>hive.server2.thrift.http.port</name>
    <value>10001</value>
    <description>Port number when in HTTP mode.</description>
</property>

<property>
    <name>hive.server2.thrift.http.path</name>
    <value>cliservice</value>
    <description>Path component of URL endpoint when in HTTP mode.</description>
</property>
The following table illustrates the configurable elements of the Apache Knox Gateway at the server level via gateway-site.xml.
| Property | Description | Default |
|---|---|---|
gateway.deployment.dir |
The directory within GATEWAY_HOME that contains gateway topology deployments |
{GATEWAY_HOME}/data/deployments |
gateway.security.dir |
The directory within GATEWAY_HOME that contains the required security artifacts |
{GATEWAY_HOME}/data/security |
gateway.data.dir |
The directory within GATEWAY_HOME that contains the gateway instance data |
{GATEWAY_HOME}/data |
gateway.services.dir |
The directory within GATEWAY_HOME that contains the gateway services definitions |
{GATEWAY_HOME}/services |
gateway.hadoop.conf.dir |
The directory within GATEWAY_HOME that contains the gateway configuration |
{GATEWAY_HOME}/conf |
gateway.frontend.url |
The URL that should be used during rewriting so that it can rewrite the URLs with the correct “frontend” URL | none |
gateway.server.header.enabled |
Indicates whether Knox displays service info in HTTP response | true |
gateway.xforwarded.enabled |
Indicates whether support for some X-Forwarded-* headers is enabled | true |
gateway.trust.all.certs |
Indicates whether all presented client certs should establish trust | false |
gateway.client.auth.needed |
Indicates whether clients are required to establish a trust relationship with client certificates | false |
gateway.truststore.path |
Location of the truststore for client certificates to be trusted | gateway.jks |
gateway.truststore.type |
Indicates the type of truststore | JKS |
gateway.keystore.type |
Indicates the type of keystore for the identity store | JKS |
gateway.jdk.tls.ephemeralDHKeySize |
jdk.tls.ephemeralDHKeySize, is defined to customize the ephemeral DH key sizes. The minimum acceptable DH key size is 1024 bits, except for exportable cipher suites or legacy mode (jdk.tls.ephemeralDHKeySize=legacy) |
2048 |
gateway.threadpool.max |
The maximum concurrent requests the server will process. The default is 254. Connections beyond this will be queued. | 254 |
gateway.httpclient.maxConnections |
The maximum number of connections that a single HttpClient will maintain to a single host:port. | 32 |
gateway.httpclient.connectionTimeout |
The amount of time to wait when attempting a connection. The natural unit is milliseconds, but a ‘s’ or ‘m’ suffix may be used for seconds or minutes respectively. | 20s |
gateway.httpclient.socketTimeout |
The amount of time to wait for data on a socket before aborting the connection. The natural unit is milliseconds, but a ‘s’ or ‘m’ suffix may be used for seconds or minutes respectively. | 20s |
gateway.httpserver.requestBuffer |
The size of the HTTP server request buffer in bytes | 16384 |
gateway.httpserver.requestHeaderBuffer |
The size of the HTTP server request header buffer in bytes | 8192 |
gateway.httpserver.responseBuffer |
The size of the HTTP server response buffer in bytes | 32768 |
gateway.httpserver.responseHeaderBuffer |
The size of the HTTP server response header buffer in bytes | 8192 |
gateway.websocket.feature.enabled |
Enable/Disable WebSocket feature | false |
gateway.gzip.compress.mime.types |
Content types to be gzip compressed by Knox on the way out to browser. | text/html, text/plain, text/xml, text/css, application/javascript, text/javascript, application/x-javascript |
gateway.signing.keystore.name |
OPTIONAL Filename of keystore file that contains the signing keypair. NOTE: An alias needs to be created using knoxcli.sh create-alias for the alias name signing.key.passphrase in order to provide the passphrase to access the keystore. |
null |
gateway.signing.key.alias |
OPTIONAL alias for the signing keypair within the keystore specified via gateway.signing.keystore.name |
null |
ssl.enabled |
Indicates whether SSL is enabled for the Gateway | true |
ssl.include.ciphers |
A comma or pipe separated list of ciphers to accept for SSL. See the JSSE Provider docs for possible ciphers. These can also contain regular expressions as shown in the Jetty documentation. | all |
ssl.exclude.ciphers |
A comma or pipe separated list of ciphers to reject for SSL. See the JSSE Provider docs for possible ciphers. These can also contain regular expressions as shown in the Jetty documentation. | none |
ssl.exclude.protocols |
Excludes a comma or pipe separated list of protocols to not accept for SSL or “none” | SSLv3 |
gateway.remote.config.monitor.client |
A reference to the remote configuration registry client the remote configuration monitor will employ | null |
gateway.remote.config.monitor.client.allowUnauthenticatedReadAccess |
When a remote registry client is configured to access a registry securely, this property can be set to allow unauthenticated clients to continue to read the content from that registry by setting the ACLs accordingly. | false |
gateway.remote.config.registry.<name> |
A named remote configuration registry client definition, where name is an arbitrary identifier for the connection | null |
gateway.cluster.config.monitor.ambari.enabled |
Indicates whether the cluster monitoring and associated dynamic topology updating is enabled | false |
gateway.cluster.config.monitor.ambari.interval |
The interval (in seconds) at which the cluster monitor will poll Ambari for cluster configuration changes | 60 |
gateway.remote.alias.service.enabled |
Turn on/off remote alias management, this will take effect only when remote configuration monitoring is enabled | true |
gateway.read.only.override.topologies |
A comma-delimited list of topology names which should be forcibly treated as read-only. | none |
gateway.discovery.default.address |
The default discovery address, which is applied if no address is specified in a descriptor. | null |
gateway.discovery.default.cluster |
The default discovery cluster name, which is applied if no cluster name is specified in a descriptor. | null |
gateway.dispatch.whitelist |
A semicolon-delimited list of regular expressions for controlling to which endpoints Knox dispatches and redirects will be permitted. If DEFAULT is specified, or the property is omitted entirely, then a default domain-based whitelist will be derived from the Knox host. An empty value means no dispatches will be permitted. | null |
gateway.dispatch.whitelist.services |
A comma-delimited list of service roles to which the gateway.dispatch.whitelist will be applied. | none |
gateway.strict.topology.validation |
If true, topology XML files will be validated against the topology schema during redeploy | false |
gateway.global.rules.services |
Set the list of service names that have global rules, all services that are not in this list have rules that are treated as scoped to only to that service. | "NAMENODE","JOBTRACKER", "WEBHDFS", "WEBHCAT", "OOZIE", "WEBHBASE", "HIVE", "RESOURCEMANAGER" |
The topology descriptor files provide the gateway with per-cluster configuration information. This includes configuration for both the providers within the gateway and the services within the Hadoop cluster. These files are located in {GATEWAY_HOME}/conf/topologies. The general outline of this document looks like this.
<topology>
    <gateway>
        <provider>
        </provider>
    </gateway>
    <service>
    </service>
</topology>
There are typically multiple <provider> and <service> elements.
Provider configuration is used to customize the behavior of a particular gateway feature. The general outline of a provider element looks like this.
<provider>
    <role>authentication</role>
    <name>ShiroProvider</name>
    <enabled>true</enabled>
    <param>
        <name></name>
        <value></value>
    </param>
</provider>
true or false respectively. When a provider is disabled any filters associated with that provider are excluded from the processing chain.Service configuration is used to specify the location of services within the Hadoop cluster. The general outline of a service element looks like this.
<service>
    <role>WEBHDFS</role>
    <url>http://localhost:50070/webhdfs</url>
</service>
The purpose of the Hostmap provider is to handle situations where hosts are known by one name within the cluster and another name externally. This frequently occurs when virtual machines are used and in particular when using cloud hosting services. Currently, the Hostmap provider is configured as part of the topology file. The basic structure is shown below.
<topology>
    <gateway>
        ...
        <provider>
            <role>hostmap</role>
            <name>static</name>
            <enabled>true</enabled>
            <param><name>external-host-name</name><value>internal-host-name</value></param>
        </provider>
        ...
    </gateway>
    ...
</topology>
This mapping is required because the Hadoop services running within the cluster are unaware that they are being accessed from outside the cluster. Therefore URLs returned as part of REST API responses will typically contain internal host names. Since clients outside the cluster will be unable to resolve those host name they must be mapped to external host names.
Consider an EC2 example where two VMs have been allocated. Each VM has an external host name by which it can be accessed via the internet. However the EC2 VM is unaware of this external host name and instead is configured with the internal host name.
External HOSTNAMES:
ec2-23-22-31-165.compute-1.amazonaws.com
ec2-23-23-25-10.compute-1.amazonaws.com

Internal HOSTNAMES:
ip-10-118-99-172.ec2.internal
ip-10-39-107-209.ec2.internal
The Hostmap configuration required to allow access external to the Hadoop cluster via the Apache Knox Gateway would be this:
<topology>
    <gateway>
        ...
        <provider>
            <role>hostmap</role>
            <name>static</name>
            <enabled>true</enabled>
            <param>
                <name>ec2-23-22-31-165.compute-1.amazonaws.com</name>
                <value>ip-10-118-99-172.ec2.internal</value>
            </param>
            <param>
                <name>ec2-23-23-25-10.compute-1.amazonaws.com</name>
                <value>ip-10-39-107-209.ec2.internal</value>
            </param>
        </provider>
        ...
    </gateway>
    ...
</topology>
The Hortonworks Sandbox 2.x poses a different challenge for host name mapping. This version of the Sandbox uses port mapping to make the Sandbox VM appear as though it is accessible via localhost. However the Sandbox VM is internally configured to consider sandbox.hortonworks.com as the host name. So from the perspective of a client accessing Sandbox the external host name is localhost. The Hostmap configuration required to allow access to Sandbox from the host operating system is this.
<topology>
    <gateway>
        ...
        <provider>
            <role>hostmap</role>
            <name>static</name>
            <enabled>true</enabled>
            <param>
                <name>localhost</name>
                <value>sandbox,sandbox.hortonworks.com</value>
            </param>
        </provider>
        ...
    </gateway>
    ...
</topology>
Details about each provider configuration element is enumerated below.
hostmap.static.true or false.Simplified descriptors are a means to facilitate provider configuration sharing and service endpoint discovery. Rather than editing an XML topology descriptor, it’s possible to create a simpler YAML (or JSON) descriptor specifying the desired contents of a topology, which will yield a full topology descriptor and deployment.
Sometimes, the same provider configuration is applied to multiple Knox topologies. With the provider configuration externalized from the simple descriptors, a single configuration can be referenced by multiple topologies. This helps reduce the duplication of configuration, and the need to update multiple configuration files when a policy change is required. Updating a provider configuration will trigger an update to all those topologies that reference it.
The contents of externalized provider configuration details are identical to the contents of the gateway element from a full topology descriptor. The only difference is that those details are defined in a separate JSON/YAML file in {GATEWAY_HOME}/conf/shared-providers/, which is then referenced by one or more descriptors.
Provider Configuration Example
{
  "providers": [
    {
      "role": "authentication",
      "name": "ShiroProvider",
      "enabled": "true",
      "params": {
        "sessionTimeout": "30",
        "main.ldapRealm": "org.apache.knox.gateway.shirorealm.KnoxLdapRealm",
        "main.ldapContextFactory": "org.apache.knox.gateway.shirorealm.KnoxLdapContextFactory",
        "main.ldapRealm.contextFactory": "$ldapContextFactory",
        "main.ldapRealm.userDnTemplate": "uid={0},ou=people,dc=hadoop,dc=apache,dc=org",
        "main.ldapRealm.contextFactory.url": "ldap://localhost:33389",
        "main.ldapRealm.contextFactory.authenticationMechanism": "simple",
        "urls./**": "authcBasic"
      }
    },
    {
      "name": "static",
      "role": "hostmape",
      "enabled": "true",
      "params": {
        "localhost": "sandbox,sandbox.hortonworks.com"
      }
    }
  ]
}
HA Providers are a special concern with respect to sharing provider configuration because they include service-specific (and possibly cluster-specific) configuration.
This requires extra attention because the service configurations corresponding to the associated HA Provider configuration must contain the correct content to function properly.
For a shared provider configuration with an HA Provider service:
Apache ZooKeeper-based HA Provider Services
The HA Provider configuration for some services (e.g., HiveServer2, Kafka) includes references to Apache ZooKeeper hosts (i.e., the ZooKeeper ensemble) and namespaces. It’s important to understand the relationship of that ensemble configuration to the topologies referencing it. These ZooKeeper details are often cluster-specific. If the ZooKeeper ensemble in the provider configuration is part of cluster A, then it’s probably incorrect to reference it in a topology for cluster B since the Hadoop service endpoints will probably be the wrong ones. However, if multiple clusters are working with a common ZooKeeper ensemble, then sharing this provider configuration may be appropriate.
It’s always best to specify cluster-specific details in a descriptor rather than a provider configuration.
All of the service attributes, which can be specified in the HaProvider, can also be specified as params in the corresponding service declaration in the descriptor. If an attribute is specified in both the service declaration and the HaProvider, then the service-level value overrides the HaProvider-level value.
"services": [
  {
    "name": "HIVE",
    "params": {
      "enabled": "true",
      "zookeeperEnsemble": "host1:2181,host2:2181,host3:2181",
      "zookeeperNamespace" : "hiveserver2",
      "maxRetryAttempts" : "100"
    }
  }
]
Note that Knox can dynamically determine these ZooKeeper ensemble details for some services; for others, they are static provider configuration details. The services for which Knox can discover the cluster-specific ZooKeeper details include:
For a subset of these supported services, Knox can also determine whether ZooKeeper-based HA is enabled or not. This means that the enabled attribute of the HA Provider configuration for these services may be set to auto, and Knox will determine whether or not it is enabled based on that service’s configuration in the target cluster.
{
  "providers": [
    {
      "role": "ha",
      "name": "HaProvider",
      "enabled": "true",
      "params": {
        "WEBHDFS": "maxFailoverAttempts=3;failoverSleep=1000;maxRetryAttempts=3;retrySleep=1000;enabled=true",
        "HIVE": "maxFailoverAttempts=10;failoverSleep=1000;maxRetryAttempts=5;retrySleep=1000;enabled=auto",
        "YARN": "maxFailoverAttempts=5;failoverSleep=5000;maxRetryAttempts=3;retrySleep=1000;enabled=auto"
      }
    }
  ]
}
These services include:
Be sure to pay extra attention when sharing HA Provider configuration across topologies.
Simplified descriptors allow service URLs to be defined explicitly, just like full topology descriptors. However, if URLs are omitted for a service, Knox will attempt to discover that service’s URLs from the Hadoop cluster. Currently, this behavior is only supported for clusters managed by Ambari. In any case, the simplified descriptors are much more concise than a full topology descriptor.
Descriptor Properties
| Property | Description |
|---|---|
discovery-type |
The discovery source type. (Currently, the only supported type is AMBARI). |
discovery-address |
The endpoint address for the discovery source. |
discovery-user |
The username with permission to access the discovery source. If omitted, then Knox will check for an alias named ambari.discovery.user, and use its value if defined. |
discovery-pwd-alias |
The alias of the password for the user with permission to access the discovery source. If omitted, then Knox will check for an alias named ambari.discovery.password, and use its value if defined. |
provider-config-ref |
A reference to a provider configuration in {GATEWAY_HOME}/conf/shared-providers/. |
cluster |
The name of the cluster from which the topology service endpoints should be determined. |
services |
The collection of services to be included in the topology. |
applications |
The collection of applications to be included in the topology. |
Two file formats are supported for two distinct purposes.
That being said, there is nothing preventing the hand-editing of files in the JSON format. However, the API will not accept YAML files as input.
YAML Example (based on the HDP Docker Sandbox)
---
# Discovery source config
discovery-type : AMBARI
discovery-address : http://sandbox.hortonworks.com:8080

# If this is not specified, the alias ambari.discovery.user is checked for a username
discovery-user : maria_dev

# If this is not specified, the default alias ambari.discovery.password is used
discovery-pwd-alias : sandbox.discovery.password

# Provider config reference, the contents of which will be included in the resulting topology descriptor
provider-config-ref : sandbox-providers

# The cluster for which the details should be discovered
cluster: Sandbox

# The services to declare in the resulting topology descriptor, whose URLs will be discovered (unless a value is specified)
services:
    - name: NAMENODE
    - name: JOBTRACKER
    - name: WEBHDFS
    - name: WEBHCAT
    - name: OOZIE
    - name: WEBHBASE
    - name: HIVE
    - name: RESOURCEMANAGER
    - name: KNOXSSO
      params:
          knoxsso.cookie.secure.only: true
          knoxsso.token.ttl: 100000
    - name: AMBARI
      urls:
          - http://sandbox.hortonworks.com:8080
    - name: AMBARIUI
      urls:
          - http://sandbox.hortonworks.com:8080
    - name: AMBARIWS
      urls:
          - ws://sandbox.hortonworks.com:8080
JSON Example (based on the HDP Docker Sandbox)
{
  "discovery-type":"AMBARI",
  "discovery-address":"http://sandbox.hortonworks.com:8080",
  "discovery-user":"maria_dev",
  "discovery-pwd-alias":"sandbox.discovery.password",
  "provider-config-ref":"sandbox-providers",
  "cluster":"Sandbox",
  "services":[
    {"name":"NAMENODE"},
    {"name":"JOBTRACKER"},
    {"name":"WEBHDFS"},
    {"name":"WEBHCAT"},
    {"name":"OOZIE"},
    {"name":"WEBHBASE"},
    {"name":"HIVE"},
    {"name":"RESOURCEMANAGER"},
    {"name":"KNOXSSO",
      "params":{
      "knoxsso.cookie.secure.only":"true",
      "knoxsso.token.ttl":"100000"
      }
    },
    {"name":"AMBARI", "urls":["http://sandbox.hortonworks.com:8080"]},
    {"name":"AMBARIUI", "urls":["http://sandbox.hortonworks.com:8080"],
    {"name":"AMBARIWS", "urls":["ws://sandbox.hortonworks.com:8080"]}
  ]
}
Both of these examples illustrate the specification of credentials for the interaction with Ambari. If no credentials are specified, then the default aliases are queried. Use of the default aliases is sufficient for scenarios where topology discovery will only interact with a single Ambari instance. For multiple Ambari instances however, it’s most likely that each will require different sets of credentials. The discovery-user and discovery-pwd-alias properties exist for this purpose. Note that whether using the default credential aliases or specifying a custom password alias, these aliases must be defined prior to any attempt to deploy a topology using a simplified descriptor.
Effecting topology changes is as simple as modifying files in two specific directories.
The {GATEWAY_HOME}/conf/shared-providers/ directory is the location where Knox looks for provider configurations. This directory is monitored for changes, such that modifying a provider configuration file therein will trigger updates to any referencing simplified descriptors in the {GATEWAY_HOME}/conf/descriptors/ directory. Care should be taken when deleting these files if there are referencing descriptors; any subsequent modifications of referencing descriptors will fail when the deleted provider configuration cannot be found. The references should all be modified before deleting the provider configuration.
Likewise, the {GATEWAY_HOME}/conf/descriptors/ directory is monitored for changes, such that adding or modifying a simplified descriptor file in this directory will trigger the generation and deployment of a topology descriptor. Deleting a descriptor from this directory will conversely result in the removal of the previously-generated topology descriptor, and the associated topology will be undeployed.
If the service details for a deployed (generated) topology are changed in the cluster, then the Knox topology can be updated by ’touch’ing the simplified descriptor. This will trigger discovery and regeneration/redeployment of the topology descriptor.
Note that deleting a generated topology descriptor from {GATEWAY_HOME}/conf/topologies/ is not sufficient for its removal. If the source descriptor is modified, or Knox is restarted, the topology descriptor will be regenerated and deployed. Removing generated topology descriptors should be done by removing the associated simplified descriptor. For the same reason, editing generated topology descriptors is strongly discouraged since they can be inadvertently overwritten.
Another means by which these topology changes can be effected is the Admin API.
Cloud Federation feature allows for a topology based federation from one Knox instance to another (from on-prem Knox instance to cloud knox instance).
Another benefit gained through the use of simplified topology descriptors, and the associated service discovery, is the ability to monitor clusters for configuration changes. Like service discovery, this is currently only available for clusters managed by Ambari.
The gateway can monitor Ambari cluster configurations, and respond to changes by dynamically regenerating and redeploying the affected topologies. The following properties in gateway-site.xml can be used to control this behavior.
<property>
    <name>gateway.cluster.config.monitor.ambari.enabled</name>
    <value>false</value>
    <description>Enable/disable Ambari cluster configuration monitoring.</description>
</property>

<property>
    <name>gateway.cluster.config.monitor.ambari.interval</name>
    <value>60</value>
    <description>The interval (in seconds) for polling Ambari for cluster configuration changes.</description>
</property>
Since service discovery supports multiple Ambari instances as discovery sources, multiple Ambari instances can be monitored for cluster configuration changes.
For example, if the cluster monitor is enabled, deployment of the following simple descriptor would trigger monitoring of the Sandbox cluster managed by Ambari @ http://sandbox.hortonworks.com:8080
---
discovery-address : http://sandbox.hortonworks.com:8080
discovery-user : maria_dev
discovery-pwd-alias : sandbox.discovery.password
cluster: Sandbox
provider-config-ref : sandbox-providers
services:
    - name: NAMENODE
    - name: JOBTRACKER
    - name: WEBHDFS
    - name: WEBHCAT
    - name: OOZIE
    - name: WEBHBASE
    - name: HIVE
    - name: RESOURCEMANAGER
Another Sandbox cluster, managed by a different Ambari instance, could simultaneously be monitored by the same gateway instance.
Now, topologies can be kept in sync with their respective target cluster configurations, without administrator intervention or service interruption.
In addition to monitoring local directories for provider configurations and simplified descriptors, the gateway similarly supports monitoring ZooKeeper.
This monitor depends on a remote configuration registry client, and that client must be specified by setting the following property in gateway-site.xml
<property>
    <name>gateway.remote.config.monitor.client</name>
    <value>sandbox-zookeeper-client</value>
    <description>Remote configuration monitor client name.</description>
</property>
This client identifier is a reference to a remote configuration registry client, as in this example (also defined in gateway-site.xml)
<property>
    <name>gateway.remote.config.registry.sandbox-zookeeper-client</name>
    <value>type=ZooKeeper;address=localhost:2181</value>
    <description>ZooKeeper configuration registry client details.</description>
</property>
The actual name of the client (e.g., sandbox-zookeeper-client) is not important, except that the reference matches the name specified in the client definition.
With this configuration, the gateway will monitor the following znodes in the specified ZooKeeper instance
/knox
    /config
        /shared-providers
        /descriptors
The creation of these znodes, and the population of their respective contents, is an activity not currently managed by the gateway. However, the KNOX CLI includes commands for managing the contents of these znodes.
These znodes are treated similarly to the local shared-providers and descriptors directories described in Deployment Directories. When the monitor notices a change to these znodes, it will attempt to effect the same change locally.
If a provider configuration is added to the /knox/config/shared-providers znode, the monitor will download the new configuration to the local shared-providers directory. Likewise, if a descriptor is added to the /knox/config/descriptors znode, the monitor will download the new descriptor to the local descriptors directory, which will trigger an attempt to generate and deploy a corresponding topology.
Modifications to the contents of these znodes, will yield the same behavior as can be seen resulting from the corresponding local modification.
| znode | action | result |
|---|---|---|
/knox/config/shared-providers |
add | Download the new file to the local shared-providers directory |
/knox/config/shared-providers |
modify | Download the new file to the local shared-providers directory; If there are any existing descriptor references, then topology will be regenerated and redeployed for those referencing descriptors. |
/knox/config/shared-providers |
delete | Delete the corresponding file from the local shared-providers directory |
/knox/config/descriptors |
add | Download the new file to the local descriptors directory; A corresponding topology will be generated and deployed. |
/knox/config/descriptors |
modify | Download the new file to the local descriptors directory; The corresponding topology will be regenerated and redeployed. |
/knox/config/descriptors |
delete | Delete the corresponding file from the local descriptors directory |
This simplifies the configuration for HA gateway deployments, in that the gateway instances can all be configured to monitor the same ZooKeeper instance, and changes to the znodes’ contents will be applied to all those gateway instances. With this approach, it is no longer necessary to manually deploy topologies to each of the gateway instances.
A Note About ACLs
While the gateway does not currently require secure interactions with remote registries, it is recommended
that ACLs be applied to restrict at least writing of the entries referenced by this monitor. If write
access is available to everyone, then the contents of the configuration cannot be known to be trustworthy,
and there is the potential for malicious activity. Be sure to carefully consider who will have the ability
to define configuration in monitored remote registries and apply the necessary measures to ensure its
trustworthiness.
One or more features of the gateway employ remote configuration registry (e.g., ZooKeeper) clients. These clients are configured by setting properties in the gateway configuration (gateway-site.xml).
Each client configuration is a single property, the name of which is prefixed with gateway.remote.config.registry. and suffixed by the client identifier. The value of such a property, is a registry-type-specific set of semicolon-delimited properties for that client, including the type of registry with which it will interact.
<property>
    <name>gateway.remote.config.registry.a-zookeeper-client</name>
    <value>type=ZooKeeper;address=zkhost1:2181,zkhost2:2181,zkhost3:2181</value>
    <description>ZooKeeper configuration registry client details.</description>
</property>
In the preceeding example, the client identifier is a-zookeeper-client, by way of the property name gateway.remote.config.registry.a-zookeeper-client.
The property value specifies that the client is intended to interact with ZooKeeper. It also specifies the particular ZooKeeper ensemble with which it will interact; this could be a single ZooKeeper instance as well.
The property value may also include an optional namespace, to which the client will be restricted (i.e., “chroot” the client).
<property>
    <name>gateway.remote.config.registry.a-zookeeper-client</name>
    <value>type=ZooKeeper;address=zkhost1:2181,zkhost2:2181,zkhost3:2181;namespace=/knox/config</value>
    <description>ZooKeeper configuration registry client details.</description>
</property>
At least for the ZooKeeper type, authentication details may also be specified as part of the property value, for interacting with instances for which authentication is required.
Digest Authentication Example
<property>
    <name>gateway.remote.config.registry.a-zookeeper-client</name>
    <value>type=ZooKeeper;address=zkhost1:2181,zkhost2:2181,zkhost3:2181;authType=Digest;principal=myzkuser;credentialAlias=myzkpass</value>
    <description>ZooKeeper configuration registry client details.</description>
</property>
Kerberos Authentication Example
<property>
    <name>gateway.remote.config.registry.a-zookeeper-client</name>
    <value>type=ZooKeeper;address=zkhost1:2181,zkhost2:2181,zkhost3:2181;authType=Kerberos;principal=myzkuser;keytab=/home/user/myzk.keytab;useKeyTab=true;useTicketCache=false</value>
    <description>ZooKeeper configuration registry client details.</description>
</property>
While multiple such clients can be configured, for ZooKeeper clients, there is currently a limitation with respect to authentication. Multiple clients cannot each have distinct authentication configurations. This limitation is imposed by the underlying ZooKeeper client. Therefore, the clients must all be insecure (no authentication configured), or they must all authenticate to the same ZooKeeper using the same credentials.
The remote configuration monitor facility uses these client configurations to perform its function.
Knox will also monitor for remote aliases that are added, deleted or updated. By default this is turned on (if Remote Configuration Monitor is on) and will sync all the aliases. In case one wants to turn off this feature they can do so by using the property “gateway.remote.alias.service.enabled” in gateway-site.xml. Knox needs to be restarted for this change to take effect.
<property>
    <name>gateway.remote.alias.service.enabled</name>
    <value>false</value>
    <description>Turn on/off Remote Alias Discovery(true by default)</description>
</property>
If necessary you can enable additional logging by editing the log4j.properties file in the conf directory. Changing the rootLogger value from ERROR to DEBUG will generate a large amount of debug logging. A number of useful, more fine loggers are also provided in the file.
TODO - Java VM options doc.
The master secret is required to start the server. This secret is used to access secured artifacts by the gateway instance. Keystore, trust stores and credential stores are all protected with the master secret.
You may persist the master secret by supplying the -persist-master switch at startup. This will result in a warning indicating that persisting the secret is less secure than providing it at startup. We do make some provisions in order to protect the persisted password.
It is encrypted with AES 128 bit encryption and where possible the file permissions are set to only be accessible by the user that the gateway is running as.
After persisting the secret, ensure that the file at data/security/master has the appropriate permissions set for your environment. This is probably the most important layer of defense for master secret. Do not assume that the encryption is sufficient protection.
A specific user should be created to run the gateway. This user will be the only user with permissions for the persisted master file.
See the Knox CLI section for descriptions of the command line utilities related to the master secret.
There are a number of artifacts that are used by the gateway in ensuring the security of wire level communications, access to protected resources and the encryption of sensitive data. These artifacts can be managed from outside of the gateway instances or generated and populated by the gateway instance itself.
The following is a description of how this is coordinated with both standalone (development, demo, etc.) gateway instances and instances as part of a cluster of gateways in mind.
Upon start of the gateway server we:
data/security/keystores/gateway.jks. The identity store contains the certificate and private key used to represent the identity of the server for SSL connections and signature creation.
data/security/keystores/__gateway-credentials.jceks. This credential store is used to store secrets/passwords that are used by the gateway. For instance, this is where the passphrase for accessing the gateway-identity certificate is kept.
gateway-identity-passphrase. This is coordinated with the population of the self-signed cert into the identity-store.Upon deployment of a Hadoop cluster topology within the gateway we:
data/security/keystores/sandbox-credentials.jceks. This topology specific credential store is used for storing secrets/passwords that are used for encrypting sensitive data with topology specific keys.
By leveraging the algorithm described above we can provide a window of opportunity for management of these artifacts in a number of ways.
See the Knox CLI section for descriptions of the command line utilities related to the security artifact management.
In order to provide your own certificate for use by the gateway, you will need to either import an existing key pair into a Java keystore or generate a self-signed cert using the Java keytool.
One way to accomplish this is to start with a PKCS12 store for your key pair and then convert it to a Java keystore or JKS.
The following example uses OpenSSL to create a PKCS12 encoded store from your provided certificate and private key that are in PEM format.
openssl pkcs12 -export -in cert.pem -inkey key.pem > server.p12
The next example converts the PKCS12 store into a Java keystore (JKS). It should prompt you for the keystore and key passwords for the destination keystore. You must use the master-secret for the keystore password and keep track of the password that you use for the key passphrase.
keytool -importkeystore -srckeystore server.p12 -destkeystore gateway.jks -srcstoretype pkcs12
While using this approach a couple of important things to be aware of:
the alias MUST be “gateway-identity”. You may need to change it using keytool after the import of the PKCS12 store. You can use keytool to do this - for example:
keytool -changealias -alias "1" -destalias "gateway-identity" -keystore gateway.jks -storepass {knoxpw}
the name of the expected identity keystore for the gateway MUST be gateway.jks
keytool -keypasswd -alias gateway-identity -keystore gateway.jks
NOTE: The password for the keystore as well as that of the imported key may be the master secret for the gateway instance or you may set the gateway-identity-passphrase alias using the Knox CLI to the actual key passphrase. See the Knox CLI section for details.
The following will allow you to provision the passphrase for the private key that you set during keystore creation above - it will prompt you for the actual passphrase.
bin/knoxcli.sh create-alias gateway-identity-passphrase
keytool -genkey -keyalg RSA -alias gateway-identity -keystore gateway.jks \
    -storepass {master-secret} -validity 360 -keysize 2048
Keytool will prompt you for a number of elements used will comprise the distinguished name (DN) within your certificate.
NOTE: When it prompts you for your First and Last name be sure to type in the hostname of the machine that your gateway instance will be running on. This is used by clients during hostname verification to ensure that the presented certificate matches the hostname that was used in the URL for the connection - so they need to match.
NOTE: When it prompts for the key password just press enter to ensure that it is the same as the keystore password. Which, as was described earlier, must match the master secret for the gateway instance. Alternatively, you can set it to another passphrase - take note of it and set the gateway-identity-passphrase alias to that passphrase using the Knox CLI.
See the Knox CLI section for descriptions of the command line utilities related to the management of the keystores.
For certain deployments a certificate key pair that is signed by a trusted certificate authority is required. There are a number of different ways in which these certificates are acquired and can be converted and imported into the Apache Knox keystore.
The following steps have been used to do this and are provided here for guidance in your installation. You may have to adjust according to your environment.
General steps:
Stop Knox gateway and back up all files in {GATEWAY_HOME}/data/security/keystores
gateway.sh stop
Create a new master key for Knox and persist it. The master key will be referred to in following steps as $master-key
knoxcli.sh create-master -force
Create identity keystore gateway.jks. cert in alias gateway-identity
cd {GATEWAY_HOME}/data/security/keystore
keytool -genkeypair -alias gateway-identity -keyalg RSA -keysize 1024 -dname "CN=$fqdn_knox,OU=hdp,O=sdge" -keypass $keypass -keystore gateway.jks -storepass $master-key -validity 300
NOTE: $fqdn_knox is the hostname of the Knox host. Some may choose $keypass to be the same as $master-key.
Create credential store to store the $keypass in step 3. This creates __gateway-credentials.jceks file
knoxcli.sh create-alias gateway-identity-passphrase --value $keypass
Generate a certificate signing request from the gateway.jks
keytool -keystore gateway.jks -storepass $master-key -alias gateway-identity -certreq -file knox.csr
Send the knox.csr file to the CA authority and get back the signed certificate (knox.signed). You also need the CA certificate, which normally can be requested through an openssl command or web browser or from the CA.
Import both the CA authority certificate (referred as corporateCA.cer) and the signed Knox certificate back into gateway.jks
keytool -keystore gateway.jks -storepass $master-key -alias $hwhq -import -file corporateCA.cer
keytool -keystore gateway.jks -storepass $master-key -alias gateway-identity -import -file knox.signed
NOTE: Use any alias appropriate for the corporate CA.
Restart Knox gateway. Check gateway.log to check whether the gateway started properly and clusters are deployed. You can check the timestamp on cluster deployment files
ls -alrt {GATEWAY_HOME}/data/deployment
Verify that clients can use the CA authority cert to access Knox (which is the goal of using public signed cert) using curl or a web browsers which has the CA certificate installed
curl --cacert supwin12ad.cer -u hdptester:hadoop -X GET 'https://$fqdn_knox:8443/gateway/$topologyname/webhdfs/v1/tmp?op=LISTSTATUS'
Whenever you provide your own keystore with either a self-signed cert or an issued certificate signed by a trusted authority, you will need to set an alias for the gateway-identity-passphrase or create an empty credential store. This is necessary for the current release in order for the system to determine the correct password for the keystore and the key.
The credential stores in Knox use the JCEKS keystore type as it allows for the storage of general secrets in addition to certificates.
Keytool may be used to create credential stores but the Knox CLI section details how to create aliases. These aliases are managed within credential stores which are created by the CLI as needed. The simplest approach is to create the gateway-identity-passphrase alias with the Knox CLI. This will create the credential store if it doesn’t already exist and add the key passphrase.
See the Knox CLI section for descriptions of the command line utilities related to the management of the credential stores.
Once you have created these keystores you must move them into place for the gateway to discover them and use them to represent its identity for SSL connections. This is done by copying the keystores to the {GATEWAY_HOME}/data/security/keystores directory for your gateway install.
NOTE: the SSL certificate will need special consideration depending on the type of certificate. Wildcard certs may be able to be shared across all gateway instances in a cluster. When certs are dedicated to specific machines the gateway identity store will not be able to be blindly replicated as host name verification problems will ensue. Obviously, trust-stores will need to be taken into account as well.
The Knox CLI is a command line utility for the management of various aspects of the Knox deployment. It is primarily concerned with the management of the security artifacts for the gateway instance and each of the deployed topologies or Hadoop clusters that are gated by the Knox Gateway instance.
The various security artifacts are also generated and populated automatically by the Knox Gateway runtime when they are not found at startup. The assumptions made in those cases are appropriate for a test or development gateway instance and assume ‘localhost’ for hostname specific activities. For production deployments the use of the CLI may aid in managing some production deployments.
The knoxcli.sh script is located in the {GATEWAY_HOME}/bin directory.
bin/knoxcli.sh [--help] prints help for all commands
bin/knoxcli.sh version [--help] Displays Knox version information.
bin/knoxcli.sh create-master [--force][--help] Creates and persists an encrypted master secret in a file within {GATEWAY_HOME}/data/security/master.
NOTE: This command fails when there is an existing master file in the expected location. You may force it to overwrite the master file with the --force switch. NOTE: this will require you to change passwords protecting the keystores for the gateway identity keystores and all credential stores.
bin/knoxcli.sh create-alias name [--cluster c] [--value v] [--generate] [--help] Creates a password alias and stores it in a credential store within the {GATEWAY_HOME}/data/security/keystores dir.
| Argument | Description |
|---|---|
| name | Name of the alias to create |
| --cluster | Name of Hadoop cluster for the cluster specific credential store otherwise assumes that it is for the gateway itself |
| --value | Parameter for specifying the actual password otherwise prompted. Escape complex passwords or surround with single quotes |
| --generate | Boolean flag to indicate whether the tool should just generate the value. This assumes that --value is not set - will result in error otherwise. User will not be prompted for the value when --generate is set. |
bin/knoxcli.sh delete-alias name [--cluster c] [--help] Deletes a password and alias mapping from a credential store within {GATEWAY_HOME}/data/security/keystores.
| Argument | Description |
|---|---|
| name | Name of the alias to delete |
| --cluster | Name of Hadoop cluster for the cluster specific credential store otherwise assumes ’__gateway’ |
bin/knoxcli.sh list-alias [--cluster c] [--help] Lists the alias names for the credential store within {GATEWAY_HOME}/data/security/keystores.
NOTE: This command will list the aliases in lowercase which is a result of the underlying credential store implementation. Lookup of credentials is a case insensitive operation - so this is not an issue.
| Argument | Description |
|---|---|
| --cluster | Name of Hadoop cluster for the cluster specific credential store otherwise assumes ’__gateway’ |
bin/knoxcli.sh create-cert [--hostname n] [--help] Creates and stores a self-signed certificate to represent the identity of the gateway instance. This is stored within the {GATEWAY_HOME}/data/security/keystores/gateway.jks keystore.
| Argument | Description |
|---|---|
| --hostname | Name of the host to be used in the self-signed certificate. This allows multi-host deployments to specify the proper hostnames for hostname verification to succeed on the client side of the SSL connection. The default is ‘localhost’. |
bin/knoxcli.sh export-cert [--type JKS|PEM] [--help] Exports and stores the gateway-identity certificate as the type indicated or PEM by default. This is stored within the {GATEWAY_HOME}/data/security/keystores/ directory as either gateway-identity.pem or gateway-client-trust.jks depending on the type specified.
bin/knoxcli.sh redeploy [--cluster c] Redeploys one or all of the gateway’s clusters (a.k.a topologies).
bin/knoxcli.sh list-topologies [--help] Lists all of the topologies found in Knox’s topologies directory. Useful for specifying a valid –cluster argument.
bin/knoxcli.sh validate-topology [--cluster c] [--path path] [--help] This ensures that a cluster’s description (a.k.a. topology) follows the correct formatting rules. It is possible to specify a name of a cluster already in the topology directory, or a path to any file.
| Argument | Description |
|---|---|
| --cluster | Name of Hadoop cluster for which you want to validate |
| --path | Path to topology file that you wish to validate. |
bin/knoxcli.sh user-auth-test [--cluster c] [--u username] [--p password] [--g] [--d] [--help] This command will test a topology’s ability to connect, authenticate, and authorize a user with an LDAP server. The only required argument is the –cluster argument to specify the name of the topology you wish to use. The topology must be valid (passes validate-topology command). If a --u and --p argument are not specified, the command line will prompt for a username and password. If authentication is successful then the command will attempt to use the topology to do an LDAP group lookup. The topology must be configured correctly to do this. If it is not, groups will not return and no errors will be printed unless the --g command is specified. Currently this command only works if a topology supports the use of ShiroProvider for authentication.
| Argument | Description |
|---|---|
| --cluster | Required; Name of cluster for which you want to test authentication |
| --u | Optional; Username you wish you authenticate with |
| --p | Optional; Password you wish to authenticate with |
| --g | Optional; Specify that you are looking to return a user’s groups. If not specified, group lookup errors won’t return |
| --d | Optional; Print extra debug info on failed authentication |
bin/knoxcli.sh system-user-auth-test [--cluster c] [--d] [--help] This command will test a given topology’s ability to connect, bind, and authenticate with the LDAP server from the settings specified in the topology file. The bind currently only will with Shiro as the authentication provider. There are also two parameters required inside of the topology for these
| Argument | Description |
|---|---|
| --cluster | Required; Name of cluster for which you want to test authentication |
| --d | Optional; Print extra debug info on failed authentication |
bin/knoxcli.sh service-test [--cluster c] [--hostname hostname] [--port port] [--u username] [--p password] [--d] [--help] This will test a topology configuration’s ability to connect to multiple Hadoop services. Each service found in a topology will be tested with multiple URLs. Results are printed to the console in JSON format.
| Argument | Description |
|---|---|
| --cluster | Required; Name of cluster for which you want to test authentication |
| --hostname | Required; Hostname of the cluster currently running on the machine |
| --port | Optional; Port that the cluster is running on. If not supplied CLI will try to read config files to find the port. |
| --u | Required; Username to authorize against Hadoop services |
| --p | Required; Password to match username |
| --d | Optional; Print extra debug info on failed authentication |
bin/knoxcli.sh list-registry-clients Lists the remote configuration registry clients defined in ‘{GATEWAY_HOME}/conf/gateway-site.xml’.
bin/knoxcli.sh list-provider-configs --registry-client name List the provider configurations in the remote configuration registry for which the referenced client provides access.
| Argument | Description |
|---|---|
| --registry-client | Required; The name of a remote configuration registry client, as defined in gateway-site.xml |
bin/knoxcli.sh list-descriptors --registry-client name List the descriptors in the remote configuration registry for which the referenced client provides access.
| Argument | Description |
|---|---|
| --registry-client | Required; The name of a remote configuration registry client, as defined in gateway-site.xml |
bin/knoxcli.sh upload-provider-config providerConfigFile --registry-client name [--entry-name entryName] Upload a provider configuration file to the remote configuration registry for which the referenced client provides access. By default, the entry name will be the same as the uploaded file’s name.
| Argument | Description |
|---|---|
| --registry-client | Required; The name of a remote configuration registry client, as defined in gateway-site.xml |
| --entry-name | Optional; The name of the entry for the uploaded content in the registry. |
bin/knoxcli.sh upload-descriptor descriptorFile --registry-client name [--entry-name entryName] Upload a descriptor file to the remote configuration registry for which the referenced client provides access. By default, the entry name will be the same as the uploaded file’s name.
| Argument | Description |
|---|---|
| --registry-client | Required; The name of a remote configuration registry client, as defined in gateway-site.xml |
| --entry-name | Optional; The name of the entry for the uploaded content in the registry. |
bin/knoxcli.sh delete-provider-config providerConfig --registry-client name Delete a provider configuration from the remote configuration registry for which the referenced client provides access.
| Argument | Description |
|---|---|
| --registry-client | Required; The name of a remote configuration registry client, as defined in gateway-site.xml |
bin/knoxcli.sh delete-descriptor descriptor --registry-client name Delete a descriptor from the remote configuration registry for which the referenced client provides access.
| Argument | Description |
|---|---|
| --registry-client | Required; The name of a remote configuration registry client, as defined in gateway-site.xml |
bin/knoxcli.sh get-registry-acl entry --registry-client name List the ACL set for the specified entry in the remote configuration registry for which the referenced client provides access.
| Argument | Description |
|---|---|
| --registry-client | Required; The name of a remote configuration registry client, as defined in gateway-site.xml |
Access to the administrator functions of Knox are provided by the Admin REST API.
The URL mapping for the Knox Admin API is:
| GatewayAPI | https://{gateway-host}:{gateway-port}/{gateway-path}/admin/api/v1 |
Please note that to access this API, the user attempting to connect must have admin credentials configured on the LDAP Server
| Resource | Operation | Description |
|---|---|---|
| version | GET | Get the gateway version and the associated version hash |
| Example Request | curl -iku admin:admin-password {GatewayAPI}/version -H Accept:application/json |
|
| Example Response |
{
  "ServerVersion" : {
    "version" : "VERSION_ID",
    "hash" : "VERSION_HASH"
  }
}
|
|
| topologies | GET | Get an enumeration of the topologies currently deployed in the gateway. |
| Example Request | curl -iku admin:admin-password {GatewayAPI}/topologies -H Accept:application/json |
|
| Example Response |
{
   "topologies" : {
      "topology" : [ {
         "name" : "admin",
         "timestamp" : "1501508536000",
         "uri" : "https://localhost:8443/gateway/admin",
         "href" : "https://localhost:8443/gateway/admin/api/v1/topologies/admin"
      }, {
         "name" : "sandbox",
         "timestamp" : "1501508536000",
         "uri" : "https://localhost:8443/gateway/sandbox",
         "href" : "https://localhost:8443/gateway/admin/api/v1/topologies/sandbox"
      } ]
   }
}
|
|
| topologies/{id} | GET | Get a JSON representation of the specified topology |
| Example Request | curl -iku admin:admin-password {GatewayAPI}/topologies/admin -H Accept:application/json |
|
| Example Response |
{
  "name": "admin",
  "providers": [{
    "enabled": true,
    "name": "ShiroProvider",
    "params": {
      "sessionTimeout": "30",
      "main.ldapRealm": "org.apache.knox.gateway.shirorealm.KnoxLdapRealm",
      "main.ldapRealm.userDnTemplate": "uid={0},ou=people,dc=hadoop,dc=apache,dc=org",
      "main.ldapRealm.contextFactory.url": "ldap://localhost:33389",
      "main.ldapRealm.contextFactory.authenticationMechanism": "simple",
      "urls./**": "authcBasic"
    },
    "role": "authentication"
  }, {
    "enabled": true,
    "name": "AclsAuthz",
    "params": {
      "knox.acl": "admin;*;*"
    },
    "role": "authorization"
  }, {
    "enabled": true,
    "name": "Default",
    "params": {},
    "role": "identity-assertion"
  }, {
    "enabled": true,
    "name": "static",
    "params": {
      "localhost": "sandbox,sandbox.hortonworks.com"
    },
    "role": "hostmap"
  }],
  "services": [{
      "name": null,
      "params": {},
      "role": "KNOX",
      "url": null
  }],
  "timestamp": 1406672646000,
  "uri": "https://localhost:8443/gateway/admin"
}
|
|
| PUT | Add (and deploy) a topology | |
| Example Request | curl -iku admin:admin-password {GatewayAPI}/topologies/mytopology \
-X PUT \
-H Content-Type:application/xml
-d "@mytopology.xml" |
|
| Example Response |
<?xml version="1.0" encoding="UTF-8"?>
<topology>
   <uri>https://localhost:8443/gateway/mytopology</uri>
   <name>mytopology</name>
   <timestamp>1509720338000</timestamp>
   <gateway>
      <provider>
         <role>authentication</role>
         <name>ShiroProvider</name>
         <enabled>true</enabled>
         <param>
            <name>sessionTimeout</name>
            <value>30</value>
         </param>
         <param>
            <name>main.ldapRealm</name>
            <value>org.apache.knox.gateway.shirorealm.KnoxLdapRealm</value>
         </param>
         <param>
            <name>main.ldapContextFactory</name>
            <value>org.apache.knox.gateway.shirorealm.KnoxLdapContextFactory</value>
         </param>
         <param>
            <name>main.ldapRealm.contextFactory</name>
            <value>$ldapContextFactory</value>
         </param>
         <param>
            <name>main.ldapRealm.userDnTemplate</name>
            <value>uid={0},ou=people,dc=hadoop,dc=apache,dc=org</value>
         </param>
         <param>
            <name>main.ldapRealm.contextFactory.url</name>
            <value>ldap://localhost:33389</value>
         </param>
         <param>
            <name>main.ldapRealm.contextFactory.authenticationMechanism</name>
            <value>simple</value>
         </param>
         <param>
            <name>urls./**</name>
            <value>authcBasic</value>
         </param>
      </provider>
      <provider>
         <role>identity-assertion</role>
         <name>Default</name>
         <enabled>true</enabled>
      </provider>
      <provider>
         <role>hostmap</role>
         <name>static</name>
         <enabled>true</enabled>
         <param>
            <name>localhost</name>
            <value>sandbox,sandbox.hortonworks.com</value>
         </param>
      </provider>
   </gateway>
   <service>
      <role>NAMENODE</role>
      <url>hdfs://localhost:8020</url>
   </service>
   <service>
      <role>JOBTRACKER</role>
      <url>rpc://localhost:8050</url>
   </service>
   <service>
      <role>WEBHDFS</role>
      <url>http://localhost:50070/webhdfs</url>
   </service>
   <service>
      <role>WEBHCAT</role>
      <url>http://localhost:50111/templeton</url>
   </service>
   <service>
      <role>OOZIE</role>
      <url>http://localhost:11000/oozie</url>
   </service>
   <service>
      <role>WEBHBASE</role>
      <url>http://localhost:60080</url>
   </service>
   <service>
      <role>HIVE</role>
      <url>http://localhost:10001/cliservice</url>
   </service>
   <service>
      <role>RESOURCEMANAGER</role>
      <url>http://localhost:8088/ws</url>
   </service>
</topology>
|
|
| DELETE | Delete (and undeploy) a topology | |
| Example Request | curl -iku admin:admin-password {GatewayAPI}/topologies/mytopology -X DELETE |
|
| Example Response | { "deleted" : true } |
|
| providerconfig | GET | Get an enumeration of the shared provider configurations currently deployed to the gateway. |
| Example Request | curl -iku admin:admin-password {GatewayAPI}/providerconfig |
|
| Example Response |
{
  "href" : "https://localhost:8443/gateway/admin/api/v1/providerconfig",
  "items" : [ {
    "href" : "https://localhost:8443/gateway/admin/api/v1/providerconfig/myproviders",
    "name" : "myproviders.xml"
  },{
   "href" : "https://localhost:8443/gateway/admin/api/v1/providerconfig/sandbox-providers",
   "name" : "sandbox-providers.xml"
  } ]
}
|
|
| providerconfig/{id} | GET | Get the XML content of the specified shared provider configuration. |
| Example Request | curl -iku admin:admin-password {GatewayAPI}/providerconfig/sandbox-providers \
-H Accept:application/xml |
|
| Example Response |
<gateway>
    <provider>
        <role>authentication</role>
        <name>ShiroProvider</name>
        <enabled>true</enabled>
        <param>
            <name>sessionTimeout</name>
            <value>30</value>
        </param>
        <param>
            <name>main.ldapRealm</name>
            <value>org.apache.knox.gateway.shirorealm.KnoxLdapRealm</value>
        </param>
        <param>
            <name>main.ldapContextFactory</name>
            <value>org.apache.knox.gateway.shirorealm.KnoxLdapContextFactory</value>
        </param>
        <param>
            <name>main.ldapRealm.contextFactory</name>
            <value>$ldapContextFactory</value>
        </param>
        <param>
            <name>main.ldapRealm.userDnTemplate</name>
            <value>uid={0},ou=people,dc=hadoop,dc=apache,dc=org</value>
        </param>
        <param>
            <name>main.ldapRealm.contextFactory.url</name>
            <value>ldap://localhost:33389</value>
        </param>
        <param>
            <name>main.ldapRealm.contextFactory.authenticationMechanism</name>
            <value>simple</value>
        </param>
        <param>
            <name>urls./**</name>
            <value>authcBasic</value>
        </param>
    </provider>

    <provider>
        <role>identity-assertion</role>
        <name>Default</name>
        <enabled>true</enabled>
    </provider>

    <provider>
        <role>hostmap</role>
        <name>static</name>
        <enabled>true</enabled>
        <param>
            <name>localhost</name>
            <value>sandbox,sandbox.hortonworks.com</value>
        </param>
    </provider>
</gateway>
|
PUT | Add a shared provider configuration. |
| Example Request | curl -iku admin:admin-password {GatewayAPI}/providerconfig/sandbox-providers \
-X PUT \
-H Content-Type:application/xml \
-d "@sandbox-providers.xml" |
|
| Example Response | HTTP 201 Created |
|
| DELETE | Delete a shared provider configuration | |
| Example Request | curl -iku admin:admin-password {GatewayAPI}/providerconfig/sandbox-providers -X DELETE |
|
| Example Response |
{ "deleted" : "provider config sandbox-providers" }
|
|
| descriptors | GET | Get an enumeration of the simple descriptors currently deployed to the gateway. |
| Example Request | curl -iku admin:admin-password {GatewayAPI}/descriptors -H Accept:application/json |
|
| Example Response |
{
   "href" : "https://localhost:8443/gateway/admin/api/v1/descriptors",
   "items" : [ {
      "href" : "https://localhost:8443/gateway/admin/api/v1/descriptors/docker-sandbox",
      "name" : "docker-sandbox.json"
   }, {
      "href" : "https://localhost:8443/gateway/admin/api/v1/descriptors/mytopology",
      "name" : "mytopology.yml"
   } ]
}
|
|
| descriptors/{id} | GET | Get the content of the specified descriptor. |
| Example Request | curl -iku admin:admin-password {GatewayAPI}/descriptors/docker-sandbox \
-H Accept:application/json |
|
| Example Response |
{
  "discovery-type":"AMBARI",
  "discovery-address":"http://sandbox.hortonworks.com:8080",
  "provider-config-ref":"sandbox-providers",
  "cluster":"Sandbox",
  "services":[
    {"name":"NAMENODE"},
    {"name":"JOBTRACKER"},
    {"name":"WEBHDFS"},
    {"name":"WEBHCAT"},
    {"name":"OOZIE"},
    {"name":"WEBHBASE"},
    {"name":"HIVE"},
    {"name":"RESOURCEMANAGER"} ]
}
|
|
| PUT | Add a simple descriptor (and generate and deploy a full topology descriptor). | |
| Example Request | curl -iku admin:admin-password {GatewayAPI}/descriptors/docker-sandbox \
-X PUT \
-H Content-Type:application/json \
-d "@docker-sandbox.json" |
|
| Example Response | HTTP 201 Created |
|
| DELETE | Delete a simple descriptor (and undeploy the associated topology) | |
| Example Request | curl -iku admin:admin-password {GatewayAPI}/descriptors/docker-sandbox -X DELETE |
|
| Example Response |
{ "deleted" : "descriptor docker-sandbox" }
|
Out-of-the-box Knox provides support for some X-Forwarded-* headers through the use of a Servlet Filter. Specifically the headers handled/populated by Knox are:
This functionality can be turned off by a configuration setting in the file gateway-site.xml and redeploying the necessary topology/topologies.
The setting is (under the ‘configuration’ tag) :
<property>
    <name>gateway.xforwarded.enabled</name>
    <value>false</value>
</property>
If this setting is absent, the default behavior is that the X-Forwarded-* header support is on or in other words, gateway.xforwarded.enabled is set to true by default.
The following are the various rules for population of these headers:
This header represents a list of client IP addresses. If the header is already present Knox adds a comma separated value to the list. The value added is the client’s IP address as Knox sees it. This value is added to the end of the list.
The protocol used in the client request. If this header is passed into Knox its value is maintained, otherwise Knox will populate the header with the value ‘https’ if the request is a secure one or ‘http’ otherwise.
The port used in the client request. If this header is passed into Knox its value is maintained, otherwise Knox will populate the header with the value of the port that the request was made coming into Knox.
Represents the original host requested by the client in the Host HTTP request header. The value passed into Knox is maintained by Knox. If no value is present, Knox populates the header with the value of the HTTP Host header.
The hostname of the server Knox is running on.
This header value contains the context path of the request to Knox.
See the KIP for details on the implementation of metrics available in the gateway.
Metrics configuration can be done in gateway-site.xml.
The initial configuration is mainly for turning on or off the metrics collection and then enabling reporters with their required config.
The two initial reporters implemented are JMX and Graphite.
gateway.metrics.enabled
Turns on or off the metrics, default is ‘true’
gateway.jmx.metrics.reporting.enabled
Turns on or off the jmx reporter, default is ‘true’
gateway.graphite.metrics.reporting.enabled
Turns on or off the graphite reporter, default is ‘false’
gateway.graphite.metrics.reporting.host
gateway.graphite.metrics.reporting.port
gateway.graphite.metrics.reporting.frequency
The above are the host, port and frequency of reporting (in seconds) parameters for the graphite reporter.
There are two types of providers supported in Knox for establishing a user’s identity:
Authentication providers directly accept a user’s credentials and validates them against some particular user store. Federation providers, on the other hand, validate a token that has been issued for the user by a trusted Identity Provider (IdP).
The current release of Knox ships with an authentication provider based on the Apache Shiro project and is initially configured for BASIC authentication against an LDAP store. This has been specifically tested against Apache Directory Server and Active Directory.
This section will cover the general approach to leveraging Shiro within the bundled provider including:
shiro.ini configAs is described in the configuration section of this document, providers have a name-value based configuration - as is the common pattern in the rest of Hadoop.
The following example shows the format of the configuration for a given provider:
<provider>
    <role>authentication</role>
    <name>ShiroProvider</name>
    <enabled>true</enabled>
    <param>
        <name>{name}</name>
        <value>{value}</value>
    </param>
</provider>
Conversely, the Shiro provider currently expects a shiro.ini file in the WEB-INF directory of the cluster specific web application.
The following example illustrates a configuration of the bundled BASIC/LDAP authentication config in a shiro.ini file:
[urls]
/**=authcBasic
[main]
ldapRealm=org.apache.shiro.realm.ldap.JndiLdapRealm
ldapRealm.contextFactory.authenticationMechanism=simple
ldapRealm.contextFactory.url=ldap://localhost:33389
ldapRealm.userDnTemplate=uid={0},ou=people,dc=hadoop,dc=apache,dc=org
In order to fit into the context of an INI file format, at deployment time we interrogate the parameters provided in the provider configuration and parse the INI section out of the parameter names. The following provider config illustrates this approach. Notice that the section names in the above shiro.ini match the beginning of the parameter names that are in the following config:
<gateway>
    <provider>
        <role>authentication</role>
        <name>ShiroProvider</name>
        <enabled>true</enabled>
        <param>
            <name>main.ldapRealm</name>
            <value>org.apache.shiro.realm.ldap.JndiLdapRealm</value>
        </param>
        <param>
            <name>main.ldapRealm.userDnTemplate</name>
            <value>uid={0},ou=people,dc=hadoop,dc=apache,dc=org</value>
        </param>
        <param>
            <name>main.ldapRealm.contextFactory.url</name>
            <value>ldap://localhost:33389</value>
        </param>
        <param>
            <name>main.ldapRealm.contextFactory.authenticationMechanism</name>
            <value>simple</value>
        </param>
        <param>
            <name>urls./**</name>
            <value>authcBasic</value>
        </param>
    </provider>
This happens to be the way that we are currently configuring Shiro for BASIC/LDAP authentication. This same config approach may be used to achieve other authentication mechanisms or variations on this one. We however have not tested additional uses for it for this release.
This section discusses the LDAP configuration used above for the Shiro Provider. Some of these configuration elements will need to be customized to reflect your deployment environment.
main.ldapRealm - this element indicates the fully qualified class name of the Shiro realm to be used in authenticating the user. The class name provided by default in the sample is the org.apache.shiro.realm.ldap.JndiLdapRealm this implementation provides us with the ability to authenticate but by default has authorization disabled. In order to provide authorization - which is seen by Shiro as dependent on an LDAP schema that is specific to each organization - an extension of JndiLdapRealm is generally used to override and implement the doGetAuthorizationInfo method. In this particular release we are providing a simple authorization provider that can be used along with the Shiro authentication provider.
main.ldapRealm.userDnTemplate - in order to bind a simple username to an LDAP server that generally requires a full distinguished name (DN), we must provide the template into which the simple username will be inserted. This template allows for the creation of a DN by injecting the simple username into the common name (CN) portion of the DN. This element will need to be customized to reflect your deployment environment. The template provided in the sample is only an example and is valid only within the LDAP schema distributed with Knox and is represented by the users.ldif file in the {GATEWAY_HOME}/conf directory.
main.ldapRealm.contextFactory.url - this element is the URL that represents the host and port of the LDAP server. It also includes the scheme of the protocol to use. This may be either ldap or ldaps depending on whether you are communicating with the LDAP over SSL (highly recommended). This element will need to be customized to reflect your deployment environment..
main.ldapRealm.contextFactory.authenticationMechanism - this element indicates the type of authentication that should be performed against the LDAP server. The current default value is simple which indicates a simple bind operation. This element should not need to be modified and no mechanism other than a simple bind has been tested for this particular release.
urls./** - this element represents a single URL_Ant_Path_Expression and the value the Shiro filter chain to apply to it. This particular sample indicates that all paths into the application have the same Shiro filter chain applied. The paths are relative to the application context path. The use of the value authcBasic here indicates that BASIC authentication is expected for every path into the application. Adding an additional Shiro filter to that chain for validating that the request isSecure() and over SSL can be achieved by changing the value to ssl, authcBasic. It is not likely that you need to change this element for your environment.
You would use LDAP configuration as documented above to authenticate against Active Directory as well.
Some Active Directory specific things to keep in mind:
Typical AD main.ldapRealm.userDnTemplate value looks slightly different, such as
cn={0},cn=users,DC=lab,DC=sample,dc=com
Please compare this with a typical Apache DS main.ldapRealm.userDnTemplate value and make note of the difference:
`uid={0},ou=people,dc=hadoop,dc=apache,dc=org`
If your AD is configured to authenticate based on just the cn and password and does not require user DN, you do not have to specify value for main.ldapRealm.userDnTemplate.
In order to communicate with your LDAP server over SSL (again, highly recommended), you will need to modify the topology file in a couple ways and possibly provision some keying material.
ldaps protocol scheme and the port must be the SSL listener port on your LDAP server.Knox maps each cluster topology to a web application and leverages standard JavaEE session management.
To configure session idle timeout for the topology, please specify value of parameter sessionTimeout for ShiroProvider in your topology file. If you do not specify the value for this parameter, it defaults to 30 minutes.
The definition would look like the following in the topology file:
...
<provider>
    <role>authentication</role>
    <name>ShiroProvider</name>
    <enabled>true</enabled>
    <param>
        <!--
        Session timeout in minutes. This is really idle timeout.
        Defaults to 30 minutes, if the property value is not defined.
        Current client authentication will expire if client idles
        continuously for more than this value
        -->
        <name>sessionTimeout</name>
        <value>30</value>
    </param>
<provider>
...
At present, ShiroProvider in Knox leverages JavaEE session to maintain authentication state for a user across requests using JSESSIONID cookie. So, a client that authenticated with Knox could pass the JSESSIONID cookie with repeated requests as long as the session has not timed out instead of submitting userid/password with every request. Presenting a valid session cookie in place of userid/password would also perform better as additional credential store lookups are avoided.
The default configuration computes the bind DN for incoming user based on userDnTemplate. This does not work in enterprises where users could belong to multiple branches of LDAP tree. You could instead enable advanced configuration that would compute bind DN of incoming user with an LDAP search.
UserDnTemplate based authentication uses the configuration parameter ldapRealm.userDnTemplate. Typical values of userDNTemplate would look like uid={0},ou=people,dc=hadoop,dc=apache,dc=org.
To compute bind DN of the client, we swap the place holder {0} with the login id provided by the client. For example, if the login id provided by the client is "guest’,
the computed bind DN would be uid=guest,ou=people,dc=hadoop,dc=apache,dc=org.
This keeps configuration simple.
However, this does not work if users belong to different branches of LDAP DIT. For example, if there are some users under ou=people,dc=hadoop,dc=apache,dc=org and some users under ou=contractors,dc=hadoop,dc=apache,dc=org,
we cannot come up with userDnTemplate that would work for all the users.
With advanced LDAP authentication, we find the bind DN of the user by searching the LDAP directory instead of interpolating the bind DN from userDNTemplate.
Assuming
The LDAP Filter for doing a search to find the bind DN would be
(&(uid=guest)(objectclass=person))
This could find the bind DN to be
uid=guest,ou=people,dc=hadoop,dc=apache,dc=org
Please note that the userSearchAttributeName need not be part of bindDN.
For example, you could use
The LDAP Filter for doing a search to find the bind DN would be
(&(email=bill.clinton@gmail.com)(objectclass=person))
This could find the bind DN to be
uid=billc,ou=contractors,dc=hadoop,dc=apache,dc=org
The table below provides a brief description and sample of the available advanced bind and search configuration parameters.
| Parameter | Description | Default | Sample |
|---|---|---|---|
| principalRegex | Parses the principal for insertion into templates via regex. | (.*) | (.*?)\\(.*) (e.g. match US\tom: {0}=US\tom, {1}=US, {2}=tom) |
| userDnTemplate | Direct user bind DN template. | {0} | cn={2},dc={1},dc=qa,dc=company,dc=com |
| userSearchBase | Search based template. Used with config below. | none | dc={1},dc=qa,dc=company,dc=com |
| userSearchAttributeName | Attribute name for simplified search filter. | none | sAMAccountName |
| userSearchAttributeTemplate | Attribute template for simplified search filter. | {0} | {2} |
| userSearchFilter | Advanced search filter template. Note & is & in XML. | none | (&(objectclass=person)(sAMAccountName={2})) |
| userSearchScope | Search scope: subtree, onelevel, object. | subtree | onelevel |
There are also only certain valid combinations of advanced LDAP configuration parameters.
The presence of multiple configuration combinations should be avoided. The rules below clarify which combinations take precedence when present.
The example configuration appears verbose due to the presence of liberal comments and illustration of optional parameters and default values. The configuration that you would use could be much shorter if you rely on default values.
<provider>

    <role>authentication</role>
    <name>ShiroProvider</name>
    <enabled>true</enabled>

    <param>
        <name>main.ldapRealm</name>
        <value>org.apache.knox.gateway.shirorealm.KnoxLdapRealm</value>
    </param>

    <param>
        <name>main.ldapContextFactory</name>
        <value>org.apache.knox.gateway.shirorealm.KnoxLdapContextFactory</value>
    </param>

    <param>
        <name>main.ldapRealm.contextFactory</name>
        <value>$ldapContextFactory</value>
    </param>

    <!-- update the value based on your ldap directory protocol, host and port -->
    <param>
        <name>main.ldapRealm.contextFactory.url</name>
        <value>ldap://hdp.example.com:389</value>
    </param>

    <!-- optional, default value: simple
         Update the value based on mechanisms supported by your ldap directory -->
    <param>
        <name>main.ldapRealm.contextFactory.authenticationMechanism</name>
        <value>simple</value>
    </param>

    <!-- optional, default value: {0}
         update the value based on your ldap DIT(directory information tree).
         ignored if value is defined for main.ldapRealm.userSearchAttributeName -->
    <param>
        <name>main.ldapRealm.userDnTemplate</name>
        <value>uid={0},ou=people,dc=hadoop,dc=apache,dc=org</value>
    </param>

    <!-- optional, default value: null
         If you specify a value for this attribute, useDnTemplate
         specified above would be ignored and user bind DN would be computed using
         ldap search
         update the value based on your ldap DIT(directory information layout)
         value of search attribute should identity the user uniquely -->
    <param>
        <name>main.ldapRealm.userSearchAttributeName</name>
        <value>uid</value>
    </param>

    <!-- optional, default value: false
         If the value is true, groups in which user is a member are looked up
         from LDAP and made available  for service level authorization checks -->
    <param>
        <name>main.ldapRealm.authorizationEnabled</name>
        <value>true</value>
    </param>

    <!-- bind DN used to search for groups and user bind DN.
         Required if a value is defined for main.ldapRealm.userSearchAttributeName
         or if the value of main.ldapRealm.authorizationEnabled is true -->
    <param>
        <name>main.ldapRealm.contextFactory.systemUsername</name>
        <value>uid=guest,ou=people,dc=hadoop,dc=apache,dc=org</value>
    </param>

    <!-- password for systemUserName.
         Required if a value is defined for main.ldapRealm.userSearchAttributeName
         or if the value of main.ldapRealm.authorizationEnabled is true -->
    <param>
        <name>main.ldapRealm.contextFactory.systemPassword</name>
        <value>${ALIAS=ldcSystemPassword}</value>
    </param>

    <!-- optional, default value: simple
         Update the value based on mechanisms supported by your ldap directory -->
    <param>
        <name>main.ldapRealm.contextFactory.systemAuthenticationMechanism</name>
        <value>simple</value>
    </param>

    <!-- optional, default value: person
         Objectclass to identify user entries in ldap, used to build search
         filter to search for user bind DN -->
    <param>
        <name>main.ldapRealm.userObjectClass</name>
        <value>person</value>
    </param>

    <!-- search base used to search for user bind DN and groups -->
    <param>
        <name>main.ldapRealm.searchBase</name>
        <value>dc=hadoop,dc=apache,dc=org</value>
    </param>

    <!-- search base used to search for user bind DN.
         Defaults to the value of main.ldapRealm.searchBase.
         If main.ldapRealm.userSearchAttributeName is defined,
         value for main.ldapRealm.searchBase  or main.ldapRealm.userSearchBase
         should be defined -->
    <param>
        <name>main.ldapRealm.userSearchBase</name>
        <value>dc=hadoop,dc=apache,dc=org</value>
    </param>

    <!-- search base used to search for groups.
         Defaults to the value of main.ldapRealm.searchBase.
         If value of main.ldapRealm.authorizationEnabled is true,
         value for main.ldapRealm.searchBase  or main.ldapRealm.groupSearchBase should be defined -->
    <param>
        <name>main.ldapRealm.groupSearchBase</name>
        <value>dc=hadoop,dc=apache,dc=org</value>
    </param>

    <!-- optional, default value: groupOfNames
         Objectclass to identify group entries in ldap, used to build search
         filter to search for group entries -->
    <param>
        <name>main.ldapRealm.groupObjectClass</name>
        <value>groupOfNames</value>
    </param>

    <!-- optional, default value: member
         If value is memberUrl, we treat found groups as dynamic groups -->
    <param>
        <name>main.ldapRealm.memberAttribute</name>
        <value>member</value>
    </param>

    <!-- optional, default value: uid={0}
         Ignored if value is defined for main.ldapRealm.userSearchAttributeName -->
    <param>
        <name>main.ldapRealm.memberAttributeValueTemplate</name>
        <value>uid={0},ou=people,dc=hadoop,dc=apache,dc=org</value>
    </param>

    <!-- optional, default value: cn -->
    <param>
        <name>main.ldapRealm.groupIdAttribute</name>
        <value>cn</value>
    </param>

    <param>
        <name>urls./**</name>
        <value>authcBasic</value>
    </param>

    <!-- optional, default value: 30min -->
    <param>
        <name>sessionTimeout</name>
        <value>30</value>
    </param>

</provider>
The value for this could have one of the following 2 formats
The first format specifies the password in plain text in the provider configuration. Use of this format should be limited for testing and troubleshooting.
We strongly recommend using the second format ${ALIAS=ldcSystemPassword} in production. This format uses an alias for the password stored in credential store. In the example ${ALIAS=ldcSystemPassword}, ldcSystemPassword is the alias for the password stored in credential store.
Assuming the plain text password is “hadoop”, and your topology file name is “hdp.xml”, you would use following command to create the right password alias in credential store.
{GATEWAY_HOME}/bin/knoxcli.sh create-alias ldcSystemPassword --cluster hdp --value hadoop
Knox can be configured to cache LDAP authentication information. Knox leverages Shiro’s built in caching mechanisms and has been tested with Shiro’s EhCache cache manager implementation.
The following provider snippet demonstrates how to configure turning on the cache using the ShiroProvider. In addition to using org.apache.knox.gateway.shirorealm.KnoxLdapRealm in the Shiro configuration, and setting up the cache you must set the flag for enabling caching authentication to true. Please see the property, main.ldapRealm.authenticationCachingEnabled below.
<provider>
    <role>authentication</role>
    <name>ShiroProvider</name>
    <enabled>true</enabled>
    <param>
        <name>main.ldapRealm</name>
        <value>org.apache.knox.gateway.shirorealm.KnoxLdapRealm</value>
    </param>
    <param>
        <name>main.ldapGroupContextFactory</name>
        <value>org.apache.knox.gateway.shirorealm.KnoxLdapContextFactory</value>
    </param>
    <param>
        <name>main.ldapRealm.contextFactory</name>
        <value>$ldapGroupContextFactory</value>
    </param>
    <param>
        <name>main.ldapRealm.contextFactory.url</name>
        <value>ldap://localhost:33389</value>
    </param>
    <param>
        <name>main.ldapRealm.userDnTemplate</name>
        <value>uid={0},ou=people,dc=hadoop,dc=apache,dc=org</value>
    </param>
    <param>
        <name>main.ldapRealm.authorizationEnabled</name>
        <!-- defaults to: false -->
        <value>true</value>
    </param>
    <param>
        <name>main.ldapRealm.searchBase</name>
        <value>ou=groups,dc=hadoop,dc=apache,dc=org</value>
    </param>
    <param>
        <name>main.cacheManager</name>
        <value>org.apache.knox.gateway.shirorealm.KnoxCacheManager</value>
    </param>
    <param>
        <name>main.securityManager.cacheManager</name>
        <value>$cacheManager</value>
    </param>
    <param>
        <name>main.ldapRealm.authenticationCachingEnabled</name>
        <value>true</value>
    </param>
    <param>
        <name>main.ldapRealm.memberAttributeValueTemplate</name>
        <value>uid={0},ou=people,dc=hadoop,dc=apache,dc=org</value>
    </param>
    <param>
        <name>main.ldapRealm.contextFactory.systemUsername</name>
        <value>uid=guest,ou=people,dc=hadoop,dc=apache,dc=org</value>
    </param>
    <param>
        <name>main.ldapRealm.contextFactory.systemPassword</name>
        <value>guest-password</value>
    </param>
    <param>
        <name>urls./**</name>
        <value>authcBasic</value>
    </param>
</provider>
Knox bundles a template topology files that can be used to try out the caching functionality. The template file located under {GATEWAY_HOME}/templates is sandbox.knoxrealm.ehcache.xml.
To try this out
cd {GATEWAY_HOME}
cp templates/sandbox.knoxrealm.ehcache.xml conf/topologies/sandbox.xml
bin/ldap.sh start
bin/gateway.sh start
The following call to WebHDFS should report: {"Path":"/user/tom"}
curl -i -v -k -u tom:tom-password -X GET https://localhost:8443/gateway/sandbox/webhdfs/v1?op=GETHOMEDIRECTORY
In order to see the cache working, LDAP can now be shutdown and the user will still authenticate successfully.
bin/ldap.sh stop
and then the following should still return successfully like it did earlier.
curl -i -v -k -u tom:tom-password -X GET https://localhost:8443/gateway/sandbox/webhdfs/v1?op=GETHOMEDIRECTORY
By default the EhCache support in Shiro contains a ehcache.xml in its classpath which is the following
<ehcache name="knox-YOUR_TOPOLOGY_NAME">

    <!-- Sets the path to the directory where cache .data files are created.

         If the path is a Java System Property it is replaced by
         its value in the running VM. The following properties are translated:

            user.home - User's home directory
            user.dir - User's current working directory
            java.io.tmpdir - Default temp file path
    -->
    <diskStore path="java.io.tmpdir/shiro-ehcache"/>


    <!--Default Cache configuration. These will applied to caches programmatically created through
    the CacheManager.

    The following attributes are required:

    maxElementsInMemory            - Sets the maximum number of objects that will be created in memory
    eternal                        - Sets whether elements are eternal. If eternal,  timeouts are ignored and the
                                     element is never expired.
    overflowToDisk                 - Sets whether elements can overflow to disk when the in-memory cache
                                     has reached the maxInMemory limit.

    The following attributes are optional:
    timeToIdleSeconds              - Sets the time to idle for an element before it expires.
                                     i.e. The maximum amount of time between accesses before an element expires
                                     Is only used if the element is not eternal.
                                     Optional attribute. A value of 0 means that an Element can idle for infinity.
                                     The default value is 0.
    timeToLiveSeconds              - Sets the time to live for an element before it expires.
                                     i.e. The maximum time between creation time and when an element expires.
                                     Is only used if the element is not eternal.
                                     Optional attribute. A value of 0 means that and Element can live for infinity.
                                     The default value is 0.
    diskPersistent                 - Whether the disk store persists between restarts of the Virtual Machine.
                                     The default value is false.
    diskExpiryThreadIntervalSeconds- The number of seconds between runs of the disk expiry thread. The default value
                                     is 120 seconds.
    memoryStoreEvictionPolicy      - Policy would be enforced upon reaching the maxElementsInMemory limit. Default
                                     policy is Least Recently Used (specified as LRU). Other policies available -
                                     First In First Out (specified as FIFO) and Less Frequently Used
                                     (specified as LFU)
    -->

    <defaultCache
            maxElementsInMemory="10000"
            eternal="false"
            timeToIdleSeconds="120"
            timeToLiveSeconds="120"
            overflowToDisk="false"
            diskPersistent="false"
            diskExpiryThreadIntervalSeconds="120"
            />

    <!-- We want eternal="true" and no timeToIdle or timeToLive settings because Shiro manages session
         expirations explicitly.  If we set it to false and then set corresponding timeToIdle and timeToLive properties,
         ehcache would evict sessions without Shiro's knowledge, which would cause many problems
        (e.g. "My Shiro session timeout is 30 minutes - why isn't a session available after 2 minutes?"
               Answer - ehcache expired it due to the timeToIdle property set to 120 seconds.)

        diskPersistent=true since we want an enterprise session management feature - ability to use sessions after
        even after a JVM restart.  -->
    <cache name="shiro-activeSessionCache"
           maxElementsInMemory="10000"
           overflowToDisk="true"
           eternal="true"
           timeToLiveSeconds="0"
           timeToIdleSeconds="0"
           diskPersistent="true"
           diskExpiryThreadIntervalSeconds="600"/>

    <cache name="org.apache.shiro.realm.text.PropertiesRealm-0-accounts"
           maxElementsInMemory="1000"
           eternal="true"
           overflowToDisk="true"/>

</ehcache>
A custom configuration file (ehcache.xml) can be used in place of this in order to set specific caching configuration.
In order to set the ehcache.xml file to use for a particular topology, set the following parameter in the configuration for the ShiroProvider:
<param>
    <name>main.cacheManager.cacheManagerConfigFile</name>
    <value>classpath:ehcache.xml</value>
</param>
In the above example, place the ehcache.xml file under {GATEWAY_HOME}/conf and restart the gateway server.
Knox can be configured to look up LDAP groups that the authenticated user belong to. Knox can look up both Static LDAP Groups and Dynamic LDAP Groups. The looked up groups are populated as Principal(s) in the Java Subject of the authenticated user. Therefore service authorization rules can be defined in terms of LDAP groups looked up from a LDAP directory.
To look up LDAP groups of authenticated user from LDAP, you have to use org.apache.knox.gateway.shirorealm.KnoxLdapRealm in Shiro configuration.
Please see below a sample Shiro configuration snippet from a topology file that was tested looking LDAP groups.
<provider>
    <role>authentication</role>
    <name>ShiroProvider</name>
    <enabled>true</enabled>
    <!--
    session timeout in minutes,  this is really idle timeout,
    defaults to 30mins, if the property value is not defined,,
    current client authentication would expire if client idles continuously for more than this value
    -->
    <!-- defaults to: 30 minutes
    <param>
        <name>sessionTimeout</name>
        <value>30</value>
    </param>
    -->

    <!--
      Use single KnoxLdapRealm to do authentication and ldap group look up
    -->
    <param>
        <name>main.ldapRealm</name>
        <value>org.apache.knox.gateway.shirorealm.KnoxLdapRealm</value>
    </param>
    <param>
        <name>main.ldapGroupContextFactory</name>
        <value>org.apache.knox.gateway.shirorealm.KnoxLdapContextFactory</value>
    </param>
    <param>
        <name>main.ldapRealm.contextFactory</name>
        <value>$ldapGroupContextFactory</value>
    </param>
    <!-- defaults to: simple
    <param>
        <name>main.ldapRealm.contextFactory.authenticationMechanism</name>
        <value>simple</value>
    </param>
    -->
    <param>
        <name>main.ldapRealm.contextFactory.url</name>
        <value>ldap://localhost:33389</value>
    </param>
    <param>
        <name>main.ldapRealm.userDnTemplate</name>
        <value>uid={0},ou=people,dc=hadoop,dc=apache,dc=org</value>
    </param>

    <param>
        <name>main.ldapRealm.authorizationEnabled</name>
        <!-- defaults to: false -->
        <value>true</value>
    </param>
    <!-- defaults to: simple
    <param>
        <name>main.ldapRealm.contextFactory.systemAuthenticationMechanism</name>
        <value>simple</value>
    </param>
    -->
    <param>
        <name>main.ldapRealm.searchBase</name>
        <value>ou=groups,dc=hadoop,dc=apache,dc=org</value>
    </param>
    <!-- defaults to: groupOfNames
    <param>
        <name>main.ldapRealm.groupObjectClass</name>
        <value>groupOfNames</value>
    </param>
    -->
    <!-- defaults to: member
    <param>
        <name>main.ldapRealm.memberAttribute</name>
        <value>member</value>
    </param>
    -->
    <param>
         <name>main.cacheManager</name>
         <value>org.apache.shiro.cache.MemoryConstrainedCacheManager</value>
    </param>
    <param>
        <name>main.securityManager.cacheManager</name>
        <value>$cacheManager</value>
    </param>
    <param>
        <name>main.ldapRealm.memberAttributeValueTemplate</name>
        <value>uid={0},ou=people,dc=hadoop,dc=apache,dc=org</value>
    </param>
    <!-- the above element is the template for most ldap servers
        for active directory use the following instead and
        remove the above configuration.
    <param>
        <name>main.ldapRealm.memberAttributeValueTemplate</name>
        <value>cn={0},ou=people,dc=hadoop,dc=apache,dc=org</value>
    </param>
    -->
    <param>
        <name>main.ldapRealm.contextFactory.systemUsername</name>
        <value>uid=guest,ou=people,dc=hadoop,dc=apache,dc=org</value>
    </param>
    <param>
        <name>main.ldapRealm.contextFactory.systemPassword</name>
        <value>${ALIAS=ldcSystemPassword}</value>
    </param>

    <param>
        <name>urls./**</name>
        <value>authcBasic</value>
    </param>

</provider>
The configuration shown above would look up Static LDAP groups of the authenticated user and populate the group principals in the Java Subject corresponding to the authenticated user.
If you want to look up Dynamic LDAP Groups instead of Static LDAP Groups, you would have to specify groupObjectClass and memberAttribute params as shown below:
<param>
    <name>main.ldapRealm.groupObjectClass</name>
    <value>groupOfUrls</value>
</param>
<param>
    <name>main.ldapRealm.memberAttribute</name>
    <value>memberUrl</value>
</param>
Knox bundles some template topology files and ldif files that you can use to try and test LDAP Group Lookup and associated authorization ACLs. All these template files are located under {GATEWAY_HOME}/templates.
To try this out
cd {GATEWAY_HOME}
cp templates/sandbox.knoxrealm1.xml conf/topologies/sandbox.xml
cp templates/users.ldapgroups.ldif conf/users.ldif
java -jar bin/ldap.jar conf
java -Dsandbox.ldcSystemPassword=guest-password -jar bin/gateway.jar -persist-master
Following call to WebHDFS should report HTTP/1.1 401 Unauthorized As guest is not a member of group “analyst”, authorization provider states user should be member of group “analyst”
curl -i -v -k -u guest:guest-password -X GET https://localhost:8443/gateway/sandbox/webhdfs/v1?op=GETHOMEDIRECTORY
Following call to WebHDFS should report: {“Path”:“/user/sam”} As sam is a member of group “analyst”, authorization provider states user should be member of group “analyst”
curl -i -v -k -u sam:sam-password -X GET https://localhost:8443/gateway/sandbox/webhdfs/v1?op=GETHOMEDIRECTORY
To try this out
cd {GATEWAY_HOME}
cp templates/sandbox.knoxrealm2.xml conf/topologies/sandbox.xml
cp templates/users.ldapgroups.ldif conf/users.ldif
java -jar bin/ldap.jar conf
java -Dsandbox.ldcSystemPassword=guest-password -jar bin/gateway.jar -persist-master
Following call to WebHDFS should report HTTP/1.1 401 Unauthorized As guest is not a member of group “analyst”, authorization provider states user should be member of group “analyst”
curl -i -v -k -u guest:guest-password -X GET https://localhost:8443/gateway/sandbox/webhdfs/v1?op=GETHOMEDIRECTORY
Following call to WebHDFS should report: {“Path”:“/user/sam”} As sam is a member of group “analyst”, authorization provider states user should be member of group “analyst”
curl -i -v -k -u sam:sam-password -X GET https://localhost:8443/gateway/sandbox/webhdfs/v1?op=GETHOMEDIRECTORY
To try this out
cd {GATEWAY_HOME}
cp templates/sandbox.knoxrealmdg.xml conf/topologies/sandbox.xml
cp templates/users.ldapdynamicgroups.ldif conf/users.ldif
java -jar bin/ldap.jar conf
java -Dsandbox.ldcSystemPassword=guest-password -jar bin/gateway.jar -persist-master
Please note that user.ldapdynamicgroups.ldif also loads necessary schema to create dynamic groups in Apache DS.
Following call to WebHDFS should report HTTP/1.1 401 Unauthorized As guest is not a member of dynamic group “directors”, authorization provider states user should be member of group “directors”
curl -i -v -k -u guest:guest-password -X GET https://localhost:8443/gateway/sandbox/webhdfs/v1?op=GETHOMEDIRECTORY
Following call to WebHDFS should report: {“Path”:“/user/bob”} As bob is a member of dynamic group “directors”, authorization provider states user should be member of group “directors”
curl -i -v -k -u sam:sam-password -X GET https://localhost:8443/gateway/sandbox/webhdfs/v1?op=GETHOMEDIRECTORY
There is a large number of pluggable authentication modules available on many Linux installations and from vendors of authentication solutions that are great to leverage for authenticating access to Hadoop through the Knox Gateway. In addition to LDAP support described in this guide, the ShiroProvider also includes support for PAM based authentication for unix based systems.
This opens up the integration possibilities to many other readily available authentication mechanisms as well as other implementations for LDAP based authentication. More flexibility may be available through various PAM modules for group lookup, more complicated LDAP schemas or other areas where the KnoxLdapRealm is not sufficient.
The primary motivation for leveraging PAM based authentication is to provide the ability to use the configuration provided by existing PAM modules that are available in a system’s /etc/pam.d/ directory. Therefore, the solution provided here is as simple as possible in order to allow the PAM module config itself to be the source of truth. What we do need to configure is the fact that we are using PAM through the main.pamRealm parameter and the KnoxPamRealm classname and the particular PAM module to use with the main.pamRealm.service parameter in the below example we have ‘login’.
<provider>
   <role>authentication</role>
   <name>ShiroProvider</name>
   <enabled>true</enabled>
   <param>
        <name>sessionTimeout</name>
        <value>30</value>
    </param>
    <param>
        <name>main.pamRealm</name>
        <value>org.apache.knox.gateway.shirorealm.KnoxPamRealm</value>
    </param>
    <param>
       <name>main.pamRealm.service</name>
       <value>login</value>
    </param>
    <param>
       <name>urls./**</name>
       <value>authcBasic</value>
   </param>
</provider>
As a non-normative example of a PAM config file see the below from my MacBook /etc/pam.d/login:
# login: auth account password session
auth       optional       pam_krb5.so use_kcminit
auth       optional       pam_ntlm.so try_first_pass
auth       optional       pam_mount.so try_first_pass
auth       required       pam_opendirectory.so try_first_pass
account    required       pam_nologin.so
account    required       pam_opendirectory.so
password   required       pam_opendirectory.so
session    required       pam_launchd.so
session    required       pam_uwtmp.so
session    optional       pam_mount.so
The first four fields are: service-name, module-type, control-flag and module-filename. The fifth and greater fields are for optional arguments that are specific to the individual authentication modules.
The second field in the configuration file is the module-type, it indicates which of the four PAM management services the corresponding module will provide to the application. Our sample configuration file refers to all four groups:
Generally, you only need to supply mappings for the functions that are needed by a specific application. For example, the standard password changing application, passwd, only requires a password group entry; any other entries are ignored.
The third field indicates what action is to be taken based on the success or failure of the corresponding module. Choices for tokens to fill this field are:
The fourth field contains the name of the loadable module, pam_*.so. For the sake of readability, the full pathname of each module is not given. Before Linux-PAM-0.56 was released, there was no support for a default authentication-module directory. If you have an earlier version of Linux-PAM installed, you will have to specify the full path for each of the modules. Your distribution most likely placed these modules exclusively in one of the following directories: /lib/security/ or /usr/lib/security/.
Also, find below a non-normative example of a PAM config file(/etc/pam.d/login) for Ubuntu:
#%PAM-1.0

auth       required     pam_sepermit.so
# pam_selinux.so close should be the first session rule
session    required     pam_selinux.so close
session    required     pam_loginuid.so
# pam_selinux.so open should only be followed by sessions to be executed in the user context
session    required     pam_selinux.so open env_params
session    optional     pam_keyinit.so force revoke

session    required     pam_env.so user_readenv=1 envfile=/etc/default/locale
@include password-auth
The identity assertion provider within Knox plays the critical role of communicating the identity principal to be used within the Hadoop cluster to represent the identity that has been authenticated at the gateway.
The general responsibilities of the identity assertion provider is to interrogate the current Java Subject that has been established by the authentication or federation provider and:
The following configuration is required for asserting the users identity to the Hadoop cluster using Pseudo or Simple “authentication” and for using Kerberos/SPNEGO for secure clusters.
<provider>
    <role>identity-assertion</role>
    <name>Default</name>
    <enabled>true</enabled>
</provider>
This particular configuration indicates that the Default identity assertion provider is enabled and that there are no principal mapping rules to apply to identities flowing from the authentication in the gateway to the backend Hadoop cluster services. The primary principal of the current subject will therefore be asserted via a query parameter or as a form parameter - ie. ?user.name={primaryPrincipal}
<provider>
    <role>identity-assertion</role>
    <name>Default</name>
    <enabled>true</enabled>
    <param>
        <name>principal.mapping</name>
        <value>guest=hdfs;</value>
    </param>
    <param>
        <name>group.principal.mapping</name>
        <value>*=users;hdfs=admin</value>
    </param>
</provider>
This configuration identifies the same identity assertion provider but does provide principal and group mapping rules. In this case, when a user is authenticated as “guest” his identity is actually asserted to the Hadoop cluster as “hdfs”. In addition, since there are group principal mappings defined, he will also be considered as a member of the groups “users” and “admin”. In this particular example the wildcard "*“ is used to indicate that all authenticated users need to be considered members of the ”users“ group and that only the user ”hdfs“ is mapped to be a member of the ”admin" group.
NOTE: These group memberships are currently only meaningful for Service Level Authorization using the AclsAuthorization provider. The groups are not currently asserted to the Hadoop cluster at this time. See the Authorization section within this guide to see how this is used.
The principal mapping aspect of the identity assertion provider is important to understand in order to fully utilize the authorization features of this provider.
This feature allows us to map the authenticated principal to a runAs or impersonated principal to be asserted to the Hadoop services in the backend.
When a principal mapping is defined that results in an impersonated principal, this impersonated principal is then the effective principal.
If there is no mapping to another principal then the authenticated or primary principal is the effective principal.
<param>
    <name>principal.mapping</name>
    <value>{primaryPrincipal}[,...]={impersonatedPrincipal}[;...]</value>
</param>
For instance:
<param>
    <name>principal.mapping</name>
    <value>guest=hdfs</value>
</param>
For multiple mappings:
<param>
    <name>principal.mapping</name>
    <value>guest,alice=hdfs;mary=alice2</value>
</param>
<param>
    <name>group.principal.mapping</name>
    <value>{userName[,*|userName...]}={groupName[,groupName...]}[,...]</value>
</param>
For instance:
<param>
    <name>group.principal.mapping</name>
    <value>*=users;hdfs=admin</value>
</param>
this configuration indicates that all (*) authenticated users are members of the “users” group and that user “hdfs” is a member of the admin group. Group principal mapping has been added along with the authorization provider described in this document.
The Concat identity assertion provider allows for composition of a new user principal through the concatenation of optionally configured prefix and/or suffix provider parameters. This is a useful assertion provider for converting an incoming identity into a disambiguated identity within the Hadoop cluster based on what topology is used to access Hadoop.
The following configuration would convert the user principal into a value that represents a domain specific identity where the identities used inside the Hadoop cluster represent this same separation.
<provider>
    <role>identity-assertion</role>
    <name>Concat</name>
    <enabled>true</enabled>
    <param>
        <name>concat.suffix</name>
        <value>_domain1</value>
    </param>
</provider>
The above configuration will result in all user interactions through that topology to have their principal communicated to the Hadoop cluster with a domain designator concatenated to the username. Possibly useful for multi-tenant deployment scenarios.
In addition to the concat.suffix parameter, the provider supports the setting of a prefix through a concat.prefix parameter.
The SwitchCase identity assertion provider solves issues where down stream ecosystem components require user and group principal names to be a specific case. An example of how this provider is enabled and configured within the <gateway> section of a topology file is shown below. This particular example will switch user principals names to lower case and group principal names to upper case.
<provider>
    <role>identity-assertion</role>
    <name>SwitchCase</name>
    <param>
        <name>principal.case</name>
        <value>lower</value>
    </param>
    <param>
        <name>group.principal.case</name>
        <value>upper</value>
    </param>
    <enabled>true</enabled>
</provider>
These are the configuration parameters used to control the behavior of the provider.
| Param | Description |
|---|---|
| principal.case | The case mapping of user principal names. Choices are: lower, upper, none. Defaults to lower. |
| group.principal.case | The case mapping of group principal names. Choices are: lower, upper, none. Defaults to setting of principal.case. |
If no parameters are provided the full defaults will results in both user and group principal names being switched to lower case. A setting of “none” or anything other than “upper” or “lower” leaves the case of the principal name unchanged.
The regular expression identity assertion provider allows incoming identities to be translated using a regular expression, template and lookup table. This will probably be most useful in conjunction with the HeaderPreAuth federation provider.
There are three configuration parameters used to control the behavior of the provider.
| Param | Description |
|---|---|
| input | This is a regular expression that will be applied to the incoming identity. The most critical part of the regular expression is the group notation within the expression. In regular expressions, groups are expressed within parenthesis. For example in the regular expression “(.*)@(.*?)\..*” there are two groups. When this regular expression is applied to “nobody@us.imaginary.tld” group 1 matches “nobody” and group 2 matches “us”. |
| output | This is a template that assembles the result identity. The result is assembled from the static text and the matched groups from the input regular expression. In addition, the matched group values can be looked up in the lookup table. An output value of “{1}_{2}” of will result in “nobody_us”. |
| lookup | This lookup table provides a simple (albeit limited) way to translate text in the incoming identities. This configuration takes the form of “=” separated name values pairs separated by “;”. For example a lookup setting is “us=USA;ca=CANADA”. The lookup is invoked in the output setting by surrounding the desired group number in square brackets (i.e. []). Putting it all together, output setting of “{1}_[{2}]” combined with input of “(.*)@(.*?)\..*” and lookup of “us=USA;ca=CANADA” will turn “nobody@us.imaginary.tld” into "nobody@USA". |
| use.original.on.lookup.failure | (Optional) Default value is false. If set to true, it will preserve the original string if there is no match. e.g. In the above lookup case for email nobody@uk.imaginary.tld, it will be transformed to nobody@ , if this property is set to true it will be transformed to nobody@uk. |
Within the topology file the provider configuration might look like this.
<provider>
    <role>identity-assertion</role>
    <name>Regex</name>
    <enabled>true</enabled>
    <param>
        <name>input</name>
        <value>(.*)@(.*?)\..*</value>
    </param>
    <param>
        <name>output</name>
        <value>{1}_{[2]}</value>
    </param>
    <param>
        <name>lookup</name>
        <value>us=USA;ca=CANADA</value>
    </param>
</provider>
Using curl with this type of configuration might produce the following results.
curl -k --header "SM_USER: nobody@us.imaginary.tld" 'https://localhost:8443/gateway/sandbox/webhdfs/v1?op=GETHOMEDIRECTORY'

{"Path":"/user/member_USA"}

url -k --header "SM_USER: nobody@ca.imaginary.tld" 'https://localhost:8443/gateway/sandbox/webhdfs/v1?op=GETHOMEDIRECTORY'

{"Path":"/user/member_CANADA"}
An identity assertion provider that looks up user’s ‘group membership’ for authenticated users using Hadoop’s group mapping service (GroupMappingServiceProvider).
This allows existing investments in the Hadoop to be leveraged within Knox and used within the access control policy enforcement at the perimeter.
The ‘role’ for this provider is ‘identity-assertion’ and name is ‘HadoopGroupProvider’.
    <provider>
        <role>identity-assertion</role>
        <name>HadoopGroupProvider</name>
        <enabled>true</enabled>
        <<param> ... </param>
    </provider>
All the configuration for ‘HadoopGroupProvider’ resides in the provider section in a gateway topology file. The ‘hadoop.security.group.mapping’ property determines the implementation. This configuration may be centralized within the gateway-site.xml through the use of a special param to this provider called CENTRAL_GROUP_CONFIG_PREFIX. This indicates to the provider that the required configuration can be found within the gateway-site.xml file with the provided prefix.
     <param>
        <name>CENTRAL_GROUP_CONFIG_PREFIX</name>
        <value>gateway.group.config.</value>
     </param>
Some of the valid implementations are as follows:
This is the default implementation and will be picked up if ‘hadoop.security.group.mapping’ is not specified. This implementation will determine if the Java Native Interface (JNI) is available. If JNI is available, the implementation will use the API within Hadoop to resolve a list of groups for a user. If JNI is not available then the shell implementation, org.apache.hadoop.security.ShellBasedUnixGroupsMapping, is used, which shells out with the bash -c id -gn <user> ; id -Gn <user> command (for a Linux/Unix environment) or the groups -F <user> command (for a Windows environment) to resolve a list of groups for a user.
As above, if JNI is available then we get the netgroup membership using Hadoop native API, else fallback on ShellBasedUnixGroupsNetgroupMapping to resolve list of groups for a user.
Uses the bash -c id -gn <user> ; id -Gn <user> command (for a Linux/Unix environment) or the groups -F <user> command (for a Windows environment) to resolve list of groups for a user.
Similar to org.apache.hadoop.security.ShellBasedUnixGroupsMapping except it uses getent netgroup command to get netgroup membership.
This implementation connects directly to an LDAP server to resolve the list of groups. However, this should only be used if the required groups reside exclusively in LDAP, and are not materialized on the Unix servers.
This implementation asks multiple other group mapping providers for determining group membership, see Composite Groups Mapping for more details.
For more information on the implementation and properties refer to Hadoop Group Mapping.
The following example snippet works with the demo ldap server that ships with Apache Knox. Replace the existing ‘Default’ identity-assertion provider with the one below (HadoopGroupProvider).
<provider>
<role>identity-assertion</role>
<name>HadoopGroupProvider</name>
<enabled>true</enabled>
<param>
<name>hadoop.security.group.mapping</name>
<value>org.apache.hadoop.security.LdapGroupsMapping</value>
</param>
<param>
<name>hadoop.security.group.mapping.ldap.bind.user</name>
<value>uid=tom,ou=people,dc=hadoop,dc=apache,dc=org</value>
</param>
<param>
<name>hadoop.security.group.mapping.ldap.bind.password</name>
<value>tom-password</value>
</param>
<param>
<name>hadoop.security.group.mapping.ldap.url</name>
<value>ldap://localhost:33389</value>
</param>
<param>
<name>hadoop.security.group.mapping.ldap.base</name>
<value></value>
</param>
<param>
<name>hadoop.security.group.mapping.ldap.search.filter.user</name>
<value>(&(|(objectclass=person)(objectclass=applicationProcess))(cn={0}))</value>
</param>
<param>
<name>hadoop.security.group.mapping.ldap.search.filter.group</name>
<value>(objectclass=groupOfNames)</value>
</param>
<param>
<name>hadoop.security.group.mapping.ldap.search.attr.member</name>
<value>member</value>
</param>
<param>
<name>hadoop.security.group.mapping.ldap.search.attr.group.name</name>
<value>cn</value>
</param>
</provider>
Here, we are working with the demo LDAP server running at ‘ldap://localhost:33389’ which populates some dummy users for testing that we will use in this example. This example uses the user ‘tom’ for LDAP binding. If you have different LDAP/AD settings, you will have to update the properties accordingly.
Let’s test our setup using the following command (assuming the gateway is started and listening on localhost:8443). Note that we are using credentials for the user ‘sam’ along with the command.
curl -i -k -u sam:sam-password -X GET 'https://localhost:8443/gateway/sandbox/webhdfs/v1/?op=LISTSTATUS'
The command should be executed successfully and you should see the groups ‘scientist’ and ‘analyst’ to which user ‘sam’ belongs to in gateway-audit.log i.e.
||a99aa0ab-fc06-48f2-8df3-36e6fe37c230|audit|WEBHDFS|sam|||identity-mapping|principal|sam|success|Groups: [scientist, analyst]
The Knox Gateway has an out-of-the-box authorization provider that allows administrators to restrict access to the individual services within a Hadoop cluster.
This provider utilizes a simple and familiar pattern of using ACLs to protect Hadoop resources by specifying users, groups and ip addresses that are permitted access.
Note: This feature will not work as expected if ‘anonymous’ authentication is used.
ACLs are bound to services within the topology descriptors by introducing the authorization provider with configuration like:
<provider>
    <role>authorization</role>
    <name>AclsAuthz</name>
    <enabled>true</enabled>
</provider>
The above configuration enables the authorization provider but does not indicate any ACLs yet and therefore there is no restriction to accessing the Hadoop services. In order to indicate the resources to be protected and the specific users, groups or ip’s to grant access, we need to provide parameters like the following:
<param>
    <name>{serviceName}.acl</name>
    <value>username[,*|username...];group[,*|group...];ipaddr[,*|ipaddr...]</value>
</param>
where {serviceName} would need to be the name of a configured Hadoop service within the topology.
NOTE: ipaddr is unique among the parts of the ACL in that you are able to specify a wildcard within an ipaddr to indicate that the remote address must being with the String prior to the asterisk within the ipaddr ACL. For instance:
<param>
    <name>{serviceName}.acl</name>
    <value>*;*;192.168.*</value>
</param>
This indicates that the request must come from an IP address that begins with ‘192.168.’ in order to be granted access.
Note also that configuration without any ACLs defined is equivalent to:
<param>
    <name>{serviceName}.acl</name>
    <value>*;*;*</value>
</param>
meaning: all users, groups and IPs have access. Each of the elements of the ACL parameter support multiple values via comma separated list and the * wildcard to match any.
For instance:
<param>
    <name>webhdfs.acl</name>
    <value>hdfs;admin;127.0.0.2,127.0.0.3</value>
</param>
this configuration indicates that ALL of the following have to be satisfied to be granted access:
This allows us to craft policy that restricts the members of a large group to a subset that should have access. The user being removed from the group will allow access to be denied even though their username may have been in the ACL.
An additional configuration element may be used to alter the processing of the ACL to be OR instead of the default AND behavior:
<param>
    <name>{serviceName}.acl.mode</name>
    <value>OR</value>
</param>
this processing behavior requires that the effective user satisfy one of the parts of the ACL definition in order to be granted access. For instance:
<param>
    <name>webhdfs.acl</name>
    <value>hdfs,guest;admin;127.0.0.2,127.0.0.3</value>
</param>
You may also set the ACL processing mode at the top level for the topology. This essentially sets the default for the managed cluster. It may then be overridden at the service level as well.
<param>
    <name>acl.mode</name>
    <value>OR</value>
</param>
this configuration indicates that ONE of the following must be satisfied to be granted access:
Following are a few concrete examples on how to use this feature.
Note: In the examples below {serviceName} represents a real service name (e.g. WEBHDFS) and would be replaced with these values in an actual configuration.
<param>
    <name>{serviceName}.acl</name>
    <value>guest;*;*</value>
</param>
<param>
    <name>{serviceName}.acls</name>
    <value>*;admins;*</value>
</param>
<param>
    <name>{serviceName}.acl</name>
    <value>*;*;127.0.0.1</value>
</param>
<param>
    <name>{serviceName}.acl.mode</name>
    <value>OR</value>
</param>
<param>
    <name>{serviceName}.acl</name>
    <value>guest;admin;*</value>
</param>
<param>
    <name>{serviceName}.acl.mode</name>
    <value>OR</value>
</param>
<param>
    <name>{serviceName}.acl</name>
    <value>guest;*;127.0.0.1</value>
</param>
<param>
    <name>{serviceName}.acl.mode</name>
    <value>OR</value>
</param>
<param>
    <name>{serviceName}.acl</name>
    <value>*;admin;127.0.0.1</value>
</param>
<param>
    <name>{serviceName}.acl.mode</name>
    <value>OR</value>
</param>
<param>
    <name>{serviceName}.acl</name>
    <value>guest;admin;127.0.0.1</value>
</param>
<param>
    <name>{serviceName}.acl</name>
    <value>guest;admin;*</value>
</param>
<param>
    <name>{serviceName}.acl</name>
    <value>guest;*;127.0.0.1</value>
</param>
<param>
    <name>{serviceName}.acl</name>
    <value>*;admins;127.0.0.1</value>
</param>
<param>
    <name>{serviceName}.acl</name>
    <value>guest;admins;127.0.0.1</value>
</param>
The principal mapping aspect of the identity assertion provider is important to understand in order to fully utilize the authorization features of this provider.
This feature allows us to map the authenticated principal to a runAs or impersonated principal to be asserted to the Hadoop services in the backend. It is fully documented in the Identity Assertion section of this guide.
These additional mapping capabilities are used together with the authorization ACL policy. An example of a full topology that illustrates these together is below.
<topology>
    <gateway>
        <provider>
            <role>authentication</role>
            <name>ShiroProvider</name>
            <enabled>true</enabled>
            <param>
                <name>main.ldapRealm</name>
                <value>org.apache.shiro.realm.ldap.JndiLdapRealm</value>
            </param>
            <param>
                <name>main.ldapRealm.userDnTemplate</name>
                <value>uid={0},ou=people,dc=hadoop,dc=apache,dc=org</value>
            </param>
            <param>
                <name>main.ldapRealm.contextFactory.url</name>
                <value>ldap://localhost:33389</value>
            </param>
            <param>
                <name>main.ldapRealm.contextFactory.authenticationMechanism</name>
                <value>simple</value>
            </param>
            <param>
                <name>urls./**</name>
                <value>authcBasic</value>
            </param>
        </provider>
        <provider>
            <role>identity-assertion</role>
            <name>Default</name>
            <enabled>true</enabled>
            <param>
                <name>principal.mapping</name>
                <value>guest=hdfs;</value>
            </param>
            <param>
                <name>group.principal.mapping</name>
                <value>*=users;hdfs=admin</value>
            </param>
        </provider>
        <provider>
            <role>authorization</role>
            <name>AclsAuthz</name>
            <enabled>true</enabled>
            <param>
                <name>acl.mode</name>
                <value>OR</value>
            </param>
            <param>
                <name>webhdfs.acl.mode</name>
                <value>AND</value>
            </param>
            <param>
                <name>webhdfs.acl</name>
                <value>hdfs;admin;127.0.0.2,127.0.0.3</value>
            </param>
            <param>
                <name>webhcat.acl</name>
                <value>hdfs;admin;127.0.0.2,127.0.0.3</value>
            </param>
        </provider>
        <provider>
            <role>hostmap</role>
            <name>static</name>
            <enabled>true</enabled>
            <param>
                <name>localhost</name>
                <value>sandbox,sandbox.hortonworks.com</value>
            </param>
        </provider>
    </gateway>

    <service>
        <role>JOBTRACKER</role>
        <url>rpc://localhost:8050</url>
    </service>

    <service>
        <role>WEBHDFS</role>
        <url>http://localhost:50070/webhdfs</url>
    </service>

    <service>
        <role>WEBHCAT</role>
        <url>http://localhost:50111/templeton</url>
    </service>

    <service>
        <role>OOZIE</role>
        <url>http://localhost:11000/oozie</url>
    </service>

    <service>
        <role>WEBHBASE</role>
        <url>http://localhost:8080</url>
    </service>

    <service>
        <role>HIVE</role>
        <url>http://localhost:10001/cliservice</url>
    </service>
</topology>
See the Hadoop documentation for setting up a secure Hadoop cluster http://hadoop.apache.org/docs/current/hadoop-project-dist/hadoop-common/SecureMode.html
Once you have a Hadoop cluster that is using Kerberos for authentication, you have to do the following to configure Knox to work with that cluster.
useradd -g hadoop knox
One way of doing this, assuming your KDC realm is EXAMPLE.COM, is to ssh into your host running KDC and execute kadmin.local That will result in an interactive session in which you can execute commands.
ssh into your host running KDC
kadmin.local
add_principal -randkey knox/knox@EXAMPLE.COM
ktadd -k knox.service.keytab -norandkey knox/knox@EXAMPLE.COM
exit
Add unix account for the knox user on Knox host
useradd -g hadoop knox
Copy knox.service.keytab created on KDC host on to your Knox host {GATEWAY_HOME}/conf/knox.service.keytab
chown knox knox.service.keytab
chmod 400 knox.service.keytab
krb5.conf at {GATEWAY_HOME}/conf/krb5.conf on Knox host You could copy the {GATEWAY_HOME}/templates/krb5.conf file provided in the Knox binary download and customize it to suit your cluster.
krb5JAASLogin.conf at /etc/knox/conf/krb5JAASLogin.conf on Knox host You could copy the {GATEWAY_HOME}/templates/krb5JAASLogin.conf file provided in the Knox binary download and customize it to suit your cluster.
gateway-site.xml on Knox host Update conf/gateway-site.xml in your Knox installation and set the value of gateway.hadoop.kerberos.secured to true.
After you do the above configurations and restart Knox, Knox would use SPNEGO to authenticate with Hadoop services and Oozie. There is no change in the way you make calls to Knox whether you use curl or Knox DSL.
This describes how Knox itself can be made highly available.
All Knox instances must be configured to use the same topology credential keystores. These files are located under {GATEWAY_HOME}/data/security/keystores/{TOPOLOGY_NAME}-credentials.jceks. They are generated after the first topology deployment.
In addition to these topology-specific credentials, gateway credentials and topologies must also be kept in-sync for Knox to operate in an HA manner.
Here are the steps to manually sync topology credential keystores:
Manually synchronizing the gateway credentials and topologies involves using ssh/scp to copy the topology-related files to all the participating Knox instances, and running the Knox CLI on each participating instance to define the gateway credential aliases.
This manual process can be tedious and error-prone. As such, ZooKeeper-based HA is recommended to simplify the management of these deployments.
Rather than manually keeping Knox HA instances in sync (in terms of credentials and topology), Knox can get it’s state from Apache ZooKeeper. By configuring all the Knox instances to monitor the same ZooKeeper ensemble, they can be kept in-sync by modifying the topology-related configuration and/or credential aliases at only one of the instances (using the Admin UI, Admin API, or Knox CLI).
When a provider configuration or descriptor is added or updated to the ZooKeeper ensemble, all of the participating Knox instances will get the change, and the affected topologies will be [re]generated and [re]deployed. Similarly, if one of these is deleted, the affected topologies will be deleted and undeployed.
When provider configurations and descriptors are added, modified or removed using the Admin UI or API (when the Knox instance is configured to monitor a ZooKeeper ensemble), then those changes will be automatically reflected in the associated ZooKeeper ensemble. Those changes will subsequently be consumed by all the other Knox instances monitoring that ensemble. By using the Admin UI or API, ssh/scp access to the Knox hosts can be avoided completely for the purpose of effecting topology changes.
Similarly, when the Knox CLI is used to create or delete a gateway alias (when the Knox instance is configured to monitor a ZooKeeper ensemble), that alias change is reflected in the ZooKeeper ensemble, and all other Knox instances montoring that ensemble will apply the change.
If you’re creating/modifying topology XML files directly, then there is no automated support for keeping these in sync across Knox HA instances.
However, if the Knox instances are running in an Apache Ambari-managed cluster, there is limited support for keeping topology XML files and gateway configuration synchronized across those instances.
openssl-devel is required for Apache Module mod_ssl.
sudo yum install openssl-devel
Apache HTTP Server 2.4.6 or later is required. See this document for installing and setting up Apache HTTP Server: http://httpd.apache.org/docs/2.4/install.html
Hint: pass --enable-ssl to the ./configure command to enable the generation of the Apache Module mod_ssl.
See this document for setting up Apache Module mod_proxy: http://httpd.apache.org/docs/2.4/mod/mod_proxy.html
See this document for setting up Apache Module mod_proxy_balancer: http://httpd.apache.org/docs/2.4/mod/mod_proxy_balancer.html
See this document for setting up Apache Module mod_ssl: http://httpd.apache.org/docs/2.4/mod/mod_ssl.html
See this document for an example: http://www.akadia.com/services/ssh_test_certificate.html
By convention, Apache HTTP Server and Knox certificates are put into the /etc/apache2/ssl/ folder.
This file is located under {APACHE_HOME}/conf/httpd.conf.
Following directives have to be added or uncommented in the configuration file:
Also following lines have to be added to file. Replace placeholders (${…}) with real data:
Listen 443
<VirtualHost *:443>
   SSLEngine On
   SSLProxyEngine On
   SSLCertificateFile ${PATH_TO_CERTIFICATE_FILE}
   SSLCertificateKeyFile ${PATH_TO_CERTIFICATE_KEY_FILE}
   SSLProxyCACertificateFile ${PATH_TO_PROXY_CA_CERTIFICATE_FILE}

   ProxyRequests Off
   ProxyPreserveHost Off

   RequestHeader set X-Forwarded-Port "443"
   Header add Set-Cookie "ROUTEID=.%{BALANCER_WORKER_ROUTE}e; path=/" env=BALANCER_ROUTE_CHANGED
   <Proxy balancer://mycluster>
     BalancerMember ${HOST_#1} route=1
     BalancerMember ${HOST_#2} route=2
     ...
     BalancerMember ${HOST_#N} route=N

     ProxySet failontimeout=On lbmethod=${LB_METHOD} stickysession=ROUTEID
   </Proxy>

   ProxyPass / balancer://mycluster/
   ProxyPassReverse / balancer://mycluster/
</VirtualHost>
Note:
APACHE_HOME/bin/apachectl -k start
APACHE_HOME/bin/apachectl -k stop
Use Knox samples.
Knox is a Web API (REST) Gateway for Hadoop. The fact that REST interactions are HTTP based means that they are vulnerable to a number of web application security vulnerabilities. This project introduces a web application security provider for plugging in various protection filters.
As with all providers in the Knox gateway, the web app security provider is configured through provider parameters. Unlike many other providers, the web app security provider may actually host multiple vulnerability/security filters. Currently, we only have implementations for CSRF, CORS and HTTP STS but others might follow, and you may be interested in creating your own.
Because of this one-to-many provider/filter relationship, there is an extra configuration element for this provider per filter. As you can see in the sample below, the actual filter configuration is defined entirely within the parameters of the WebAppSec provider.
<provider>
    <role>webappsec</role>
    <name>WebAppSec</name>
    <enabled>true</enabled>
    <param><name>csrf.enabled</name><value>true</value></param>
    <param><name>csrf.customHeader</name><value>X-XSRF-Header</value></param>
    <param><name>csrf.methodsToIgnore</name><value>GET,OPTIONS,HEAD</value></param>
    <param><name>cors.enabled</name><value>false</value></param>
    <param><name>xframe.options.enabled</name><value>true</value></param>
    <param><name>xss.protection.enabled</name><value>true</value></param>
    <param><name>strict.transport.enabled</name><value>true</value></param>
</provider>
The following tables describes the configuration options for the web app security provider:
Cross site request forgery (CSRF) attacks attempt to force an authenticated user to execute functionality without their knowledge. By presenting them with a link or image that when clicked invokes a request to another site with which the user may have already established an active session.
CSRF is entirely a browser-based attack. Some background knowledge of how browsers work enables us to provide a filter that will prevent CSRF attacks. HTTP requests from a web browser performed via form, image, iframe, etc. are unable to set custom HTTP headers. The only way to create a HTTP request from a browser with a custom HTTP header is to use a technology such as JavaScript XMLHttpRequest or Flash. These technologies can set custom HTTP headers but have security policies built in to prevent web sites from sending requests to each other unless specifically allowed by policy.
This means that a website www.bad.com cannot send a request to http://bank.example.com with the custom header X-XSRF-Header unless they use a technology such as a XMLHttpRequest. That technology would prevent such a request from being made unless the bank.example.com domain specifically allowed it. This then results in a REST endpoint that can only be called via XMLHttpRequest (or similar technology).
NOTE: by enabling this protection within the topology, this custom header will be required for all clients that interact with it - not just browsers.
| Name | Description | Default |
|---|---|---|
| csrf.enabled | This parameter enables the CSRF protection capabilities | false |
| csrf.customHeader | This is an optional parameter that indicates the name of the header to be used in order to determine that the request is from a trusted source. It defaults to the header name described by the NSA in its guidelines for dealing with CSRF in REST. | X-XSRF-Header |
| csrf.methodsToIgnore | This is also an optional parameter that enumerates the HTTP methods to allow through without the custom HTTP header. This is useful for allowing things like GET requests from the URL bar of a browser, but it assumes that the GET request adheres to REST principals in terms of being idempotent. If this cannot be assumed then it would be wise to not include GET in the list of methods to ignore. | GET,OPTIONS,HEAD |
The following curl command can be used to request a directory listing from HDFS while passing in the expected header X-XSRF-Header.
curl -k -i --header "X-XSRF-Header: valid" -v -u guest:guest-password https://localhost:8443/gateway/sandbox/webhdfs/v1/tmp?op=LISTSTATUS
Omitting the --header "X-XSRF-Header: valid" above should result in an HTTP 400 bad_request.
Disabling the provider will then allow a request that is missing the header through.
For security reasons, browsers restrict cross-origin HTTP requests initiated from within scripts. For example, XMLHttpRequest follows the same-origin policy. So, a web application using XMLHttpRequest could only make HTTP requests to its own domain. To improve web applications, developers asked browser vendors to allow XMLHttpRequest to make cross-domain requests.
Cross Origin Resource Sharing is a way to explicitly alter the same-origin policy for a given application or API. In order to allow for applications to make cross domain requests through Apache Knox, we need to configure the CORS filter of the WebAppSec provider.
| Name | Description | Default |
|---|---|---|
| cors.enabled | Setting this parameter to true allows cross origin requests. The default of false prevents cross origin requests. | false |
| cors.allowGenericHttpRequests | {true|false} defaults to true. If true, generic HTTP requests will be allowed to pass through the filter, else only valid and accepted CORS requests will be allowed (strict CORS filtering). | true |
| cors.allowOrigin | {“*”|origin-list} defaults to “*”. Whitespace-separated list of origins that the CORS filter must allow. Requests from origins not included here will be refused with an HTTP 403 “Forbidden” response. If set to * (asterisk) any origin will be allowed. | “*” |
| cors.allowSubdomains | {true|false} defaults to false. If true, the CORS filter will allow requests from any origin which is a subdomain origin of the allowed origins. A subdomain is matched by comparing its scheme and suffix (host name / IP address and optional port number). | false |
| cors.supportedMethods | {method-list} defaults to GET, POST, HEAD, OPTIONS. List of the supported HTTP methods. These are advertised through the Access-Control-Allow-Methods header and must also be implemented by the actual CORS web service. Requests for methods not included here will be refused by the CORS filter with an HTTP 405 “Method not allowed” response. | GET, POST, HEAD, OPTIONS |
| cors.supportedHeaders | {“*”|header-list} defaults to *. The names of the supported author request headers. These are advertised through the Access-Control-Allow-Headers header. If the configuration property value is set to * (asterisk) any author request header will be allowed. The CORS Filter implements this by simply echoing the requested value back to the browser. | * |
| cors.exposedHeaders | {header-list} defaults to empty list. List of the response headers other than simple response headers that the browser should expose to the author of the cross-domain request through the XMLHttpRequest.getResponseHeader() method. The CORS filter supplies this information through the Access-Control-Expose-Headers header. | empty |
| cors.supportsCredentials | {true|false} defaults to true. Indicates whether user credentials, such as cookies, HTTP authentication or client-side certificates, are supported. The CORS filter uses this value in constructing the Access-Control-Allow-Credentials header. | true |
| cors.maxAge | {int} defaults to -1 (unspecified). Indicates how long the results of a preflight request can be cached by the web browser, in seconds. If -1 unspecified. This information is passed to the browser via the Access-Control-Max-Age header. | -1 |
| cors.tagRequests | {true|false} defaults to false (no tagging). Enables HTTP servlet request tagging to provide CORS information to downstream handlers (filters and/or servlets). | false |
Cross Frame Scripting and Clickjacking are attacks that can be prevented by controlling the ability for a third-party to embed an application or resource within a Frame, IFrame or Object html element. This can be done adding the X-Frame-Options HTTP header to responses.
| Name | Description | Default |
|---|---|---|
| xframe-options.enabled | This parameter enables the X-Frame-Options capabilities | false |
| xframe-options.value | This parameter specifies a particular value for the X-Frame-Options header. Most often the default value of DENY will be most appropriate. You can also use SAMEORIGIN or ALLOW-FROM uri | DENY |
Cross-site Scripting (XSS) type attacks can be prevented by adding the X-XSS-Protection header to HTTP response. The 1; mode=block value will force browser to stop rendering the page if XSS attack is detected.
| Name | Description | Default |
|---|---|---|
| xss.protection.enabled | This parameter specifies a particular value for the X-XSS-Protection header. When it is set to true, it will add X-Xss-Protection: '1; mode=block' header to HTTP response |
false |
Browser MIME content type sniffing can be exploited for malicious purposes. Adding the X-Content-Type-Options HTTP header to responses directs the browser to honor the type specified in the Content-Type header, rather than trying to determine the type from the content itself. Most modern browsers support this.
| Name | Description | Default |
|---|---|---|
| xcontent-type.options.enabled | This param enables the X-Content-Type-Options header inclusion | false |
| xcontent-type.options | This param specifies a particular value for the X-Content-Type-Options header. The default value is really the only meaningful value | nosniff |
HTTP Strict Transport Security (HSTS) is a web security policy mechanism which helps to protect websites against protocol downgrade attacks and cookie hijacking. It allows web servers to declare that web browsers (or other complying user agents) should only interact with it using secure HTTPS connections and never via the insecure HTTP protocol.
| Name | Description | Default |
|---|---|---|
| strict.transport.enabled | This parameter enables the HTTP Strict-Transport-Security response header | false |
| strict.transport | This parameter specifies a particular value for the HTTP Strict-Transport-Security header. Default value is max-age=31536000. You can also use max-age=<expire-time> or max-age=<expire-time>; includeSubDomains or max-age=<expire-time>;preload |
max-age=31536000 |
The HadoopAuth authentication provider for Knox integrates the use of the Apache Hadoop module for SPNEGO and delegation token based authentication. This introduces the same authentication pattern used across much of the Hadoop ecosystem to Apache Knox and allows clients to using the strong authentication and SSO capabilities of Kerberos.
As with all providers in the Knox gateway, the HadoopAuth provider is configured through provider parameters. The configuration parameters are the same parameters used within Apache Hadoop for the same capabilities. In this section, we provide an example configuration and description of each of the parameters. We do encourage the reader to refer to the Hadoop documentation for this as well. (see http://hadoop.apache.org/docs/current/hadoop-auth/Configuration.html)
One of the interesting things to note about this configuration is the use of the config.prefix parameter. In Hadoop there may be multiple components with their own specific configuration values for these parameters and since they may get mixed into the same Configuration object - there needs to be a way to identify the component specific values. The config.prefix parameter is used for this and is prepended to each of the configuration parameters for this provider. Below, you see an example configuration where the value for config.prefix happens to be hadoop.auth.config. You will also notice that this same value is prepended to the name of the rest of the configuration parameters.
<provider>
  <role>authentication</role>
  <name>HadoopAuth</name>
  <enabled>true</enabled>
  <param>
    <name>config.prefix</name>
    <value>hadoop.auth.config</value>
  </param>
  <param>
    <name>hadoop.auth.config.signature.secret</name>
    <value>knox-signature-secret</value>
  </param>
  <param>
    <name>hadoop.auth.config.type</name>
    <value>kerberos</value>
  </param>
  <param>
    <name>hadoop.auth.config.simple.anonymous.allowed</name>
    <value>false</value>
  </param>
  <param>
    <name>hadoop.auth.config.token.validity</name>
    <value>1800</value>
  </param>
  <param>
    <name>hadoop.auth.config.cookie.domain</name>
    <value>novalocal</value>
  </param>
  <param>
    <name>hadoop.auth.config.cookie.path</name>
    <value>gateway/default</value>
  </param>
  <param>
    <name>hadoop.auth.config.kerberos.principal</name>
    <value>HTTP/lmccay-knoxft-24m-r6-sec-160422-1327-2.novalocal@EXAMPLE.COM</value>
  </param>
  <param>
    <name>hadoop.auth.config.kerberos.keytab</name>
    <value>/etc/security/keytabs/spnego.service.keytab</value>
  </param>
  <param>
    <name>hadoop.auth.config.kerberos.name.rules</name>
    <value>DEFAULT</value>
  </param>
</provider>
The following tables describes the configuration parameters for the HadoopAuth provider:
| Name | Description | Default |
|---|---|---|
| config.prefix | If specified, all other configuration parameter names must start with the prefix. | none |
| signature.secret | This is the secret used to sign the delegation token in the hadoop.auth cookie. This same secret needs to be used across all instances of the Knox gateway in a given cluster. Otherwise, the delegation token will fail validation and authentication will be repeated each request. | A simple random number |
| type | This parameter needs to be set to kerberos |
none, would throw exception |
| simple.anonymous.allowed | This should always be false for a secure deployment. | true |
| token.validity | The validity -in seconds- of the generated authentication token. This is also used for the rollover interval when signer.secret.provider is set to random or ZooKeeper. |
36000 seconds |
| cookie.domain | Domain to use for the HTTP cookie that stores the authentication token | null |
| cookie.path | Path to use for the HTTP cookie that stores the authentication token | null |
| kerberos.principal | The web-application Kerberos principal name. The Kerberos principal name must start with HTTP/…. For example: HTTP/localhost@LOCALHOST |
null |
| kerberos.keytab | The path to the keytab file containing the credentials for the kerberos principal. For example: /Users/lmccay/lmccay.keytab |
null |
| kerberos.name.rules | The name of the ruleset for extracting the username from the kerberos principal. | DEFAULT |
Once a user logs in with kinit then their Kerberos session may be used across client requests with things like curl. The following curl command can be used to request a directory listing from HDFS while authenticating with SPNEGO via the --negotiate flag
curl -k -i --negotiate -u : https://localhost:8443/gateway/sandbox/webhdfs/v1/tmp?op=LISTSTATUS
A number of SSO solutions provide mechanisms for federating an authenticated identity across applications. These mechanisms are at times simple HTTP Header type tokens that can be used to propagate the identity across process boundaries.
Knox Gateway needs a pluggable mechanism for consuming these tokens and federating the asserted identity through an interaction with the Hadoop cluster.
CAUTION: The use of this provider requires that proper network security and identity provider configuration and deployment does not allow requests directly to the Knox gateway. Otherwise, this provider will leave the gateway exposed to identity spoofing.
This provider was designed for use with identity solutions such as those provided by CA’s SiteMinder and IBM’s Tivoli Access Manager. While direct testing with these products has not been done, there has been extensive unit and functional testing that ensure that it should work with such providers.
The HeaderPreAuth provider is configured within the topology file and has a minimal configuration that assumes SM_USER for CA SiteMinder. The following example is the bare minimum configuration for SiteMinder (with no IP address validation).
<provider>
    <role>federation</role>
    <name>HeaderPreAuth</name>
    <enabled>true</enabled>
</provider>
The following table describes the configuration options for the web app security provider:
| Name | Description | Default |
|---|---|---|
| preauth.validation.method | Optional parameter that indicates the types of trust validation to perform on incoming requests. There could be one or more comma-separated validators defined in this property. If there are multiple validators, Apache Knox validates each validator in the same sequence as it is configured. This works similar to short-circuit AND operation i.e. if any validator fails, Knox does not perform further validation and returns overall failure immediately. Possible values are: null, preauth.default.validation, preauth.ip.validation, custom validator (details described in Custom Validator). Failure results in a 403 forbidden HTTP status response. | null - which means ‘preauth.default.validation’ that is no validation will be performed and that we are assuming that the network security and external authentication system is sufficient. |
| preauth.ip.addresses | Optional parameter that indicates the list of trusted ip addresses. When preauth.ip.validation is indicated as the validation method this parameter must be provided to indicate the trusted ip address set. Wildcarded IPs may be used to indicate subnet level trust. ie. 127.0.* | null - which means that no validation will be performed. |
| preauth.custom.header | Required parameter for indicating a custom header to use for extracting the preauthenticated principal. The value extracted from this header is utilized as the PrimaryPrincipal within the established Subject. An incoming request that is missing the configured header will be refused with a 401 unauthorized HTTP status. | SM_USER for SiteMinder usecase |
| preauth.custom.group.header | Optional parameter for indicating a HTTP header name that contains a comma separated list of groups. These are added to the authenticated Subject as group principals. A missing group header will result in no groups being extracted from the incoming request and a log entry but processing will continue. | null - which means that there will be no group principals extracted from the request and added to the established Subject. |
NOTE: Mutual authentication can be used to establish a strong trust relationship between clients and servers while using the Preauthenticated SSO provider. See the configuration for Mutual Authentication with SSL in this document.
The following is an example of a configuration of the preauthenticated SSO provider that leverages the default SM_USER header name - assuming use with CA SiteMinder. It further configures the validation based on the IP address from the incoming request.
<provider>
    <role>federation</role>
    <name>HeaderPreAuth</name>
    <enabled>true</enabled>
    <param><name>preauth.validation.method</name><value>preauth.ip.validation</value></param>
    <param><name>preauth.ip.addresses</name><value>127.0.0.2,127.0.0.1</value></param>
</provider>
The following curl command can be used to request a directory listing from HDFS while passing in the expected header SM_USER.
curl -k -i --header "SM_USER: guest" -v https://localhost:8443/gateway/sandbox/webhdfs/v1/tmp?op=LISTSTATUS
Omitting the --header "SM_USER: guest" above will result in a rejected request.
As an example for configuring the preauthenticated SSO provider for another SSO provider, the following illustrates the values used for IBM’s Tivoli Access Manager:
<provider>
    <role>federation</role>
    <name>HeaderPreAuth</name>
    <enabled>true</enabled>
    <param><name>preauth.custom.header</name><value>iv_user</value></param>
    <param><name>preauth.custom.group.header</name><value>iv_group</value></param>
    <param><name>preauth.validation.method</name><value>preauth.ip.validation</value></param>
    <param><name>preauth.ip.addresses</name><value>127.0.0.2,127.0.0.1</value></param>
</provider>
The following curl command can be used to request a directory listing from HDFS while passing in the expected headers of iv_user and iv_group. Note that the iv_group value in this command matches the expected ACL for webhdfs in the above topology file. Changing this from “admin” to “admin2” should result in a 401 unauthorized response.
curl -k -i --header "iv_user: guest" --header "iv_group: admin" -v https://localhost:8443/gateway/sandbox/webhdfs/v1/tmp?op=LISTSTATUS
Omitting the --header "iv_user: guest" above will result in a rejected request.
The SSOCookieProvider enables the federation of the authentication event that occurred through KnoxSSO. KnoxSSO is a typical SP initiated websso mechanism that sets a cookie to be presented by browsers to participating applications and cryptographically verified.
Knox Gateway needs a pluggable mechanism for consuming these cookies and federating the KnoxSSO authentication event as an asserted identity in its interaction with the Hadoop cluster for REST API invocations. This provider is useful when an application that is integrated with KnoxSSO for authentication also consumes REST APIs through the Knox Gateway.
Based on our understanding of the WebSSO flow it should behave like:
hadoop-jwtConfiguring one of the cluster topologies to use the SSOCookieProvider instead of the out of the box ShiroProvider would look something like the following:
<?xml version="1.0" encoding="utf-8"?>
<topology>
  <gateway>
    <provider>
        <role>federation</role>
        <name>SSOCookieProvider</name>
        <enabled>true</enabled>
        <param>
            <name>sso.authentication.provider.url</name>
            <value>https://localhost:9443/gateway/idp/api/v1/websso</value>
        </param>
    </provider>
    <provider>
        <role>identity-assertion</role>
        <name>Default</name>
        <enabled>true</enabled>
    </provider>
  </gateway>
  <service>
      <role>WEBHDFS</role>
      <url>http://localhost:50070/webhdfs</url>
  </service>
  <service>
      <role>WEBHCAT</role>
      <url>http://localhost:50111/templeton</url>
  </service>
</topology>
The following table describes the configuration options for the sso cookie provider:
| Name | Description | Default |
|---|---|---|
| sso.authentication.provider.url | Required parameter that indicates the location of the KnoxSSO endpoint and where to redirect the useragent when no SSO cookie is found in the incoming request. | N/A |
The JWT federation provider accepts JWT tokens as Bearer tokens within the Authorization header of the incoming request. Upon successfully extracting and verifying the token, the request is then processed on behalf of the user represented by the JWT token.
This provider is closely related to the Knox Token Service and is essentially the provider that is used to consume the tokens issued by the Knox Token Service.
Typical deployments have the KnoxToken service defined in a topology such as sandbox.xml that authenticates users based on username and password which as with the ShiroProvider. They also have a topology dedicated to clients that wish to use KnoxTokens to access Hadoop resources through Knox.
The following provider configuration can be used within such a topology.
<provider>
   <role>federation</role>
   <name>JWTProvider</name>
   <enabled>true</enabled>
   <param>
       <name>knox.token.audiences</name>
       <value>tokenbased</value>
   </param>
</provider>
The knox.token.audiences parameter above indicates that any token in an incoming request must contain an audience claim called “tokenbased”. In this case, the idea is that the issuing KnoxToken service will be configured to include such an audience claim and that the resulting token is valid to use in the topology that contains configuration like above. This would generally be the name of the topology but you can standardize on anything.
The following table describes the configuration options for the JWT federation provider:
| Name | Description | Default |
|---|---|---|
| knox.token.audiences | Optional parameter. This parameter allows the administrator to constrain the use of tokens on this endpoint to those that have tokens with at least one of the configured audience claims. These claims have associated configuration within the KnoxToken service as well. This provides an interesting way to make sure that the token issued based on authentication to a particular LDAP server or other IdP is accepted but not others. | N/A |
See the documentation for the Knox Token service for related details.
![]()
pac4j is a Java security engine to authenticate users, get their profiles and manage their authorizations in order to secure Java web applications.
It supports many authentication mechanisms for UI and web services and is implemented by many frameworks and tools.
For Knox, it is used as a federation provider to support the OAuth, CAS, SAML and OpenID Connect protocols. It must be used for SSO, in association with the KnoxSSO service and optionally with the SSOCookieProvider for access to REST APIs.
To enable SSO for REST API access through the Knox gateway, you need to protect your Hadoop services with the SSOCookieProvider configured to use the KnoxSSO service (sandbox.xml topology):
<gateway>
  <provider>
    <role>federation</role>
    <name>SSOCookieProvider</name>
    <enabled>true</enabled>
    <param>
      <name>sso.authentication.provider.url</name>
      <value>https://127.0.0.1:8443/gateway/knoxsso/api/v1/websso</value>
    </param>
  </provider>
  <provider>
    <role>identity-assertion</role>
    <name>Default</name>
    <enabled>true</enabled>
  </provider>
</gateway>

<service>
  <role>NAMENODE</role>
  <url>hdfs://localhost:8020</url>
</service>

...
and protect the KnoxSSO service by the pac4j provider (knoxsso.xml topology):
<gateway>
  <provider>
    <role>federation</role>
    <name>pac4j</name>
    <enabled>true</enabled>
    <param>
      <name>pac4j.callbackUrl</name>
      <value>https://127.0.0.1:8443/gateway/knoxsso/api/v1/websso</value>
    </param>
    <param>
      <name>cas.loginUrl</name>
      <value>https://casserverpac4j.herokuapp.com/login</value>
    </param>
  </provider>
  <provider>
    <role>identity-assertion</role>
    <name>Default</name>
    <enabled>true</enabled>
  </provider>
</gateway>

<service>
  <role>KNOXSSO</role>
  <param>
    <name>knoxsso.cookie.secure.only</name>
    <value>true</value>
  </param>
  <param>
    <name>knoxsso.token.ttl</name>
    <value>100000</value>
  </param>
  <param>
     <name>knoxsso.redirect.whitelist.regex</name>
     <value>^https?:\/\/(localhost|127\.0\.0\.1|0:0:0:0:0:0:0:1|::1):[0-9].*$</value>
  </param>
</service>
Notice that the pac4j callback URL is the KnoxSSO URL (pac4j.callbackUrl parameter). An additional pac4j.cookie.domain.suffix parameter allows you to define the domain suffix for the pac4j cookies.
In this example, the pac4j provider is configured to authenticate users via a CAS server hosted at: https://casserverpac4j.herokuapp.com/login.
You can define the identity provider client/s to be used for authentication with the appropriate parameters - as defined below. When configuring any pac4j identity provider client there is a mandatory parameter that must be defined to indicate the order in which the providers should be engaged with the first in the comma separated list being the default. Consuming applications may indicate their desire to use one of the configured clients with a query parameter called client_name. When there is no client_name specified, the default (first) provider is selected.
<param>
  <name>clientName</name>
  <value>CLIENTNAME[,CLIENTNAME]</value>
</param>
Valid client names are: FacebookClient, TwitterClient, CasClient, SAML2Client or OidcClient
For tests only, you can use a basic authentication where login equals password by defining the following configuration:
<param>
  <name>clientName</name>
  <value>testBasicAuth</value>
</param>
NOTE: This is NOT a secure mechanism and must NOT be used in production deployments.
Otherwise, you can use Facebook, Twitter, a CAS server, a SAML IdP or an OpenID Connect provider by using the following parameters:
| Name | Value |
|---|---|
| facebook.id | Identifier of the OAuth Facebook application |
| facebook.secret | Secret of the OAuth Facebook application |
| facebook.scope | Requested scope at Facebook login |
| facebook.fields | Fields returned by Facebook |
| twitter.id | Identifier of the OAuth Twitter application |
| twitter.secret | Secret of the OAuth Twitter application |
| Name | Value |
|---|---|
| cas.loginUrl | Login URL of the CAS server |
| cas.protocol | CAS protocol (CAS10, CAS20, CAS20_PROXY, CAS30, CAS30_PROXY, SAML) |
| Name | Value |
|---|---|
| saml.keystorePassword | Password of the keystore (storepass) |
| saml.privateKeyPassword | Password for the private key (keypass) |
| saml.keystorePath | Path of the keystore |
| saml.identityProviderMetadataPath | Path of the identity provider metadata |
| saml.maximumAuthenticationLifetime | Maximum lifetime for authentication |
| saml.serviceProviderEntityId | Identifier of the service provider |
| saml.serviceProviderMetadataPath | Path of the service provider metadata |
Get more details on the pac4j wiki.
The SSO URL in your SAML 2 provider config will need to include a special query parameter that lets the pac4j provider know that the request is coming back from the provider rather than from a redirect from a KnoxSSO participating application. This query parameter is “pac4jCallback=true”.
This results in a URL that looks something like:
https://hostname:8443/gateway/knoxsso/api/v1/websso?pac4jCallback=true&client_name=SAML2Client
This also means that the SP Entity ID should also include this query parameter as appropriate for your provider. Often something like the above URL is used for both the SSO URL and SP Entity ID.
| Name | Value |
|---|---|
| oidc.id | Identifier of the OpenID Connect provider |
| oidc.secret | Secret of the OpenID Connect provider |
| oidc.discoveryUri | Direcovery URI of the OpenID Connect provider |
| oidc.useNonce | Whether to use nonce during login process |
| oidc.preferredJwsAlgorithm | Preferred JWS algorithm |
| oidc.maxClockSkew | Max clock skew during login process |
| oidc.customParamKey1 | Key of the first custom parameter |
| oidc.customParamValue1 | Value of the first custom parameter |
| oidc.customParamKey2 | Key of the second custom parameter |
| oidc.customParamValue2 | Value of the second custom parameter |
Get more details on the pac4j wiki.
In fact, you can even define several identity providers at the same time, the first being chosen by default unless you define a client_name parameter to specify it (FacebookClient, TwitterClient, CasClient, SAML2Client or OidcClient).
In a browser, when calling your Hadoop service (for example: https://127.0.0.1:8443/gateway/sandbox/webhdfs/v1/tmp?op=LISTSTATUS), you are redirected to the identity provider for login. Then, after a successful authentication, your are redirected back to your originally requested URL and your KnoxSSO session is initialized.
Authentication of the Hadoop component UIs, and those of the overall ecosystem, is usually limited to Kerberos (which requires SPNEGO to be configured for the user’s browser) and simple/pseudo. This often results in the UIs not being secured - even in secured clusters. This is where KnoxSSO provides value by providing WebSSO capabilities to the Hadoop cluster.
By leveraging the hadoop-auth module in Hadoop common, we have introduced the ability to consume a common SSO cookie for web UIs while retaining the non-web browser authentication through kerberos/SPNEGO. We do this by extending the AltKerberosAuthenticationHandler class which provides the useragent based multiplexing.
We also provide integration guidance within the developers guide for other applications to be able to participate in these SSO capabilities.
The flexibility of the Apache Knox authentication and federation providers allows KnoxSSO to provide a normalization of authentication events through token exchange resulting in a common JWT (JSON WebToken) based token.
KnoxSSO provides an abstraction for integrating any number of authentication systems and SSO solutions and enables participating web applications to scale to those solutions more easily. Without the token exchange capabilities offered by KnoxSSO each component UI would need to integrate with each desired solution on its own. With KnoxSSO they only need to integrate with the single solution and common token.
In addition, KnoxSSO comes with its own form-based IdP. This allows for easily integrating a form-based login with the enterprise AD/LDAP server.
This document describes the overall setup requirements for KnoxSSO and participating applications.
By default the knoxsso.xml topology contains an application element for the knoxauth login application. This is a simple single page application for providing a login page and authenticating the user with HTTP basic auth against AD/LDAP.
<application>
    <name>knoxauth</name>
</application>
The Shiro Provider has specialized configuration beyond the typical HTTP Basic authentication requirements for REST APIs or other non-knoxauth applications. You will notice below that there are a couple additional elements - namely, redirectToUrl and restrictedCookies with WWW-Authenticate. These are used to short-circuit the browser’s HTTP basic dialog challenge so that we can use a form instead.
<provider>
   <role>authentication</role>
   <name>ShiroProvider</name>
   <enabled>true</enabled>
   <param>
      <name>sessionTimeout</name>
      <value>30</value>
   </param>
   <param>
      <name>redirectToUrl</name>
      <value>/gateway/knoxsso/knoxauth/login.html</value>
   </param>
   <param>
      <name>restrictedCookies</name>
      <value>rememberme,WWW-Authenticate</value>
   </param>
   <param>
      <name>main.ldapRealm</name>
      <value>org.apache.knox.gateway.shirorealm.KnoxLdapRealm</value>
   </param>
   <param>
      <name>main.ldapContextFactory</name>
      <value>org.apache.knox.gateway.shirorealm.KnoxLdapContextFactory</value>
   </param>
   <param>
      <name>main.ldapRealm.contextFactory</name>
      <value>$ldapContextFactory</value>
   </param>
   <param>
      <name>main.ldapRealm.userDnTemplate</name>
      <value>uid={0},ou=people,dc=hadoop,dc=apache,dc=org</value>
   </param>
   <param>
      <name>main.ldapRealm.contextFactory.url</name>
      <value>ldap://localhost:33389</value>
   </param>
   <param>
      <name>main.ldapRealm.authenticationCachingEnabled</name>
      <value>false</value>
   </param>
   <param>
      <name>main.ldapRealm.contextFactory.authenticationMechanism</name>
      <value>simple</value>
   </param>
   <param>
      <name>urls./**</name>
      <value>authcBasic</value>
   </param>
</provider>
To enable KnoxSSO, we use the KnoxSSO topology for exposing an API that can be used to abstract the use of any number of enterprise or customer IdPs. By default, the knoxsso.xml file is configured for using the simple KnoxAuth application for form-based authentication against LDAP/AD. By swapping the Shiro authentication provider that is there out-of-the-box with another authentication or federation provider, an admin may leverage many of the existing providers for SSO for the UI components that participate in KnoxSSO.
Just as with any Knox service, the KNOXSSO service is protected by the gateway providers defined above it. In this case, the ShiroProvider is taking care of HTTP Basic Auth against LDAP for us. Once the user authenticates the request processing continues to the KNOXSSO service that will create the required cookie and do the necessary redirects.
The knoxsso.xml topology will result in a KnoxSSO URL that looks something like:
https://{gateway_host}:{gateway_port}/gateway/knoxsso/api/v1/websso
This URL is needed when configuring applications that participate in KnoxSSO for a given deployment. We will refer to this as the Provider URL.
| Parameter | Description | Default |
|---|---|---|
| knoxsso.cookie.name | This optional setting allows the admin to set the name of the sso cookie to use to represent a successful authentication event. | hadoop-jwt |
| knoxsso.cookie.secure.only | This determines whether the browser is allowed to send the cookie over unsecured channels. This should always be set to true in production systems. If during development a relying party is not running SSL then you can turn this off. Running with it off exposes the cookie and underlying token for capture and replay by others. | true |
| knoxsso.cookie.max.age | optional: This indicates that a cookie can only live for a specified amount of time - in seconds. This should probably be left to the default which makes it a session cookie. Session cookies are discarded once the browser session is closed. | session |
| knoxsso.cookie.domain.suffix | optional: This indicates the portion of the request hostname that represents the domain to be used for the cookie domain. For single host development scenarios, the default behavior should be fine. For production deployments, the expected domain should be set and all configured URLs that are related to SSO should use this domain. Otherwise, the cookie will not be presented by the browser to mismatched URLs. | Default cookie domain or a domain derived from a hostname that includes more than 2 dots. |
| knoxsso.token.ttl | This indicates the lifespan of the token within the cookie. Once it expires a new cookie must be acquired from KnoxSSO. This is in milliseconds. The 36000000 in the topology above gives you 10 hrs. | 30000 That is 30 seconds. |
| knoxsso.token.audiences | This is a comma separated list of audiences to add to the JWT token. This is used to ensure that a token received by a participating application knows that the token was intended for use with that application. It is optional. In the event that an application has expected audiences and they are not present the token must be rejected. In the event where the token has audiences and the application has none expected then the token is accepted. | empty |
| knoxsso.redirect.whitelist.regex | A semicolon-delimited list of regular expressions. The incoming originalUrl must match one of the expressions in order for KnoxSSO to redirect to it after authentication. Note that cookie use is still constrained to redirect destinations in the same domain as the KnoxSSO service - regardless of the expressions specified here. | The value of the gateway-site property named gateway.dispatch.whitelist. If that is not defined, the default allows only relative paths, localhost or destinations in the same domain as the Knox host (with or without SSL). This may need to be opened up for production use and actual participating applications. |
| knoxsso.expected.params | Optional: Comma separated list of query parameters that are expected and consumed by KnoxSSO and will not be passed on to originalUrl | empty |
The following is used as the KnoxSSO configuration in the Hadoop JWTRedirectAuthenticationHandler implementation. Any participating application will need similar configuration. Since JWTRedirectAuthenticationHandler extends the AltKerberosAuthenticationHandler, the typical Kerberos configuration parameters for authentication are also required.
<property>
    <name>hadoop.http.authentication.type</name
    <value>org.apache.hadoop.security.authentication.server.JWTRedirectAuthenticationHandler</value>
</property>
This is the handler classname in Hadoop auth for JWT token (KnoxSSO) support.
<property>
    <name>hadoop.http.authentication.authentication.provider.url</name>
    <value>https://c6401.ambari.apache.org:8443/gateway/knoxsso/api/v1/websso</value>
</property>
The above property is the SSO provider URL that points to the knoxsso endpoint.
<property>
    <name>hadoop.http.authentication.public.key.pem</name>
    <value>MIICVjCCAb+gAwIBAgIJAPPvOtuTxFeiMA0GCSqGSIb3DQEBBQUAMG0xCzAJBgNV
  BAYTAlVTMQ0wCwYDVQQIEwRUZXN0MQ0wCwYDVQQHEwRUZXN0MQ8wDQYDVQQKEwZI
  YWRvb3AxDTALBgNVBAsTBFRlc3QxIDAeBgNVBAMTF2M2NDAxLmFtYmFyaS5hcGFj
  aGUub3JnMB4XDTE1MDcxNjE4NDcyM1oXDTE2MDcxNTE4NDcyM1owbTELMAkGA1UE
  BhMCVVMxDTALBgNVBAgTBFRlc3QxDTALBgNVBAcTBFRlc3QxDzANBgNVBAoTBkhh
  ZG9vcDENMAsGA1UECxMEVGVzdDEgMB4GA1UEAxMXYzY0MDEuYW1iYXJpLmFwYWNo
  ZS5vcmcwgZ8wDQYJKoZIhvcNAQEBBQADgY0AMIGJAoGBAMFs/rymbiNvg8lDhsdA
  qvh5uHP6iMtfv9IYpDleShjkS1C+IqId6bwGIEO8yhIS5BnfUR/fcnHi2ZNrXX7x
  QUtQe7M9tDIKu48w//InnZ6VpAqjGShWxcSzR6UB/YoGe5ytHS6MrXaormfBg3VW
  tDoy2MS83W8pweS6p5JnK7S5AgMBAAEwDQYJKoZIhvcNAQEFBQADgYEANyVg6EzE
  2q84gq7wQfLt9t047nYFkxcRfzhNVL3LB8p6IkM4RUrzWq4kLA+z+bpY2OdpkTOe
  wUpEdVKzOQd4V7vRxpdANxtbG/XXrJAAcY/S+eMy1eDK73cmaVPnxPUGWmMnQXUi
  TLab+w8tBQhNbq6BOQ42aOrLxA8k/M4cV1A=</value>
</property>
The above property holds the KnoxSSO server’s public key for signature verification. Adding it directly to the config like this is convenient and is easily done through Ambari to existing config files that take custom properties. Config is generally protected as root access only as well - so it is a pretty good solution.
Individual UIs within the Hadoop ecosystem will have similar configuration for participating in the KnoxSSO websso capabilities.
Blogs will be provided on the Apache Knox project site for these usecases as they become available.
The Knox Token Service enables the ability for clients to acquire the same JWT token that is used for KnoxSSO with WebSSO flows for UIs to be used for accessing REST APIs. By acquiring the token and setting it as a Bearer token on a request, a client is able to access REST APIs that are protected with the JWTProvider federation provider.
This section describes the overall setup requirements and options for KnoxToken service.
The Knox Token Service configuration can be configured in any topology and be tailored to issue tokens to authenticated users and constrain the usage of the tokens in a number of ways.
<service>
   <role>KNOXTOKEN</role>
   <param>
      <name>knox.token.ttl</name>
      <value>36000000</value>
   </param>
   <param>
      <name>knox.token.audiences</name>
      <value>tokenbased</value>
   </param>
   <param>
      <name>knox.token.target.url</name>
      <value>https://localhost:8443/gateway/tokenbased</value>
   </param>
</service>
| Parameter | Description | Default |
|---|---|---|
| knox.token.ttl | This indicates the lifespan of the token. Once it expires a new token must be acquired from KnoxToken service. This is in milliseconds. The 36000000 in the topology above gives you 10 hrs. | 30000 That is 30 seconds. |
| knox.token.audiences | This is a comma separated list of audiences to add to the JWT token. This is used to ensure that a token received by a participating application knows that the token was intended for use with that application. It is optional. In the event that an endpoint has expected audiences and they are not present the token must be rejected. In the event where the token has audiences and the endpoint has none expected then the token is accepted. | empty |
| knox.token.target.url | This is an optional configuration parameter to indicate the intended endpoint for which the token may be used. The KnoxShell token credential collector can pull this URL from a knoxtokencache file to be used in scripts. This eliminates the need to prompt for or hardcode endpoints in your scripts. | n/a |
Adding the KnoxToken configuration shown above to a topology that is protected with the ShrioProvider is a very simple and effective way to expose an endpoint from which a Knox token can be requested. Once it is acquired it may be used to access resources at intended endpoints until it expires.
The following curl command can be used to acquire a token from the Knox Token service as configured in the sandbox topology:
curl -ivku guest:guest-password https://localhost:8443/gateway/sandbox/knoxtoken/api/v1/token
Resulting in a JSON response that contains the token, the expiration and the optional target endpoint:
`{"access_token":"eyJhbGciOiJSUzI1NiJ9.eyJzdWIiOiJndWVzdCIsImF1ZCI6InRva2VuYmFzZWQiLCJpc3MiOiJLTk9YU1NPIiwiZXhwIjoxNDg5OTQyMTg4fQ.bcqSK7zMnABEM_HVsm3oWNDrQ_ei7PcMI4AtZEERY9LaPo9dzugOg3PA5JH2BRF-lXM3tuEYuZPaZVf8PenzjtBbuQsCg9VVImuu2r1YNVJlcTQ7OV-eW50L6OTI0uZfyrFwX6C7jVhf7d7YR1NNxs4eVbXpS1TZ5fDIRSfU3MU","target_url":"https://localhost:8443/gateway/tokenbased","token_type":"Bearer ","expires_in":1489942188233}`
The following curl example shows how to add a bearer token to an Authorization header:
curl -ivk -H "Authorization: Bearer eyJhbGciOiJSUzI1NiJ9.eyJzdWIiOiJndWVzdCIsImF1ZCI6InRva2VuYmFzZWQiLCJpc3MiOiJLTk9YU1NPIiwiZXhwIjoxNDg5OTQyMTg4fQ.bcqSK7zMnABEM_HVsm3oWNDrQ_ei7PcMI4AtZEERY9LaPo9dzugOg3PA5JH2BRF-lXM3tuEYuZPaZVf8PenzjtBbuQsCg9VVImuu2r1YNVJlcTQ7OV-eW50L6OTI0uZfyrFwX6C7jVhf7d7YR1NNxs4eVbXpS1TZ5fDIRSfU3MU" https://localhost:8443/gateway/tokenbased/webhdfs/v1/tmp?op=LISTSTATUS
See documentation in Client Details for KnoxShell init, list and destroy for commands that leverage this token service for CLI sessions.
To establish a stronger trust relationship between client and server, we provide mutual authentication with SSL via client certs. This is particularly useful in providing additional validation for Preauthenticated SSO with HTTP Headers. Rather than just IP address validation, connections will only be accepted by Knox from clients presenting trusted certificates.
This behavior is configured for the entire gateway instance within the gateway-site.xml file. All topologies deployed within the configured gateway instance will require incoming connections to present trusted client certificates during the SSL handshake. Otherwise, connections will be refused.
The following table describes the configuration elements related to mutual authentication and their defaults:
| Configuration Element | Description |
|---|---|
| gateway.client.auth.needed | True|False - indicating the need for client authentication. Default is False. |
| gateway.truststore.path | Fully qualified path to the trust store to use. Default is the gateway.jks. |
| gateway.truststore.type | Keystore type of the trust store. Default is JKS. |
| gateway.trust.all.certs | Allows for all certificates to be trusted. Default is false. |
By only indicating that it is needed with gateway.client.auth.needed, the {GATEWAY_HOME}/data/security/keystores/gateway.jks keystore is used. This is the identity keystore for the server and can also be used as the truststore. We can specify the path to a dedicated truststore via gateway.truststore.path. If the truststore password is different from the gateway master secret then it can be set using
knoxcli.sh create-alias gateway-truststore-password --value {pwd}
Otherwise, the master secret will be used. If the truststore is not a JKS type then it can be set via gateway.truststore.type.
WebSocket is a communication protocol that allows full duplex communication over a single TCP connection. Knox provides out-of-the-box support for the WebSocket protocol, currently only text messages are supported.
By default WebSocket functionality is disabled, it can be easily enabled by changing the gateway.websocket.feature.enabled property to true in <KNOX-HOME>/conf/gateway-site.xml file.
  <property>
      <name>gateway.websocket.feature.enabled</name>
      <value>true</value>
      <description>Enable/Disable websocket feature.</description>
  </property>
Service and rewrite rules need to changed accordingly to match the appropriate websocket context.
In the following sample configuration we assume that the backend WebSocket URL is ws://myhost:9999/ws. And ‘gateway.websocket.feature.enabled’ property is set to ‘true’ as shown above.
Example code snippet from <KNOX-HOME>/data/services/{myservice}/{version}/rewrite.xml where myservice = websocket and version = 0.6.0
  <rules>
    <rule dir="IN" name="WEBSOCKET/ws/inbound" pattern="*://*:*/**/ws">
      <rewrite template="{$serviceUrl[WEBSOCKET]}/ws"/>
    </rule>
  </rules>
Example code snippet from <KNOX-HOME>/data/services/{myservice}/{version}/service.xml where myservice = websocket and version = 0.6.0
  <service role="WEBSOCKET" name="websocket" version="0.6.0">
    <policies>
          <policy role="webappsec"/>
          <policy role="authentication" name="Anonymous"/>
          <policy role="rewrite"/>
          <policy role="authorization"/>
    </policies>
    <routes>
      <route path="/ws">
          <rewrite apply="WEBSOCKET/ws/inbound" to="request.url"/>
      </route>
    </routes>
  </service>
Finally, update the topology file at <KNOX-HOME>/conf/{topology}.xml with the backend service URL
  <service>
      <role>WEBSOCKET</role>
      <url>ws://myhost:9999/ws</url>
  </service>
The Audit facility within the Knox Gateway introduces functionality for tracking actions that are executed by Knox per user’s request or that are produced by Knox internal events like topology deploy, etc. The Knox Audit module is based on Apache log4j.
Out of the box, the Knox Gateway includes preconfigured auditing capabilities. To change its configuration please read the following sections.
The Audit module is preconfigured to write audit records to the log file {GATEWAY_HOME}/log/gateway-audit.log.
This behavior can be changed in the {GATEWAY_HOME}/conf/gateway-log4j.properties file. app.audit.file can be used to change the location. The log4j.appender.auditfile.* properties can be used for further customization. For detailed information read the Apache log4j documentation.
Out of the box, the audit record format is defined by org.apache.knox.gateway.audit.log4j.layout.AuditLayout. Its structure is as follows:
EVENT_PUBLISHING_TIME ROOT_REQUEST_ID|PARENT_REQUEST_ID|REQUEST_ID|LOGGER_NAME|TARGET_SERVICE_NAME|USER_NAME|PROXY_USER_NAME|SYSTEM_USER_NAME|ACTION|RESOURCE_TYPE|RESOURCE_NAME|OUTCOME|LOGGING_MESSAGE
The audit record format can be changed by setting log4j.appender.auditfile.layout property in {GATEWAY_HOME}/conf/gateway-log4j.properties to another class that extends org.apache.log4j.Layout or its subclasses.
For detailed information read Apache log4j.
| Component | Description |
|---|---|
| EVENT_PUBLISHING_TIME | Time when audit record was published. |
| ROOT_REQUEST_ID | The root request ID if this is a sub-request. Currently it is empty. |
| PARENT_REQUEST_ID | The parent request ID if this is a sub-request. Currently it is empty. |
| REQUEST_ID | A unique value representing the current, active request. If the current request id value is different from the current parent request id value then the current request id value is moved to the parent request id before it is replaced by the provided request id. If the root request id is not set it will be set with the first non-null value of either the parent request id or the passed request id. |
| LOGGER_NAME | The name of the logger |
| TARGET_SERVICE_NAME | Name of Hadoop service. Can be empty if audit record is not linked to any Hadoop service, for example, audit record for topology deployment. |
| USER_NAME | Name of user that initiated session with Knox |
| PROXY_USER_NAME | Mapped user name. For detailed information read Identity Assertion. |
| SYSTEM_USER_NAME | Currently is empty. |
| ACTION | Type of action that was executed. Following actions are defined: authentication, authorization, redeploy, deploy, undeploy, identity-mapping, dispatch, access. |
| RESOURCE_TYPE | Type of resource for which action was executed. Following resource types are defined: uri, topology, principal. |
| RESOURCE_NAME | Name of resource. For resource of type topology it is name of topology. For resource of type uri it is inbound or dispatch request path. For resource of type principal it is a name of mapped user. |
| OUTCOME | Action result type. Following outcomes are defined: success, failure, unavailable. |
| LOGGING_MESSAGE | Logging message. Contains additional tracking information. |
Audit logging is preconfigured with org.apache.log4j.DailyRollingFileAppender. Apache log4j contains information about other Appenders.
All audit messages are logged at INFO level and this behavior can’t be changed.
Disabling auditing can be done by decreasing the log level for the Audit appender or setting it to OFF.
The KnoxShell release artifact provides a small footprint client environment that removes all unnecessary server dependencies, configuration, binary scripts, etc. It is comprised a couple different things that empower different sorts of users.
The following sections provide an overview and quickstart for the KnoxShell.
The following installation and setup instructions should get you started with using the KnoxShell very quickly.
Download a knoxshell-x.x.x.zip or tar file and unzip it in your preferred location {GATEWAY_CLIENT_HOME}
home:knoxshell-0.12.0 larry$ ls -l
total 296
-rw-r--r--@  1 larry  staff  71714 Mar 14 14:06 LICENSE
-rw-r--r--@  1 larry  staff    164 Mar 14 14:06 NOTICE
-rw-r--r--@  1 larry  staff  71714 Mar 15 20:04 README
drwxr-xr-x@ 12 larry  staff    408 Mar 15 21:24 bin
drwxr--r--@  3 larry  staff    102 Mar 14 14:06 conf
drwxr-xr-x+  3 larry  staff    102 Mar 15 12:41 logs
drwxr-xr-x@ 18 larry  staff    612 Mar 14 14:18 samples
| Directory | Description |
|---|---|
| bin | contains the main knoxshell jar and related shell scripts |
| conf | only contains log4j config |
| logs | contains the knoxshell.log file |
| samples | has numerous examples to help you get started |
cd {GATEWAY_CLIENT_HOME}
knoxcli.sh export-cert --type JKSgateway-client-identity.jks to your user home directory{GATEWAY_CLIENT_HOME}/samples directory - for instance:
bin/knoxshell.sh samples/ExampleWebHdfsLs.groovy
home:knoxshell-0.12.0 larry$ bin/knoxshell.sh samples/ExampleWebHdfsLs.groovy
Enter username: guest
Enter password:
[app-logs, apps, mapred, mr-history, tmp, user]
At this point, you should have seen something similar to the above output - probably with different directories listed. You should get the idea from the above. Take a look at the sample that we ran above:
import groovy.json.JsonSlurper
import org.apache.knox.gateway.shell.Hadoop
import org.apache.knox.gateway.shell.hdfs.Hdfs

import org.apache.knox.gateway.shell.Credentials

gateway = "https://localhost:8443/gateway/sandbox"

credentials = new Credentials()
credentials.add("ClearInput", "Enter username: ", "user")
                .add("HiddenInput", "Enter pas" + "sword: ", "pass")
credentials.collect()

username = credentials.get("user").string()
pass = credentials.get("pass").string()

session = Hadoop.login( gateway, username, pass )

text = Hdfs.ls( session ).dir( "/" ).now().string
json = (new JsonSlurper()).parseText( text )
println json.FileStatuses.FileStatus.pathSuffix
session.shutdown()
Some things to note about this sample:
Building on the Quickstart above we will drill into some of the token session details here and walk through another sample.
Unlike the quickstart, token sessions require the server to be configured in specific ways to allow the use of token sessions/federation.
KnoxToken service should be added to your sandbox.xml topology - see the KnoxToken Configuration Section
<service>
   <role>KNOXTOKEN</role>
   <param>
      <name>knox.token.ttl</name>
      <value>36000000</value>
   </param>
   <param>
      <name>knox.token.audiences</name>
      <value>tokenbased</value>
   </param>
   <param>
      <name>knox.token.target.url</name>
      <value>https://localhost:8443/gateway/tokenbased</value>
   </param>
</service>
tokenbased.xml topology to accept tokens as federation tokens for access to exposed resources with JWTProvider JWT Provider
<provider>
   <role>federation</role>
   <name>JWTProvider</name>
   <enabled>true</enabled>
   <param>
       <name>knox.token.audiences</name>
       <value>tokenbased</value>
   </param>
</provider>
Use the KnoxShell token commands to establish and manage your session
Execute a script that can take advantage of the token credential collector and target url
import groovy.json.JsonSlurper
import java.util.HashMap
import java.util.Map
import org.apache.knox.gateway.shell.Credentials
import org.apache.knox.gateway.shell.Hadoop
import org.apache.knox.gateway.shell.hdfs.Hdfs

credentials = new Credentials()
credentials.add("KnoxToken", "none: ", "token")
credentials.collect()

token = credentials.get("token").string()

gateway = System.getenv("KNOXSHELL_TOPOLOGY_URL")
if (gateway == null || gateway.equals("")) {
  gateway = credentials.get("token").getTargetUrl()
}

println ""
println "*****************************GATEWAY INSTANCE**********************************"
println gateway
println "*******************************************************************************"
println ""

headers = new HashMap()
headers.put("Authorization", "Bearer " + token)

session = Hadoop.login( gateway, headers )

if (args.length > 0) {
  dir = args[0]
} else {
  dir = "/"
}

text = Hdfs.ls( session ).dir( dir ).now().string
json = (new JsonSlurper()).parseText( text )
statuses = json.get("FileStatuses");

println statuses

session.shutdown()
Note the following about the above sample script:
Also note that there is no reason to prompt for username and password as long as the token has not been destroyed or expired. There is also no hardcoded endpoint for using the token - it is specified in the token cache or overridden by environment variable.
The lack of any formal SDK or client for REST APIs in Hadoop led to thinking about a very simple client that could help people use and evaluate the gateway. The list below outlines the general requirements for such a client.
The result is a very simple DSL (Domain Specific Language) of sorts that is used via Groovy scripts. Here is an example of a command that copies a file from the local file system to HDFS.
Note: The variables session, localFile and remoteFile are assumed to be defined.
Hdfs.put(session).file(localFile).to(remoteFile).now()
This work is in very early development but is already very useful in its current state. We are very interested in receiving feedback about how to improve this feature and the DSL in particular.
A note of thanks to REST-assured which provides a Fluent interface style DSL for testing REST services. It served as the initial inspiration for the creation of this DSL.
This document assumes a few things about your environment in order to simplify the examples.
java.GATEWAY_HOME current directory. The GATEWAY_HOME directory is the directory within the Apache Knox Gateway installation that contains the README file and the bin, conf and deployments directories.In order for secure connections to be made to the Knox gateway server over SSL, the user will need to trust the certificate presented by the gateway while connecting. The knoxcli command export-cert may be used to get access the gateway-identity cert. It can then be imported into cacerts on the client machine or put into a keystore that will be discovered in:
KNOX_CLIENT_TRUSTSTORE_DIRKNOX_CLIENT_TRUSTSTORE_FILENAMEKNOX_CLIENT_TRUSTSTORE_PASSjavax.net.ssl.trustStore can be used to specify its locationThe DSL requires a shell to interpret the Groovy script. The shell can either be used interactively or to execute a script file. To simplify use, the distribution contains an embedded version of the Groovy shell.
The shell can be run interactively. Use the command exit to exit.
java -jar bin/shell.jar
When running interactively it may be helpful to reduce some of the output generated by the shell console. Use the following command in the interactive shell to reduce that output. This only needs to be done once as these preferences are persisted.
set verbosity QUIET
set show-last-result false
Also when running interactively use the exit command to terminate the shell. Using ^C to exit can sometimes leaves the parent shell in a problematic state.
The shell can also be used to execute a script by passing a single filename argument.
java -jar bin/shell.jar samples/ExampleWebHdfsPutGet.groovy
Once the shell can be launched the DSL can be used to interact with the gateway and Hadoop. Below is a very simple example of an interactive shell session to upload a file to HDFS.
java -jar bin/shell.jar
knox:000> session = Hadoop.login( "https://localhost:8443/gateway/sandbox", "guest", "guest-password" )
knox:000> Hdfs.put( session ).file( "README" ).to( "/tmp/example/README" ).now()
The knox:000> in the example above is the prompt from the embedded Groovy console. If you output doesn’t look like this you may need to set the verbosity and show-last-result preferences as described above in the Usage section.
If you receive an error HTTP/1.1 403 Forbidden it may be because that file already exists. Try deleting it with the following command and then try again.
knox:000> Hdfs.rm(session).file("/tmp/example/README").now()
Without using some other tool to browse HDFS it is hard to tell that this command did anything. Execute this to get a bit more feedback.
knox:000> println "Status=" + Hdfs.put( session ).file( "README" ).to( "/tmp/example/README2" ).now().statusCode
Status=201
Notice that a different filename is used for the destination. Without this an error would have resulted. Of course the DSL also provides a command to list the contents of a directory.
knox:000> println Hdfs.ls( session ).dir( "/tmp/example" ).now().string
{"FileStatuses":{"FileStatus":[{"accessTime":1363711366977,"blockSize":134217728,"group":"hdfs","length":19395,"modificationTime":1363711366977,"owner":"guest","pathSuffix":"README","permission":"644","replication":1,"type":"FILE"},{"accessTime":1363711375617,"blockSize":134217728,"group":"hdfs","length":19395,"modificationTime":1363711375617,"owner":"guest","pathSuffix":"README2","permission":"644","replication":1,"type":"FILE"}]}}
It is a design decision of the DSL to not provide type safe classes for various request and response payloads. Doing so would provide an undesirable coupling between the DSL and the service implementation. It also would make adding new commands much more difficult. See the Groovy section below for a variety capabilities and tools for working with JSON and XML to make this easy. The example below shows the use of JsonSlurper and GPath to extract content from a JSON response.
knox:000> import groovy.json.JsonSlurper
knox:000> text = Hdfs.ls( session ).dir( "/tmp/example" ).now().string
knox:000> json = (new JsonSlurper()).parseText( text )
knox:000> println json.FileStatuses.FileStatus.pathSuffix
[README, README2]
In the future, “built-in” methods to slurp JSON and XML may be added to make this a bit easier. This would allow for the following type of single line interaction:
println Hdfs.ls(session).dir("/tmp").now().json().FileStatuses.FileStatus.pathSuffix
Shell sessions should always be ended with shutting down the session. The examples above do not touch on it but the DSL supports the simple execution of commands asynchronously. The shutdown command attempts to ensures that all asynchronous commands have completed before existing the shell.
knox:000> session.shutdown()
knox:000> exit
All of the commands above could have been combined into a script file and executed as a single line.
java -jar bin/shell.jar samples/ExampleWebHdfsPutGet.groovy
This would be the content of that script.
import org.apache.knox.gateway.shell.Hadoop
import org.apache.knox.gateway.shell.hdfs.Hdfs
import groovy.json.JsonSlurper

gateway = "https://localhost:8443/gateway/sandbox"
username = "guest"
password = "guest-password"
dataFile = "README"

session = Hadoop.login( gateway, username, password )
Hdfs.rm( session ).file( "/tmp/example" ).recursive().now()
Hdfs.put( session ).file( dataFile ).to( "/tmp/example/README" ).now()
text = Hdfs.ls( session ).dir( "/tmp/example" ).now().string
json = (new JsonSlurper()).parseText( text )
println json.FileStatuses.FileStatus.pathSuffix
session.shutdown()
exit
Notice the Hdfs.rm command. This is included simply to ensure that the script can be rerun. Without this an error would result the second time it is run.
The DSL supports the ability to invoke commands asynchronously via the later() invocation method. The object returned from the later() method is a java.util.concurrent.Future parameterized with the response type of the command. This is an example of how to asynchronously put a file to HDFS.
future = Hdfs.put(session).file("README").to("/tmp/example/README").later()
println future.get().statusCode
The future.get() method will block until the asynchronous command is complete. To illustrate the usefulness of this however multiple concurrent commands are required.
readmeFuture = Hdfs.put(session).file("README").to("/tmp/example/README").later()
licenseFuture = Hdfs.put(session).file("LICENSE").to("/tmp/example/LICENSE").later()
session.waitFor( readmeFuture, licenseFuture )
println readmeFuture.get().statusCode
println licenseFuture.get().statusCode
The session.waitFor() method will wait for one or more asynchronous commands to complete.
Futures alone only provide asynchronous invocation of the command. What if some processing should also occur asynchronously once the command is complete. Support for this is provided by closures. Closures are blocks of code that are passed into the later() invocation method. In Groovy these are contained within {} immediately after a method. These blocks of code are executed once the asynchronous command is complete.
Hdfs.put(session).file("README").to("/tmp/example/README").later(){ println it.statusCode }
In this example the put() command is executed on a separate thread and once complete the println it.statusCode block is executed on that thread. The it variable is automatically populated by Groovy and is a reference to the result that is returned from the future or now() method. The future example above can be rewritten to illustrate the use of closures.
readmeFuture = Hdfs.put(session).file("README").to("/tmp/example/README").later() { println it.statusCode }
licenseFuture = Hdfs.put(session).file("LICENSE").to("/tmp/example/LICENSE").later() { println it.statusCode }
session.waitFor( readmeFuture, licenseFuture )
Again, the session.waitFor() method will wait for one or more asynchronous commands to complete.
In order to understand the DSL there are three primary constructs that need to be understood.
This construct encapsulates the client side session state that will be shared between all command invocations. In particular it will simplify the management of any tokens that need to be presented with each command invocation. It also manages a thread pool that is used by all asynchronous commands which is why it is important to call one of the shutdown methods.
The syntax associated with this is expected to change. We expect that credentials will not need to be provided to the gateway. Rather it is expected that some form of access token will be used to initialize the session.
Services are the primary extension point for adding new suites of commands. The current built-in examples are: Hdfs, Job and Workflow. The desire for extensibility is the reason for the slightly awkward Hdfs.ls(session) syntax. Certainly something more like session.hdfs().ls() would have been preferred but this would prevent adding new commands easily. At a minimum it would result in extension commands with a different syntax from the “built-in” commands.
The service objects essentially function as a factory for a suite of commands.
Commands provide the behavior of the DSL. They typically follow a Fluent interface style in order to allow for single line commands. There are really three parts to each command: Request, Invocation, Response
The request is populated by all of the methods following the “verb” method and the “invoke” method. For example in Hdfs.rm(session).ls(dir).now() the request is populated between the “verb” method rm() and the “invoke” method now().
The invocation method controls how the request is invoked. Currently supported synchronous and asynchronous invocation. The now() method executes the request and returns the result immediately. The later() method submits the request to be executed later and returns a future from which the result can be retrieved. In addition later() invocation method can optionally be provided a closure to execute when the request is complete. See the Futures and Closures sections below for additional detail and examples.
The response contains the results of the invocation of the request. In most cases the response is a thin wrapper over the HTTP response. In fact many commands will share a single BasicResponse type that only provides a few simple methods.
public int getStatusCode()
public long getContentLength()
public String getContentType()
public String getContentEncoding()
public InputStream getStream()
public String getString()
public byte[] getBytes()
public void close();
Thanks to Groovy these methods can be accessed as attributes. In the some of the examples the staticCode was retrieved for example.
println Hdfs.put(session).rm(dir).now().statusCode
Groovy will invoke the getStatusCode method to retrieve the statusCode attribute.
The three methods getStream(), getBytes() and getString() deserve special attention. Care must be taken that the HTTP body is fully read once and only once. Therefore one of these methods (and only one) must be called once and only once. Calling one of these more than once will cause an error. Failing to call one of these methods once will result in lingering open HTTP connections. The close() method may be used if the caller is not interested in reading the result body. Most commands that do not expect a response body will call close implicitly. If the body is retrieved via getBytes() or getString(), the close() method need not be called. When using getStream(), care must be taken to consume the entire body otherwise lingering open HTTP connections will result. The close() method may be called after reading the body partially to discard the remainder of the body.
The built-in supported client DSL for each Hadoop service can be found in the Service Details section.
Extensibility is a key design goal of the KnoxShell and client DSL. There are two ways to provide extended functionality for use with the shell. The first is to simply create Groovy scripts that use the DSL to perform a useful task. The second is to add new services and commands. In order to add new service and commands new classes must be written in either Groovy or Java and added to the classpath of the shell. Fortunately there is a very simple way to add classes and JARs to the shell classpath. The first time the shell is executed it will create a configuration file in the same directory as the JAR with the same base name and a .cfg extension.
bin/shell.jar
bin/shell.cfg
That file contains both the main class for the shell as well as a definition of the classpath. Currently that file will by default contain the following.
main.class=org.apache.knox.gateway.shell.Shell
class.path=../lib; ../lib/*.jar; ../ext; ../ext/*.jar
Therefore to extend the shell you should copy any new service and command class either to the ext directory or if they are packaged within a JAR copy the JAR to the ext directory. The lib directory is reserved for JARs that may be delivered with the product.
Below are samples for the service and command classes that would need to be written to add new commands to the shell. These happen to be Groovy source files but could - with very minor changes - be Java files. The easiest way to add these to the shell is to compile them directly into the ext directory. Note: This command depends upon having the Groovy compiler installed and available on the execution path.
groovy -d ext -cp bin/shell.jar samples/SampleService.groovy \
    samples/SampleSimpleCommand.groovy samples/SampleComplexCommand.groovy
These source files are available in the samples directory of the distribution but are included here for convenience.
import org.apache.knox.gateway.shell.Hadoop

class SampleService {

    static String PATH = "/webhdfs/v1"

    static SimpleCommand simple( Hadoop session ) {
        return new SimpleCommand( session )
    }

    static ComplexCommand.Request complex( Hadoop session ) {
        return new ComplexCommand.Request( session )
    }

}
import org.apache.knox.gateway.shell.AbstractRequest
import org.apache.knox.gateway.shell.BasicResponse
import org.apache.knox.gateway.shell.Hadoop
import org.apache.http.client.methods.HttpGet
import org.apache.http.client.utils.URIBuilder

import java.util.concurrent.Callable

class SimpleCommand extends AbstractRequest<BasicResponse> {

    SimpleCommand( Hadoop session ) {
        super( session )
    }

    private String param
    SimpleCommand param( String param ) {
        this.param = param
        return this
    }

    @Override
    protected Callable<BasicResponse> callable() {
        return new Callable<BasicResponse>() {
            @Override
            BasicResponse call() {
                URIBuilder uri = uri( SampleService.PATH, param )
                addQueryParam( uri, "op", "LISTSTATUS" )
                HttpGet get = new HttpGet( uri.build() )
                return new BasicResponse( execute( get ) )
            }
        }
    }

}
import com.jayway.jsonpath.JsonPath
import org.apache.knox.gateway.shell.AbstractRequest
import org.apache.knox.gateway.shell.BasicResponse
import org.apache.knox.gateway.shell.Hadoop
import org.apache.http.HttpResponse
import org.apache.http.client.methods.HttpGet
import org.apache.http.client.utils.URIBuilder

import java.util.concurrent.Callable

class ComplexCommand {

    static class Request extends AbstractRequest<Response> {

        Request( Hadoop session ) {
            super( session )
        }

        private String param;
        Request param( String param ) {
            this.param = param;
            return this;
        }

        @Override
        protected Callable<Response> callable() {
            return new Callable<Response>() {
                @Override
                Response call() {
                    URIBuilder uri = uri( SampleService.PATH, param )
                    addQueryParam( uri, "op", "LISTSTATUS" )
                    HttpGet get = new HttpGet( uri.build() )
                    return new Response( execute( get ) )
                }
            }
        }

    }

    static class Response extends BasicResponse {

        Response(HttpResponse response) {
            super(response)
        }

        public List<String> getNames() {
            return JsonPath.read( string, "\$.FileStatuses.FileStatus[*].pathSuffix" )
        }

    }

}
The shell included in the distribution is basically an unmodified packaging of the Groovy shell. The distribution does however provide a wrapper that makes it very easy to setup the class path for the shell. In fact the JARs required to execute the DSL are included on the class path by default. Therefore these command are functionally equivalent if you have Groovy installed. See below for a description of what is required for JARs required by the DSL from lib and dep directories.
java -jar bin/shell.jar samples/ExampleWebHdfsPutGet.groovy
groovy -classpath {JARs required by the DSL from lib and dep} samples/ExampleWebHdfsPutGet.groovy
The interactive shell isn’t exactly equivalent. However the only difference is that the shell.jar automatically executes some additional imports that are useful for the KnoxShell client DSL. So these two sets of commands should be functionality equivalent. However there is currently a class loading issue that prevents the groovysh command from working properly.
java -jar bin/shell.jar

groovysh -classpath {JARs required by the DSL from lib and dep}
import org.apache.knox.gateway.shell.Hadoop
import org.apache.knox.gateway.shell.hdfs.Hdfs
import org.apache.knox.gateway.shell.job.Job
import org.apache.knox.gateway.shell.workflow.Workflow
import java.util.concurrent.TimeUnit
Alternatively, you can use the Groovy Console which does not appear to have the same class loading issue.
groovyConsole -classpath {JARs required by the DSL from lib and dep}

import org.apache.knox.gateway.shell.Hadoop
import org.apache.knox.gateway.shell.hdfs.Hdfs
import org.apache.knox.gateway.shell.job.Job
import org.apache.knox.gateway.shell.workflow.Workflow
import java.util.concurrent.TimeUnit
The JARs currently required by the client DSL are
lib/gateway-shell-{GATEWAY_VERSION}.jar
dep/httpclient-4.3.6.jar
dep/httpcore-4.3.3.jar
dep/commons-lang3-3.4.jar
dep/commons-codec-1.7.jar
So on Linux/MacOS you would need this command
groovy -cp lib/gateway-shell-0.10.0.jar:dep/httpclient-4.3.6.jar:dep/httpcore-4.3.3.jar:dep/commons-lang3-3.4.jar:dep/commons-codec-1.7.jar samples/ExampleWebHdfsPutGet.groovy
and on Windows you would need this command
groovy -cp lib/gateway-shell-0.10.0.jar;dep/httpclient-4.3.6.jar;dep/httpcore-4.3.3.jar;dep/commons-lang3-3.4.jar;dep/commons-codec-1.7.jar samples/ExampleWebHdfsPutGet.groovy
The exact list of required JARs is likely to change from release to release so it is recommended that you utilize the wrapper bin/shell.jar.
In addition because the DSL can be used via standard Groovy, the Groovy integrations in many popular IDEs (e.g. IntelliJ, Eclipse) can also be used. This makes it particularly nice to develop and execute scripts to interact with Hadoop. The code-completion features in modern IDEs in particular provides immense value. All that is required is to add the gateway-shell-{GATEWAY_VERSION}.jar to the projects class path.
There are a variety of Groovy tools that make it very easy to work with the standard interchange formats (i.e. JSON and XML). In Groovy the creation of XML or JSON is typically done via a “builder” and parsing done via a “slurper”. In addition once JSON or XML is “slurped” the GPath, an XPath like feature build into Groovy can be used to access data.
In the sections that follow, the integrations currently available out of the box with the gateway will be described. In general these sections will include examples that demonstrate how to access each of these services via the gateway. In many cases this will include both the use of cURL as a REST API client as well as the use of the Knox Client DSL. You may notice that there are some minor differences between using the REST API of a given service via the gateway. In general this is necessary in order to achieve the goal of not leaking internal Hadoop cluster details to the client.
Keep in mind that the gateway uses a plugin model for supporting Hadoop services. Check back with the Apache Knox site for the latest news on plugin availability. You can also create your own custom plugin to extend the capabilities of the gateway.
These are the current Hadoop services with built-in support.
This document assumes a few things about your environment in order to simplify the examples.
java.GATEWAY_HOME current directory. The GATEWAY_HOME directory is the directory within the Apache Knox Gateway installation that contains the README file and the bin, conf and deployments directories.Using these samples with other Hadoop installations will require changes to the steps described here as well as changes to referenced sample scripts. This will also likely require changes to the gateway’s default configuration. In particular host names, ports, user names and password may need to be changed to match your environment. These changes may need to be made to gateway configuration and also the Groovy sample script files in the distribution. All of the values that may need to be customized in the sample scripts can be found together at the top of each of these files.
The cURL HTTP client command line utility is used extensively in the examples for each service. In particular this form of the cURL command line is used repeatedly.
curl -i -k -u guest:guest-password ...
The option -i (aka --include) is used to output HTTP response header information. This will be important when the content of the HTTP Location header is required for subsequent requests.
The option -k (aka --insecure) is used to avoid any issues resulting from the use of demonstration SSL certificates.
The option -u (aka --user) is used to provide the credentials to be used when the client is challenged by the gateway.
Keep in mind that the samples do not use the cookie features of cURL for the sake of simplicity. Therefore each request via cURL will result in an authentication.
REST API access to HDFS in a Hadoop cluster is provided by WebHDFS or HttpFS. Both services provide the same API. The WebHDFS REST API documentation is available online. WebHDFS must be enabled in the hdfs-site.xml configuration file and exposes the API on each NameNode and DataNode. HttpFS however is a separate server to be configured and started separately. In the sandbox this configuration file is located at /etc/hadoop/conf/hdfs-site.xml. Note the properties shown below as they are related to configuration required by the gateway. Some of these represent the default values and may not actually be present in hdfs-site.xml.
<property>
    <name>dfs.webhdfs.enabled</name>
    <value>true</value>
</property>
<property>
    <name>dfs.namenode.rpc-address</name>
    <value>sandbox.hortonworks.com:8020</value>
</property>
<property>
    <name>dfs.namenode.http-address</name>
    <value>sandbox.hortonworks.com:50070</value>
</property>
<property>
    <name>dfs.https.namenode.https-address</name>
    <value>sandbox.hortonworks.com:50470</value>
</property>
The values above need to be reflected in each topology descriptor file deployed to the gateway. The gateway by default includes a sample topology descriptor file {GATEWAY_HOME}/deployments/sandbox.xml. The values in this sample are configured to work with an installed Sandbox VM.
Please also note that the port changed from 50070 to 9870 in Hadoop 3.0.
<service>
    <role>NAMENODE</role>
    <url>hdfs://localhost:8020</url>
</service>
<service>
    <role>WEBHDFS</role>
    <url>http://localhost:50070/webhdfs</url>
</service>
The URL provided for the role NAMENODE does not result in an endpoint being exposed by the gateway. This information is only required so that other URLs can be rewritten that reference the Name Node’s RPC address. This prevents clients from needing to be aware of the internal cluster details.
By default the gateway is configured to use the HTTP endpoint for WebHDFS in the Sandbox. This could alternatively be configured to use the HTTPS endpoint by providing the correct address.
NameNode federation introduces some additional complexity when determining to which URL(s) Knox should proxy HDFS-related requests.
The HDFS core-site.xml configuration includes additional properties, which represent options in terms of the NameNode endpoints.
| Property Name | Description | Example Value |
| dfs.internal.nameservices | The list of defined namespaces | ns1,ns2 |
For each value enumerated by dfs.internal.nameservices, there is another property defined, for specifying the associated NameNode names.
| Property Name | Description | Example Value |
| dfs.ha.namenodes.ns1 | The NameNode identifiers associated with the ns1 namespace | nn1,nn2 |
| dfs.ha.namenodes.ns2 | The NameNode identifiers associated with the ns2 namespace | nn3,nn4 |
For each namenode name enumerated by each of these properties, there are other properties defined, for specifying the associated host addresses.
| Property Name | Description | Example Value |
| dfs.namenode.http-address.ns1.nn1 | The HTTP host address of nn1 NameNode in the ns1 namespace | host1:50070 |
| dfs.namenode.https-address.ns1.nn1 | The HTTPS host address of nn1 NameNode in the ns1 namespace | host1:50470 |
| dfs.namenode.http-address.ns1.nn2 | The HTTP host address of nn2 NameNode in the ns1 namespace | host2:50070 |
| dfs.namenode.https-address.ns1.nn2 | The HTTPS host address of nn2 NameNode in the ns1 namespace | host2:50470 |
| dfs.namenode.http-address.ns2.nn3 | The HTTP host address of nn3 NameNode in the ns2 namespace | host3:50070 |
| dfs.namenode.https-address.ns2.nn3 | The HTTPS host address of nn3 NameNode in the ns2 namespace | host3:50470 |
| dfs.namenode.http-address.ns2.nn4 | The HTTP host address of nn4 NameNode in the ns2 namespace | host4:50070 |
| dfs.namenode.https-address.ns2.nn4 | The HTTPS host address of nn4 NameNode in the ns2 namespace | host4:50470 |
So, if Knox should proxy the NameNodes associated with ns1, and the configuration does not dictate HTTPS, then the WEBHDFS service must contain URLs based on the values of dfs.namenode.http-address.ns1.nn1 and dfs.namenode.http-address.ns1.nn2. Likewise, if Knox should proxy the NameNodes associated with ns2, the WEBHDFS service must contain URLs based on the values of dfs.namenode.http-address.ns2.nn3 and dfs.namenode.http-address.ns2.nn3.
Fortunately, for Ambari-managed clusters, descriptors and service discovery can handle this complexity for administrators. In the descriptor, the service can be declared without any endpoints, and the desired namespace can be specified to disambiguate which endpoint(s) should be proxied by way of a parameter named discovery-namespace.
"services": [
  {
    "name": "WEBHDFS",
    "params": {
      "discovery-nameservice": "ns2"
    }
  },
If no namespace is specified, then the default namespace will be applied. This default namespace is derived from the value of the property named fs.defaultFS defined in the HDFS core-site.xml configuration.
For Name Node URLs, the mapping of Knox Gateway accessible WebHDFS URLs to direct WebHDFS URLs is simple.
| Gateway | https://{gateway-host}:{gateway-port}/{gateway-path}/{cluster-name}/webhdfs |
| Cluster | http://{webhdfs-host}:50070/webhdfs |
However, there is a subtle difference to URLs that are returned by WebHDFS in the Location header of many requests. Direct WebHDFS requests may return Location headers that contain the address of a particular DataNode. The gateway will rewrite these URLs to ensure subsequent requests come back through the gateway and internal cluster details are protected.
A WebHDFS request to the NameNode to retrieve a file will return a URL of the form below in the Location header.
http://{datanode-host}:{data-node-port}/webhdfs/v1/{path}?...
Note that this URL contains the network location of a DataNode. The gateway will rewrite this URL to look like the URL below.
https://{gateway-host}:{gateway-port}/{gateway-path}/{cluster-name}/webhdfs/data/v1/{path}?_={encrypted-query-parameters}
The {encrypted-query-parameters} will contain the {datanode-host} and {datanode-port} information. This information along with the original query parameters are encrypted so that the internal Hadoop details are protected.
The examples below upload a file, download the file and list the contents of the directory.
You can use the Groovy example scripts and interpreter provided with the distribution.
java -jar bin/shell.jar samples/ExampleWebHdfsPutGet.groovy
java -jar bin/shell.jar samples/ExampleWebHdfsLs.groovy
You can manually type the client DSL script into the KnoxShell interactive Groovy interpreter provided with the distribution. The command below starts the KnoxShell in interactive mode.
java -jar bin/shell.jar
Each line below could be typed or copied into the interactive shell and executed. This is provided as an example to illustrate the use of the client DSL.
// Import the client DSL and a useful utilities for working with JSON.
import org.apache.knox.gateway.shell.Hadoop
import org.apache.knox.gateway.shell.hdfs.Hdfs
import groovy.json.JsonSlurper

// Setup some basic config.
gateway = "https://localhost:8443/gateway/sandbox"
username = "guest"
password = "guest-password"

// Start the session.
session = Hadoop.login( gateway, username, password )

// Cleanup anything leftover from a previous run.
Hdfs.rm( session ).file( "/user/guest/example" ).recursive().now()

// Upload the README to HDFS.
Hdfs.put( session ).file( "README" ).to( "/user/guest/example/README" ).now()

// Download the README from HDFS.
text = Hdfs.get( session ).from( "/user/guest/example/README" ).now().string
println text

// List the contents of the directory.
text = Hdfs.ls( session ).dir( "/user/guest/example" ).now().string
json = (new JsonSlurper()).parseText( text )
println json.FileStatuses.FileStatus.pathSuffix

// Cleanup the directory.
Hdfs.rm( session ).file( "/user/guest/example" ).recursive().now()

// Clean the session.
session.shutdown()
Users can use cURL to directly invoke the REST APIs via the gateway.
curl -i -k -u guest:guest-password -X DELETE \
    'https://localhost:8443/gateway/sandbox/webhdfs/v1/user/guest/example?op=DELETE&recursive=true'
curl -i -k -u guest:guest-password -X PUT \
    'https://localhost:8443/gateway/sandbox/webhdfs/v1/user/guest/example/README?op=CREATE'
curl -i -k -u guest:guest-password -T README -X PUT \
    '{Value of Location header from command above}'
curl -i -k -u guest:guest-password -X GET \
    'https://localhost:8443/gateway/sandbox/webhdfs/v1/user/guest/example?op=LISTSTATUS'
curl -i -k -u guest:guest-password -X GET \
    'https://localhost:8443/gateway/sandbox/webhdfs/v1/user/guest/example/README?op=OPEN'
curl -i -k -u guest:guest-password -X GET \
    '{Value of Location header from command above}'
curl -i -k -u guest:guest-password -X DELETE \
    'https://localhost:8443/gateway/sandbox/webhdfs/v1/user/guest/example?op=DELETE&recursive=true'
Hdfs.get( session ).from( "/user/guest/example/README" ).now().stringHdfs.ls( session ).dir( "/user/guest/example" ).now().stringHdfs.mkdir( session ).dir( "/user/guest/example" ).now()Hdfs.put( session ).file( README ).to( "/user/guest/example/README" ).now()Hdfs.rm( session ).file( "/user/guest/example" ).recursive().now()Knox provides basic failover and retry functionality for REST API calls made to WebHDFS when HDFS HA has been configured and enabled.
To enable HA functionality for WebHDFS in Knox the following configuration has to be added to the topology file.
<provider>
   <role>ha</role>
   <name>HaProvider</name>
   <enabled>true</enabled>
   <param>
       <name>WEBHDFS</name>
       <value>maxFailoverAttempts=3;failoverSleep=1000;maxRetryAttempts=300;retrySleep=1000;enabled=true</value>
   </param>
</provider>
The role and name of the provider above must be as shown. The name in the ‘param’ section must match that of the service role name that is being configured for HA and the value in the ‘param’ section is the configuration for that particular service in HA mode. In this case the name is ‘WEBHDFS’.
The various configuration parameters are described below:
maxFailoverAttempts - This is the maximum number of times a failover will be attempted. The failover strategy at this time is very simplistic in that the next URL in the list of URLs provided for the service is used and the one that failed is put at the bottom of the list. If the list is exhausted and the maximum number of attempts is not reached then the first URL that failed will be tried again (the list will start again from the original top entry).
failoverSleep - The amount of time in milliseconds that the process will wait or sleep before attempting to failover.
maxRetryAttempts - The is the maximum number of times that a retry request will be attempted. Unlike failover, the retry is done on the same URL that failed. This is a special case in HDFS when the node is in safe mode. The expectation is that the node will come out of safe mode so a retry is desirable here as opposed to a failover.
retrySleep - The amount of time in milliseconds that the process will wait or sleep before a retry is issued.
enabled - Flag to turn the particular service on or off for HA.
And for the service configuration itself the additional URLs should be added to the list. The active URL (at the time of configuration) should ideally be added to the top of the list.
<service>
    <role>WEBHDFS</role>
    <url>http://{host1}:50070/webhdfs</url>
    <url>http://{host2}:50070/webhdfs</url>
</service>
WebHCat (also called Templeton) is a related but separate service from HiveServer2. As such it is installed and configured independently. The WebHCat wiki pages describe this processes. In sandbox this configuration file for WebHCat is located at /etc/hadoop/hcatalog/webhcat-site.xml. Note the properties shown below as they are related to configuration required by the gateway.
<property>
    <name>templeton.port</name>
    <value>50111</value>
</property>
Also important is the configuration of the JOBTRACKER RPC endpoint. For Hadoop 2 this can be found in the yarn-site.xml file. In Sandbox this file can be found at /etc/hadoop/conf/yarn-site.xml. The property yarn.resourcemanager.address within that file is relevant for the gateway’s configuration.
<property>
    <name>yarn.resourcemanager.address</name>
    <value>sandbox.hortonworks.com:8050</value>
</property>
See WebHDFS for details about locating the Hadoop configuration for the NAMENODE endpoint.
The gateway by default includes a sample topology descriptor file {GATEWAY_HOME}/deployments/sandbox.xml. The values in this sample are configured to work with an installed Sandbox VM.
<service>
    <role>NAMENODE</role>
    <url>hdfs://localhost:8020</url>
</service>
<service>
    <role>JOBTRACKER</role>
    <url>rpc://localhost:8050</url>
</service>
<service>
    <role>WEBHCAT</role>
    <url>http://localhost:50111/templeton</url>
</service>
The URLs provided for the role NAMENODE and JOBTRACKER do not result in an endpoint being exposed by the gateway. This information is only required so that other URLs can be rewritten that reference the appropriate RPC address for Hadoop services. This prevents clients from needing to be aware of the internal cluster details. Note that for Hadoop 2 the JOBTRACKER RPC endpoint is provided by the Resource Manager component.
By default the gateway is configured to use the HTTP endpoint for WebHCat in the Sandbox. This could alternatively be configured to use the HTTPS endpoint by providing the correct address.
For WebHCat URLs, the mapping of Knox Gateway accessible URLs to direct WebHCat URLs is simple.
| Gateway | https://{gateway-host}:{gateway-port}/{gateway-path}/{cluster-name}/templeton |
| Cluster | http://{webhcat-host}:{webhcat-port}/templeton} |
Users can use cURL to directly invoke the REST APIs via the gateway. For the full list of available REST calls look at the WebHCat documentation. This is a simple curl command to test the connection:
curl -i -k -u guest:guest-password 'https://localhost:8443/gateway/sandbox/templeton/v1/status'
This example will submit the familiar WordCount Java MapReduce job to the Hadoop cluster via the gateway using the KnoxShell DSL. There are several ways to do this depending upon your preference.
You can use the “embedded” Groovy interpreter provided with the distribution.
java -jar bin/shell.jar samples/ExampleWebHCatJob.groovy
You can manually type in the KnoxShell DSL script into the “embedded” Groovy interpreter provided with the distribution.
java -jar bin/shell.jar
Each line from the file samples/ExampleWebHCatJob.groovy would then need to be typed or copied into the interactive shell.
Job.submitJava(session) .jar(remoteJarName) .app(appName) .input(remoteInputDir) .output(remoteOutputDir) .now() .jobId
Job.submitPig(session).file(remotePigFileName).arg("-v").statusDir(remoteStatusDir).now()Job.submitHive(session).file(remoteHiveFileName).arg("-v").statusDir(remoteStatusDir).now()Using the Knox DSL, you can now easily submit and monitor Apache Sqoop jobs. The WebHCat Job class now supports the submitSqoop command.
Job.submitSqoop(session)
    .command("import --connect jdbc:mysql://hostname:3306/dbname ... ")
    .statusDir(remoteStatusDir)
    .now().jobId
The submitSqoop command supports the following arguments:
A complete example is available here: https://cwiki.apache.org/confluence/display/KNOX/2016/11/08/Running+SQOOP+job+via+KNOX+Shell+DSL
Job.queryQueue(session).now().stringJob.queryStatus(session).jobId(jobId).now().stringPlease look at Default Service HA support
Oozie is a Hadoop component that provides complex job workflows to be submitted and managed. Please refer to the latest Oozie documentation for details.
In order to make Oozie accessible via the gateway there are several important Hadoop configuration settings. These all relate to the network endpoint exposed by various Hadoop services.
The HTTP endpoint at which Oozie is running can be found via the oozie.base.url property in the oozie-site.xml file. In a Sandbox installation this can typically be found in /etc/oozie/conf/oozie-site.xml.
<property>
    <name>oozie.base.url</name>
    <value>http://sandbox.hortonworks.com:11000/oozie</value>
</property>
The RPC address at which the Resource Manager exposes the JOBTRACKER endpoint can be found via the yarn.resourcemanager.address in the yarn-site.xml file. In a Sandbox installation this can typically be found in /etc/hadoop/conf/yarn-site.xml.
<property>
    <name>yarn.resourcemanager.address</name>
    <value>sandbox.hortonworks.com:8050</value>
</property>
The RPC address at which the Name Node exposes its RPC endpoint can be found via the dfs.namenode.rpc-address in the hdfs-site.xml file. In a Sandbox installation this can typically be found in /etc/hadoop/conf/hdfs-site.xml.
<property>
    <name>dfs.namenode.rpc-address</name>
    <value>sandbox.hortonworks.com:8020</value>
</property>
If HDFS has been configured to be in High Availability mode (HA), then instead of the RPC address mentioned above for the Name Node, look up and use the logical name of the service found via dfs.nameservices in hdfs-site.xml. For example,
<property>
    <name>dfs.nameservices</name>
    <value>ha-service</value>
</property>
Please note, only one of the URLs, either the RPC endpoint or the HA service name should be used as the NAMENODE HDFS URL in the gateway topology file.
The information above must be provided to the gateway via a topology descriptor file. These topology descriptor files are placed in {GATEWAY_HOME}/deployments. An example that is setup for the default configuration of the Sandbox is {GATEWAY_HOME}/deployments/sandbox.xml. These values will need to be changed for non-default Sandbox or other Hadoop cluster configuration.
<service>
    <role>NAMENODE</role>
    <url>hdfs://localhost:8020</url>
</service>
<service>
    <role>JOBTRACKER</role>
    <url>rpc://localhost:8050</url>
</service>
<service>
    <role>OOZIE</role>
    <url>http://localhost:11000/oozie</url>
    <param>
        <name>replayBufferSize</name>
        <value>8</value>
    </param>
</service>
A default replayBufferSize of 8KB is shown in the sample topology file above. This may need to be increased if your request size is larger.
For Oozie URLs, the mapping of Knox Gateway accessible URLs to direct Oozie URLs is simple.
| Gateway | https://{gateway-host}:{gateway-port}/{gateway-path}/{cluster-name}/oozie |
| Cluster | http://{oozie-host}:{oozie-port}/oozie} |
TODO - In some cases the Oozie requests needs to be slightly different when made through the gateway. These changes are required in order to protect the client from knowing the internal structure of the Hadoop cluster.
This example will also submit the familiar WordCount Java MapReduce job to the Hadoop cluster via the gateway using the KnoxShell DSL. However in this case the job will be submitted via a Oozie workflow. There are several ways to do this depending upon your preference.
You can use the “embedded” Groovy interpreter provided with the distribution.
java -jar bin/shell.jar samples/ExampleOozieWorkflow.groovy
You can manually type in the KnoxShell DSL script into the “embedded” Groovy interpreter provided with the distribution.
java -jar bin/shell.jar
Each line from the file samples/ExampleOozieWorkflow.groovy will need to be typed or copied into the interactive shell.
The example below illustrates the sequence of curl commands that could be used to run a “word count” map reduce job via an Oozie workflow.
It utilizes the hadoop-examples.jar from a Hadoop install for running a simple word count job. A copy of that jar has been included in the samples directory for convenience.
In addition a workflow definition and configuration file is required. These have not been included but are available for download. Download workflow-definition.xml and workflow-configuration.xml and store them in the {GATEWAY_HOME} directory. Review the contents of workflow-configuration.xml to ensure that it matches your environment.
Take care to follow the instructions below where replacement values are required. These replacement values are identified with { } markup.
# 0. Optionally cleanup the test directory in case a previous example was run without cleaning up.
curl -i -k -u guest:guest-password -X DELETE \
    'https://localhost:8443/gateway/sandbox/webhdfs/v1/user/guest/example?op=DELETE&recursive=true'

# 1. Create the inode for workflow definition file in /user/guest/example
curl -i -k -u guest:guest-password -X PUT \
    'https://localhost:8443/gateway/sandbox/webhdfs/v1/user/guest/example/workflow.xml?op=CREATE'

# 2. Upload the workflow definition file.  This file can be found in {GATEWAY_HOME}/templates
curl -i -k -u guest:guest-password -T workflow-definition.xml -X PUT \
    '{Value Location header from command above}'

# 3. Create the inode for hadoop-examples.jar in /user/guest/example/lib
curl -i -k -u guest:guest-password -X PUT \
    'https://localhost:8443/gateway/sandbox/webhdfs/v1/user/guest/example/lib/hadoop-examples.jar?op=CREATE'

# 4. Upload hadoop-examples.jar to /user/guest/example/lib.  Use a hadoop-examples.jar from a Hadoop install.
curl -i -k -u guest:guest-password -T samples/hadoop-examples.jar -X PUT \
    '{Value Location header from command above}'

# 5. Create the inode for a sample input file readme.txt in /user/guest/example/input.
curl -i -k -u guest:guest-password -X PUT \
    'https://localhost:8443/gateway/sandbox/webhdfs/v1/user/guest/example/input/README?op=CREATE'

# 6. Upload readme.txt to /user/guest/example/input.  Use the readme.txt in {GATEWAY_HOME}.
# The sample below uses this README file found in {GATEWAY_HOME}.
curl -i -k -u guest:guest-password -T README -X PUT \
    '{Value of Location header from command above}'

# 7. Submit the job via Oozie
# Take note of the Job ID in the JSON response as this will be used in the next step.
curl -i -k -u guest:guest-password -H Content-Type:application/xml -T workflow-configuration.xml \
    -X POST 'https://localhost:8443/gateway/sandbox/oozie/v1/jobs?action=start'

# 8. Query the job status via Oozie.
curl -i -k -u guest:guest-password -X GET \
    'https://localhost:8443/gateway/sandbox/oozie/v1/job/{Job ID from JSON body}'

# 9. List the contents of the output directory /user/guest/example/output
curl -i -k -u guest:guest-password -X GET \
    'https://localhost:8443/gateway/sandbox/webhdfs/v1/user/guest/example/output?op=LISTSTATUS'

# 10. Optionally cleanup the test directory
curl -i -k -u guest:guest-password -X DELETE \
    'https://localhost:8443/gateway/sandbox/webhdfs/v1/user/guest/example?op=DELETE&recursive=true'
Workflow.submit(session).file(localFile).action("start").now()Workflow.status(session).jobId(jobId).now().stringPlease look at Default Service HA support
HBase provides an optional REST API (previously called Stargate). See the HBase REST Setup section below for getting started with the HBase REST API and Knox with the Hortonworks Sandbox environment.
The gateway by default includes a sample topology descriptor file {GATEWAY_HOME}/deployments/sandbox.xml. The value in this sample is configured to work with an installed Sandbox VM.
<service>
    <role>WEBHBASE</role>
    <url>http://localhost:60080</url>
    <param>
        <name>replayBufferSize</name>
        <value>8</value>
    </param>
</service>
By default the gateway is configured to use port 60080 for Hbase in the Sandbox. Please see the steps to configure the port mapping below.
A default replayBufferSize of 8KB is shown in the sample topology file above. This may need to be increased if your query size is larger.
| Gateway | https://{gateway-host}:{gateway-port}/{gateway-path}/{cluster-name}/hbase |
| Cluster | http://{hbase-rest-host}:8080/ |
The examples below illustrate the set of basic operations with HBase instance using the REST API. Use following link to get more details about HBase REST API: http://hbase.apache.org/book.html#_rest.
Note: Some HBase examples may not work due to enabled Access Control. User may not be granted access for performing operations in the samples. In order to check if Access Control is configured in the HBase instance verify hbase-site.xml for a presence of org.apache.hadoop.hbase.security.access.AccessController in hbase.coprocessor.master.classes and hbase.coprocessor.region.classes properties.
To grant the Read, Write, Create permissions to guest user execute the following command:
echo grant 'guest', 'RWC' | hbase shell
If you are using a cluster secured with Kerberos you will need to have used kinit to authenticate to the KDC.
The command below launches the REST daemon on port 8080 (the default)
sudo {HBASE_BIN}/hbase-daemon.sh start rest
Where {HBASE_BIN} is /usr/hdp/current/hbase-master/bin/ in the case of a HDP install.
To use a different port use the -p option:
sudo {HBASE_BIN/hbase-daemon.sh start rest -p 60080
If it becomes necessary to restart HBase you can log into the hosts running HBase and use these steps.
sudo {HBASE_BIN}/hbase-daemon.sh stop rest
sudo -u hbase {HBASE_BIN}/hbase-daemon.sh stop regionserver
sudo -u hbase {HBASE_BIN}/hbase-daemon.sh stop master
sudo -u hbase {HBASE_BIN}/hbase-daemon.sh stop zookeeper

sudo -u hbase {HBASE_BIN}/hbase-daemon.sh start regionserver
sudo -u hbase {HBASE_BIN}/hbase-daemon.sh start master
sudo -u hbase {HBASE_BIN}/hbase-daemon.sh start zookeeper
sudo {HBASE_BIN}/hbase-daemon.sh start rest -p 60080
Where {HBASE_BIN} is /usr/hdp/current/hbase-master/bin/ in the case of a HDP Sandbox install.
For more details about client DSL usage please look at the chapter about the client DSL in this guide.
After launching the shell, execute the following command to be able to use the snippets below. import org.apache.knox.gateway.shell.hbase.HBase;
HBase.session(session).systemVersion().now().stringHBase.session(session).clusterVersion().now().stringHBase.session(session).status().now().stringHBase.session(session).table().list().now().stringHBase.session(session).table().schema().now().stringHBase.session(session).table(tableName).create() .attribute(“tb_attr1”, “value1”) .attribute(“tb_attr2”, “value2”) .family(“family1”) .attribute(“fm_attr1”, “value3”) .attribute(“fm_attr2”, “value4”) .endFamilyDef() .family(“family2”) .family(“family3”) .endFamilyDef() .attribute(“tb_attr3”, “value5”) .now()
HBase.session(session).table(tableName).update() .family(“family1”) .attribute(“fm_attr1”, “new_value3”) .endFamilyDef() .family(“family4”) .attribute(“fm_attr3”, “value6”) .endFamilyDef() .now()```
HBase.session(session).table(tableName).regions().now().stringHBase.session(session).table(tableName).delete().now()HBase.session(session).table(tableName).row(“row_id_1”).store() .column(“family1”, “col1”, “col_value1”) .column(“family1”, “col2”, “col_value2”, 1234567890l) .column(“family2”, null, “fam_value1”) .now()
HBase.session(session).table(tableName).row(“row_id_2”).store() .column(“family1”, “row2_col1”, “row2_col_value1”) .now()
HBase.session(session).table(tableName).row(“row_id_1”) .query() .now().string
HBase.session(session).table(tableName).row().query().now().string
HBase.session(session).table(tableName).row().query() .column(“family1”, “row2_col1”) .column(“family2”) .times(0, Long.MAX_VALUE) .numVersions(1) .now().string
HBase.session(session).table(tableName).row(“row_id_1”) .delete() .column(“family1”, “col1”) .now()```
HBase.session(session).table(tableName).row(“row_id_1”) .delete() .column(“family2”) .time(Long.MAX_VALUE) .now()```
HBase.session(session).table(tableName).scanner().create() .column(“family1”, “col2”) .column(“family2”) .startRow(“row_id_1”) .endRow(“row_id_2”) .batch(1) .startTime(0) .endTime(Long.MAX_VALUE) .filter("") .maxVersions(100) .now()```
HBase.session(session).table(tableName).scanner(scannerId).getNext().now().stringHBase.session(session).table(tableName).scanner(scannerId).delete().now()This example illustrates sequence of all basic HBase operations: 1. get system version 2. get cluster version 3. get cluster status 4. create the table 5. get list of tables 6. get table schema 7. update table schema 8. insert single row into table 9. query row by id 10. query all rows 11. delete cell from row 12. delete entire column family from row 13. get table regions 14. create scanner 15. fetch values using scanner 16. drop scanner 17. drop the table
There are several ways to do this depending upon your preference.
You can use the Groovy interpreter provided with the distribution.
java -jar bin/shell.jar samples/ExampleHBase.groovy
You can manually type in the KnoxShell DSL script into the interactive Groovy interpreter provided with the distribution.
java -jar bin/shell.jar
Each line from the file below will need to be typed or copied into the interactive shell.
/**
 * Licensed to the Apache Software Foundation (ASF) under one
 * or more contributor license agreements.  See the NOTICE file
 * distributed with this work for additional information
 * regarding copyright ownership.  The ASF licenses this file
 * to you under the Apache License, Version 2.0 (the
 * "License"); you may not use this file except in compliance
 * with the License.  You may obtain a copy of the License at
 *
 *     https://www.apache.org/licenses/LICENSE-2.0
 *
 * Unless required by applicable law or agreed to in writing, software
 * distributed under the License is distributed on an "AS IS" BASIS,
 * WITHOUT WARRANTIES OR CONDITIONS OF ANY KIND, either express or implied.
 * See the License for the specific language governing permissions and
 * limitations under the License.
 */
package org.apache.knox.gateway.shell.hbase

import org.apache.knox.gateway.shell.Hadoop

import static java.util.concurrent.TimeUnit.SECONDS

gateway = "https://localhost:8443/gateway/sandbox"
username = "guest"
password = "guest-password"
tableName = "test_table"

session = Hadoop.login(gateway, username, password)

println "System version : " + HBase.session(session).systemVersion().now().string

println "Cluster version : " + HBase.session(session).clusterVersion().now().string

println "Status : " + HBase.session(session).status().now().string

println "Creating table '" + tableName + "'..."

HBase.session(session).table(tableName).create()  \
    .attribute("tb_attr1", "value1")  \
    .attribute("tb_attr2", "value2")  \
    .family("family1")  \
        .attribute("fm_attr1", "value3")  \
        .attribute("fm_attr2", "value4")  \
    .endFamilyDef()  \
    .family("family2")  \
    .family("family3")  \
    .endFamilyDef()  \
    .attribute("tb_attr3", "value5")  \
    .now()

println "Done"

println "Table List : " + HBase.session(session).table().list().now().string

println "Schema for table '" + tableName + "' : " + HBase.session(session)  \
    .table(tableName)  \
    .schema()  \
    .now().string

println "Updating schema of table '" + tableName + "'..."

HBase.session(session).table(tableName).update()  \
    .family("family1")  \
        .attribute("fm_attr1", "new_value3")  \
    .endFamilyDef()  \
    .family("family4")  \
        .attribute("fm_attr3", "value6")  \
    .endFamilyDef()  \
    .now()

println "Done"

println "Schema for table '" + tableName + "' : " + HBase.session(session)  \
    .table(tableName)  \
    .schema()  \
    .now().string

println "Inserting data into table..."

HBase.session(session).table(tableName).row("row_id_1").store()  \
    .column("family1", "col1", "col_value1")  \
    .column("family1", "col2", "col_value2", 1234567890l)  \
    .column("family2", null, "fam_value1")  \
    .now()

HBase.session(session).table(tableName).row("row_id_2").store()  \
    .column("family1", "row2_col1", "row2_col_value1")  \
    .now()

println "Done"

println "Querying row by id..."

println HBase.session(session).table(tableName).row("row_id_1")  \
    .query()  \
    .now().string

println "Querying all rows..."

println HBase.session(session).table(tableName).row().query().now().string

println "Querying row by id with extended settings..."

println HBase.session(session).table(tableName).row().query()  \
    .column("family1", "row2_col1")  \
    .column("family2")  \
    .times(0, Long.MAX_VALUE)  \
    .numVersions(1)  \
    .now().string

println "Deleting cell..."

HBase.session(session).table(tableName).row("row_id_1")  \
    .delete()  \
    .column("family1", "col1")  \
    .now()

println "Rows after delete:"

println HBase.session(session).table(tableName).row().query().now().string

println "Extended cell delete"

HBase.session(session).table(tableName).row("row_id_1")  \
    .delete()  \
    .column("family2")  \
    .time(Long.MAX_VALUE)  \
    .now()

println "Rows after delete:"

println HBase.session(session).table(tableName).row().query().now().string

println "Table regions : " + HBase.session(session).table(tableName)  \
    .regions()  \
    .now().string

println "Creating scanner..."

scannerId = HBase.session(session).table(tableName).scanner().create()  \
    .column("family1", "col2")  \
    .column("family2")  \
    .startRow("row_id_1")  \
    .endRow("row_id_2")  \
    .batch(1)  \
    .startTime(0)  \
    .endTime(Long.MAX_VALUE)  \
    .filter("")  \
    .maxVersions(100)  \
    .now().scannerId

println "Scanner id=" + scannerId

println "Scanner get next..."

println HBase.session(session).table(tableName).scanner(scannerId)  \
    .getNext()  \
    .now().string

println "Dropping scanner with id=" + scannerId

HBase.session(session).table(tableName).scanner(scannerId).delete().now()

println "Done"

println "Dropping table '" + tableName + "'..."

HBase.session(session).table(tableName).delete().now()

println "Done"

session.shutdown(10, SECONDS)
Set Accept Header to “text/plain”, “text/xml”, “application/json” or “application/x-protobuf”
%  curl -ik -u guest:guest-password\
 -H "Accept:  application/json"\
 -X GET 'https://localhost:8443/gateway/sandbox/hbase/version'
Set Accept Header to “text/plain”, “text/xml” or “application/x-protobuf”
%  curl -ik -u guest:guest-password\
 -H "Accept: text/xml"\
 -X GET 'https://localhost:8443/gateway/sandbox/hbase/version/cluster'
Set Accept Header to “text/plain”, “text/xml”, “application/json” or “application/x-protobuf”
curl -ik -u guest:guest-password\
 -H "Accept: text/xml"\
 -X GET 'https://localhost:8443/gateway/sandbox/hbase/status/cluster'
Set Accept Header to “text/plain”, “text/xml”, “application/json” or “application/x-protobuf”
curl -ik -u guest:guest-password\
 -H "Accept: text/xml"\
 -X GET 'https://localhost:8443/gateway/sandbox/hbase'
curl -ik -u guest:guest-password\
 -H "Accept: text/xml"   -H "Content-Type: text/xml"\
 -d '<?xml version="1.0" encoding="UTF-8"?><TableSchema name="table1"><ColumnSchema name="family1"/><ColumnSchema name="family2"/></TableSchema>'\
 -X PUT 'https://localhost:8443/gateway/sandbox/hbase/table1/schema'
curl -ik -u guest:guest-password\
 -H "Accept: application/json"  -H "Content-Type: application/json"\
 -d '{"name":"table2","ColumnSchema":[{"name":"family3"},{"name":"family4"}]}'\
 -X PUT 'https://localhost:8443/gateway/sandbox/hbase/table2/schema'
curl -ik -u guest:guest-password\
 -H "Accept: text/xml"\
 -X GET 'https://localhost:8443/gateway/sandbox/hbase/table1/regions'
curl -ik -u guest:guest-password\
 -H "Content-Type: text/xml"\
 -H "Accept: text/xml"\
 -d '<?xml version="1.0" encoding="UTF-8" standalone="yes"?><CellSet><Row key="cm93MQ=="><Cell column="ZmFtaWx5MTpjb2wx" >dGVzdA==</Cell></Row></CellSet>'\
 -X POST 'https://localhost:8443/gateway/sandbox/hbase/table1/row1'
curl -ik -u guest:guest-password\
 -H "Content-Type: text/xml"\
 -H "Accept: text/xml"\
 -d '<?xml version="1.0" encoding="UTF-8" standalone="yes"?><CellSet><Row key="cm93MA=="><Cell column=" ZmFtaWx5Mzpjb2x1bW4x" >dGVzdA==</Cell></Row><Row key="cm93MQ=="><Cell column=" ZmFtaWx5NDpjb2x1bW4x" >dGVzdA==</Cell></Row></CellSet>'\
 -X POST 'https://localhost:8443/gateway/sandbox/hbase/table2/false-row-key'
Set Accept Header to “text/plain”, “text/xml”, “application/json” or “application/x-protobuf”
curl -ik -u guest:guest-password\
-H "Accept: text/xml"\
-X GET 'https://localhost:8443/gateway/sandbox/hbase/table1/*'
Set Accept Header to “text/plain”, “text/xml”, “application/json” or “application/x-protobuf”
curl -ik -u guest:guest-password\
-H "Accept: text/xml"\
-X GET 'https://localhost:8443/gateway/sandbox/hbase/table1/row1/family1:col1'
curl -ik -u guest:guest-password\
-H "Accept: text/xml"\
-X DELETE 'https://localhost:8443/gateway/sandbox/hbase/table2/row0'
curl -ik -u guest:guest-password\
-H "Accept: text/xml"\
-X DELETE 'https://localhost:8443/gateway/sandbox/hbase/table2/row0/family3'
curl -ik -u guest:guest-password\
-H "Accept: text/xml"\
-X DELETE 'https://localhost:8443/gateway/sandbox/hbase/table2/row0/family3'
Scanner URL will be in Location response header
curl -ik -u guest:guest-password\
-H "Content-Type: text/xml"\
-d '<Scanner batch="1"/>'\
-X PUT 'https://localhost:8443/gateway/sandbox/hbase/table1/scanner'
curl -ik -u guest:guest-password\
-H "Accept: application/json"\
-X GET 'https://localhost:8443/gateway/sandbox/hbase/table1/scanner/13705290446328cff5ed'
curl -ik -u guest:guest-password\
-H "Accept: text/xml"\
-X DELETE 'https://localhost:8443/gateway/sandbox/hbase/table1/scanner/13705290446328cff5ed'
curl -ik -u guest:guest-password\
-X DELETE 'https://localhost:8443/gateway/sandbox/hbase/table1/schema'
Please look at Default Service HA support if you wish to explicitly list the URLs under the service definition.
If you run the HBase REST Server from the HBase Region Server nodes, you can utilize more advanced HA support. The HBase REST Server does not register itself with ZooKeeper. So the Knox HA component looks in ZooKeeper for instances of HBase Region Servers and then performs a light weight ping for the presence of the REST Server on the same hosts. The user should not supply URLs in the service definition.
Note: Users of Ambari must manually startup the HBase REST Server.
To enable HA functionality for HBase in Knox the following configuration has to be added to the topology file.
<provider>
<role>ha</role>
<name>HaProvider</name>
<enabled>true</enabled>
<param>
<name>WEBHBASE</name>
<value>maxFailoverAttempts=3;failoverSleep=1000;enabled=true;zookeeperEnsemble=machine1:2181,machine2:2181,machine3:2181</value>
</param>
</provider>
The role and name of the provider above must be as shown. The name in the ‘param’ section must match that of the service role name that is being configured for HA and the value in the ‘param’ section is the configuration for that particular service in HA mode. In this case the name is ‘WEBHBASE’.
The various configuration parameters are described below:
maxFailoverAttempts - This is the maximum number of times a failover will be attempted. The failover strategy at this time is very simplistic in that the next URL in the list of URLs provided for the service is used and the one that failed is put at the bottom of the list. If the list is exhausted and the maximum number of attempts is not reached then the first URL will be tried again after the list is fetched again from Zookeeper (a refresh of the list is done at this point)
failoverSleep - The amount of time in millis that the process will wait or sleep before attempting to failover.
enabled - Flag to turn the particular service on or off for HA.
zookeeperEnsemble - A comma separated list of host names (or IP addresses) of the ZooKeeper hosts that consist of the ensemble that the HBase servers register their information with.
And for the service configuration itself the URLs need NOT be added to the list. For example:
<service>
<role>WEBHBASE</role>
</service>
Please note that there is no <url> tag specified here as the URLs for the Kafka servers are obtained from ZooKeeper.
The Hive wiki pages describe Hive installation and configuration processes. In sandbox configuration file for Hive is located at /etc/hive/hive-site.xml. Hive Server has to be started in HTTP mode. Note the properties shown below as they are related to configuration required by the gateway.
<property>
<name>hive.server2.thrift.http.port</name>
<value>10001</value>
<description>Port number when in HTTP mode.</description>
</property>
<property>
<name>hive.server2.thrift.http.path</name>
<value>cliservice</value>
<description>Path component of URL endpoint when in HTTP mode.</description>
</property>
<property>
<name>hive.server2.transport.mode</name>
<value>http</value>
<description>Server transport mode. "binary" or "http".</description>
</property>
<property>
<name>hive.server2.allow.user.substitution</name>
<value>true</value>
</property>
The gateway by default includes a sample topology descriptor file {GATEWAY_HOME}/deployments/sandbox.xml. The value in this sample is configured to work with an installed Sandbox VM.
<service>
<role>HIVE</role>
<url>http://localhost:10001/cliservice</url>
<param>
<name>replayBufferSize</name>
<value>8</value>
</param>
</service>
By default the gateway is configured to use the binary transport mode for Hive in the Sandbox.
A default replayBufferSize of 8KB is shown in the sample topology file above. This may need to be increased if your query size is larger.
| Gateway | jdbc:hive2://{gateway-host}:{gateway-port}/;ssl=true;sslTrustStore={gateway-trust-store-path};trustStorePassword={gateway-trust-store-password};transportMode=http;httpPath={gateway-path}/{cluster-name}/hive |
| Cluster | http://{hive-host}:{hive-port}/{hive-path} |
This guide provides detailed examples for how to do some basic interactions with Hive via the Apache Knox Gateway.
jdbc:hive2://{gateway-host}:{gateway-port}/;ssl=true;sslTrustStore={gateway-trust-store-path};trustStorePassword={gateway-trust-store-password};transportMode=http;httpPath={gateway-path}/{cluster-name}/hiveset hive.security.authorization.enabled=false as the first statement. Hint: Good examples of Hive DDL/DML can be found here http://gettingstarted.hadooponazure.com/hw/hive.htmlThis example may need to be tailored to the execution environment. In particular host name, host port, user name, user password and context path may need to be changed to match your environment. In particular there is one example file in the distribution that may need to be customized. Take a moment to review this file. All of the values that may need to be customized can be found together at the top of the file.
Sample example for creating new table, loading data into it from the file system local to the Hive server and querying data from that table.
import java.sql.Connection;
import java.sql.DriverManager;
import java.sql.ResultSet;
import java.sql.SQLException;
import java.sql.Statement;
import java.util.logging.Level;
import java.util.logging.Logger;
public class HiveJDBCSample {
public static void main( String[] args ) {
Connection connection = null;
Statement statement = null;
ResultSet resultSet = null;
try {
String user = "guest";
String password = user + "-password";
String gatewayHost = "localhost";
int gatewayPort = 8443;
String trustStore = "/usr/lib/knox/data/security/keystores/gateway.jks";
String trustStorePassword = "knoxsecret";
String contextPath = "gateway/sandbox/hive";
String connectionString = String.format( "jdbc:hive2://%s:%d/;ssl=true;sslTrustStore=%s;trustStorePassword=%s?hive.server2.transport.mode=http;hive.server2.thrift.http.path=/%s", gatewayHost, gatewayPort, trustStore, trustStorePassword, contextPath );
// load Hive JDBC Driver
Class.forName( "org.apache.hive.jdbc.HiveDriver" );
// configure JDBC connection
connection = DriverManager.getConnection( connectionString, user, password );
statement = connection.createStatement();
// disable Hive authorization - it could be omitted if Hive authorization
// was configured properly
statement.execute( "set hive.security.authorization.enabled=false" );
// create sample table
statement.execute( "CREATE TABLE logs(column1 string, column2 string, column3 string, column4 string, column5 string, column6 string, column7 string) ROW FORMAT DELIMITED FIELDS TERMINATED BY ' '" );
// load data into Hive from file /tmp/log.txt which is placed on the local file system
statement.execute( "LOAD DATA LOCAL INPATH '/tmp/log.txt' OVERWRITE INTO TABLE logs" );
resultSet = statement.executeQuery( "SELECT * FROM logs" );
while ( resultSet.next() ) {
System.out.println( resultSet.getString( 1 ) + " --- " + resultSet.getString( 2 ) + " --- " + resultSet.getString( 3 ) + " --- " + resultSet.getString( 4 ) );
}
} catch ( ClassNotFoundException ex ) {
Logger.getLogger( HiveJDBCSample.class.getName() ).log( Level.SEVERE, null, ex );
} catch ( SQLException ex ) {
Logger.getLogger( HiveJDBCSample.class.getName() ).log( Level.SEVERE, null, ex );
} finally {
if ( resultSet != null ) {
try {
resultSet.close();
} catch ( SQLException ex ) {
Logger.getLogger( HiveJDBCSample.class.getName() ).log( Level.SEVERE, null, ex );
}
}
if ( statement != null ) {
try {
statement.close();
} catch ( SQLException ex ) {
Logger.getLogger( HiveJDBCSample.class.getName() ).log( Level.SEVERE, null, ex );
}
}
if ( connection != null ) {
try {
connection.close();
} catch ( SQLException ex ) {
Logger.getLogger( HiveJDBCSample.class.getName() ).log( Level.SEVERE, null, ex );
}
}
}
}
}
Make sure that {GATEWAY_HOME/ext} directory contains the following libraries for successful execution:
There are several ways to execute this sample depending upon your preference.
You can use the Groovy interpreter provided with the distribution.
java -jar bin/shell.jar samples/hive/groovy/jdbc/sandbox/HiveJDBCSample.groovy
You can manually type in the KnoxShell DSL script into the interactive Groovy interpreter provided with the distribution.
java -jar bin/shell.jar
Each line from the file below will need to be typed or copied into the interactive shell.
import java.sql.DriverManager
user = "guest";
password = user + "-password";
gatewayHost = "localhost";
gatewayPort = 8443;
trustStore = "/usr/lib/knox/data/security/keystores/gateway.jks";
trustStorePassword = "knoxsecret";
contextPath = "gateway/sandbox/hive";
connectionString = String.format( "jdbc:hive2://%s:%d/;ssl=true;sslTrustStore=%s;trustStorePassword=%s?hive.server2.transport.mode=http;hive.server2.thrift.http.path=/%s", gatewayHost, gatewayPort, trustStore, trustStorePassword, contextPath );
// Load Hive JDBC Driver
Class.forName( "org.apache.hive.jdbc.HiveDriver" );
// Configure JDBC connection
connection = DriverManager.getConnection( connectionString, user, password );
statement = connection.createStatement();
// Disable Hive authorization - This can be omitted if Hive authorization is configured properly
statement.execute( "set hive.security.authorization.enabled=false" );
// Create sample table
statement.execute( "CREATE TABLE logs(column1 string, column2 string, column3 string, column4 string, column5 string, column6 string, column7 string) ROW FORMAT DELIMITED FIELDS TERMINATED BY ' '" );
// Load data into Hive from file /tmp/log.txt which is placed on the local file system
statement.execute( "LOAD DATA LOCAL INPATH '/tmp/sample.log' OVERWRITE INTO TABLE logs" );
resultSet = statement.executeQuery( "SELECT * FROM logs" );
while ( resultSet.next() ) {
System.out.println( resultSet.getString( 1 ) + " --- " + resultSet.getString( 2 ) );
}
resultSet.close();
statement.close();
connection.close();
Examples use ‘log.txt’ with content:
2012-02-03 18:35:34 SampleClass6 [INFO] everything normal for id 577725851
2012-02-03 18:35:34 SampleClass4 [FATAL] system problem at id 1991281254
2012-02-03 18:35:34 SampleClass3 [DEBUG] detail for id 1304807656
2012-02-03 18:35:34 SampleClass3 [WARN] missing id 423340895
2012-02-03 18:35:34 SampleClass5 [TRACE] verbose detail for id 2082654978
2012-02-03 18:35:34 SampleClass0 [ERROR] incorrect id 1886438513
2012-02-03 18:35:34 SampleClass9 [TRACE] verbose detail for id 438634209
2012-02-03 18:35:34 SampleClass8 [DEBUG] detail for id 2074121310
2012-02-03 18:35:34 SampleClass0 [TRACE] verbose detail for id 1505582508
2012-02-03 18:35:34 SampleClass0 [TRACE] verbose detail for id 1903854437
2012-02-03 18:35:34 SampleClass7 [DEBUG] detail for id 915853141
2012-02-03 18:35:34 SampleClass3 [TRACE] verbose detail for id 303132401
2012-02-03 18:35:34 SampleClass6 [TRACE] verbose detail for id 151914369
2012-02-03 18:35:34 SampleClass2 [DEBUG] detail for id 146527742
...
Expected output:
2012-02-03 --- 18:35:34 --- SampleClass6 --- [INFO]
2012-02-03 --- 18:35:34 --- SampleClass4 --- [FATAL]
2012-02-03 --- 18:35:34 --- SampleClass3 --- [DEBUG]
2012-02-03 --- 18:35:34 --- SampleClass3 --- [WARN]
2012-02-03 --- 18:35:34 --- SampleClass5 --- [TRACE]
2012-02-03 --- 18:35:34 --- SampleClass0 --- [ERROR]
2012-02-03 --- 18:35:34 --- SampleClass9 --- [TRACE]
2012-02-03 --- 18:35:34 --- SampleClass8 --- [DEBUG]
2012-02-03 --- 18:35:34 --- SampleClass0 --- [TRACE]
2012-02-03 --- 18:35:34 --- SampleClass0 --- [TRACE]
2012-02-03 --- 18:35:34 --- SampleClass7 --- [DEBUG]
2012-02-03 --- 18:35:34 --- SampleClass3 --- [TRACE]
2012-02-03 --- 18:35:34 --- SampleClass6 --- [TRACE]
2012-02-03 --- 18:35:34 --- SampleClass2 --- [DEBUG]
...
Knox provides basic failover functionality for calls made to Hive Server when more than one HiveServer2 instance is installed in the cluster and registered with the same ZooKeeper ensemble. The HA functionality in this case fetches the HiveServer2 URL information from a ZooKeeper ensemble, so the user need only supply the necessary ZooKeeper configuration and not the Hive connection URLs.
To enable HA functionality for Hive in Knox the following configuration has to be added to the topology file.
<provider>
<role>ha</role>
<name>HaProvider</name>
<enabled>true</enabled>
<param>
<name>HIVE</name>
<value>maxFailoverAttempts=3;failoverSleep=1000;enabled=true;zookeeperEnsemble=machine1:2181,machine2:2181,machine3:2181;zookeeperNamespace=hiveserver2</value>
</param>
</provider>
The role and name of the provider above must be as shown. The name in the ‘param’ section must match that of the service role name that is being configured for HA and the value in the ‘param’ section is the configuration for that particular service in HA mode. In this case the name is ‘HIVE’.
The various configuration parameters are described below:
maxFailoverAttempts - This is the maximum number of times a failover will be attempted. The failover strategy at this time is very simplistic in that the next URL in the list of URLs provided for the service is used and the one that failed is put at the bottom of the list. If the list is exhausted and the maximum number of attempts is not reached then the first URL will be tried again after the list is fetched again from Zookeeper (a refresh of the list is done at this point)
failoverSleep - The amount of time in millis that the process will wait or sleep before attempting to failover.
enabled - Flag to turn the particular service on or off for HA.
zookeeperEnsemble - A comma separated list of host names (or IP addresses) of the zookeeper hosts that consist of the ensemble that the Hive servers register their information with. This value can be obtained from Hive’s config file hive-site.xml as the value for the parameter ‘hive.zookeeper.quorum’.
zookeeperNamespace - This is the namespace under which HiveServer2 information is registered in the Zookeeper ensemble. This value can be obtained from Hive’s config file hive-site.xml as the value for the parameter ‘hive.server2.zookeeper.namespace’.
And for the service configuration itself the URLs need not be added to the list. For example.
<service>
<role>HIVE</role>
</service>
Please note that there is no <url> tag specified here as the URLs for the Hive servers are obtained from Zookeeper.
Knox provides gateway functionality for the REST APIs of the ResourceManager. The ResourceManager REST APIs allow the user to get information about the cluster - status on the cluster, metrics on the cluster, scheduler information, information about nodes in the cluster, and information about applications on the cluster. Also as of Hadoop version 2.5.0, the user can submit a new application as well as kill it (or get state) using the ‘Writable’ APIs.
The docs for this can be found here
http://hadoop.apache.org/docs/current/hadoop-yarn/hadoop-yarn-site/ResourceManagerRest.html
To enable this functionality, a topology file needs to have the following configuration:
<service>
<role>RESOURCEMANAGER</role>
<url>http://<hostname>:<port>/ws</url>
</service>
The default resource manager http port is 8088. If it is configured to some other port, that configuration can be found in yarn-site.xml under the property yarn.resourcemanager.webapp.address.
For Yarn URLs, the mapping of Knox Gateway accessible URLs to direct Yarn URLs is the following.
| Gateway | https://{gateway-host}:{gateway-port}/{gateway-path}/{cluster-name}/resourcemanager |
| Cluster | http://{yarn-host}:{yarn-port}/ws} |
Some of the various calls that can be made and examples using curl are listed below.
# 0. Getting cluster info
curl -ikv -u guest:guest-password -X GET 'https://localhost:8443/gateway/sandbox/resourcemanager/v1/cluster'
# 1. Getting cluster metrics
curl -ikv -u guest:guest-password -X GET 'https://localhost:8443/gateway/sandbox/resourcemanager/v1/cluster/metrics'
To get the same information in an xml format
curl -ikv -u guest:guest-password -H Accept:application/xml -X GET 'https://localhost:8443/gateway/sandbox/resourcemanager/v1/cluster/metrics'
# 2. Getting scheduler information
curl -ikv -u guest:guest-password -X GET 'https://localhost:8443/gateway/sandbox/resourcemanager/v1/cluster/scheduler'
# 3. Getting all the applications listed and their information
curl -ikv -u guest:guest-password -X GET 'https://localhost:8443/gateway/sandbox/resourcemanager/v1/cluster/apps'
# 4. Getting applications statistics
curl -ikv -u guest:guest-password -X GET 'https://localhost:8443/gateway/sandbox/resourcemanager/v1/cluster/appstatistics'
Also query params can be used as below to filter the results
curl -ikv -u guest:guest-password -X GET 'https://localhost:8443/gateway/sandbox/resourcemanager/v1/cluster/appstatistics?states=accepted,running,finished&applicationTypes=mapreduce'
# 5. To get a specific application (please note, replace the application id with a real value)
curl -ikv -u guest:guest-password -X GET 'https://localhost:8443/gateway/sandbox/resourcemanager/v1/cluster/apps/{application_id}'
# 6. To get the attempts made for a particular application
curl -ikv -u guest:guest-password -X GET 'https://localhost:8443/gateway/sandbox/resourcemanager/v1/cluster/apps/{application_id}/appattempts'
# 7. To get information about the various nodes
curl -ikv -u guest:guest-password -X GET 'https://localhost:8443/gateway/sandbox/resourcemanager/v1/cluster/nodes'
Also to get a specific node, use an id obtained in the response from above (the node id is scrambled) and issue the following
curl -ikv -u guest:guest-password -X GET 'https://localhost:8443/gateway/sandbox/resourcemanager/v1/cluster/nodes/{node_id}'
# 8. To create a new Application
curl -ikv -u guest:guest-password -X POST 'https://localhost:8443/gateway/sandbox/resourcemanager/v1/cluster/apps/new-application'
An application id is returned from the request above and this can be used to submit an application.
# 9. To submit an application, put together a request containing the application id received in the above response (please refer to Yarn REST
API documentation).
curl -ikv -u guest:guest-password -T request.json -H Content-Type:application/json -X POST 'https://localhost:8443/gateway/sandbox/resourcemanager/v1/cluster/apps'
Here the request is saved in a file called request.json
#10. To get application state
curl -ikv -u guest:guest-password -X GET 'https://localhost:8443/gateway/sandbox/resourcemanager/v1/cluster/apps/{application_id}/state'
curl -ikv -u guest:guest-password -H Content-Type:application/json -X PUT -T state-killed.json 'https://localhost:8443/gateway/sandbox/resourcemanager/v1/cluster/apps/application_1409008107556_0007/state'
# 11. To kill an application that is running issue the below command with the application id of the application that is to be killed.
The contents of the state-killed.json file are :
{
"state":"KILLED"
}
curl -ikv -u guest:guest-password -H Content-Type:application/json -X PUT -T state-killed.json 'https://localhost:8443/gateway/sandbox/resourcemanager/v1/cluster/apps/{application_id}/state'
Note: The sensitive data like nodeHttpAddress, nodeHostName, id will be hidden.
Knox provides gateway functionality to Kafka when used with the Confluent Kafka REST Proxy. The Kafka REST APIs allow the user to view the status of the cluster, perform administrative actions and produce messages.
Note: Consumption of messages via Knox at this time is not supported.
The docs for the Confluent Kafka REST Proxy can be found here: http://docs.confluent.io/current/kafka-rest/docs/index.html
To enable this functionality, a topology file needs to have the following configuration:
<service>
<role>KAFKA</role>
<url>http://<kafka-rest-host>:<kafka-rest-port></url>
</service>
The default Kafka REST Proxy port is 8082. If it is configured to some other port, that configuration can be found in kafka-rest.properties under the property listeners.
For Kafka URLs, the mapping of Knox Gateway accessible URLs to direct Kafka URLs is the following.
| Gateway | https://{gateway-host}:{gateway-port}/{gateway-path}/{cluster-name}/kafka |
| Cluster | http://{kakfa-rest-host}:{kafka-rest-port}} |
Some of the various calls that can be made and examples using curl are listed below.
# 0. Getting topic info
curl -ikv -u guest:guest-password -X GET 'https://localhost:8443/gateway/sandbox/kafka/topics'
# 1. Publish message to topic
curl -ikv -u guest:guest-password -X POST 'https://localhost:8443/gateway/sandbox/kafka/topics/TOPIC1' -H 'Content-Type: application/vnd.kafka.json.v2+json' -H 'Accept: application/vnd.kafka.v2+json' --data '"records":[{"value":{"foo":"bar"}}]}'
Knox provides basic failover functionality for calls made to Kafka. Since the Confluent Kafka REST Proxy does not register itself with ZooKeeper, the HA component looks in ZooKeeper for instances of Kafka and then performs a light weight ping for the presence of the REST Proxy on the same hosts. As such the Kafka REST Proxy must be installed on the same host as Kafka. The user should not supply URLs in the service definition.
Note: Users of Ambari must manually startup the Confluent Kafka REST Proxy.
To enable HA functionality for Kafka in Knox the following configuration has to be added to the topology file.
<provider>
<role>ha</role>
<name>HaProvider</name>
<enabled>true</enabled>
<param>
<name>KAFKA</name>
<value>maxFailoverAttempts=3;failoverSleep=1000;enabled=true;zookeeperEnsemble=machine1:2181,machine2:2181,machine3:2181</value>
</param>
</provider>
The role and name of the provider above must be as shown. The name in the ‘param’ section must match that of the service role name that is being configured for HA and the value in the ‘param’ section is the configuration for that particular service in HA mode. In this case the name is ‘KAFKA’.
The various configuration parameters are described below:
maxFailoverAttempts - This is the maximum number of times a failover will be attempted. The failover strategy at this time is very simplistic in that the next URL in the list of URLs provided for the service is used and the one that failed is put at the bottom of the list. If the list is exhausted and the maximum number of attempts is not reached then the first URL will be tried again after the list is fetched again from Zookeeper (a refresh of the list is done at this point)
failoverSleep - The amount of time in millis that the process will wait or sleep before attempting to failover.
enabled - Flag to turn the particular service on or off for HA.
zookeeperEnsemble - A comma separated list of host names (or IP addresses) of the ZooKeeper hosts that consist of the ensemble that the Kafka servers register their information with.
And for the service configuration itself the URLs need NOT be added to the list. For example:
<service>
<role>KAFKA</role>
</service>
Please note that there is no <url> tag specified here as the URLs for the Kafka servers are obtained from ZooKeeper.
Storm is a distributed realtime computation system. Storm exposes REST APIs for UI functionality that can be used for retrieving metrics data and configuration information as well as management operations such as starting or stopping topologies.
The docs for this can be found here
https://github.com/apache/storm/blob/master/docs/STORM-UI-REST-API.md
To enable this functionality, a topology file needs to have the following configuration:
<service>
<role>STORM</role>
<url>http://<hostname>:<port></url>
</service>
The default UI daemon port is 8744. If it is configured to some other port, that configuration can be found in storm.yaml as the value for the property ui.port.
In addition to the storm service configuration above, a STORM-LOGVIEWER service must be configured if the log files are to be retrieved through Knox. The value of the port for the logviewer can be found by the property logviewer.port also in the file storm.yaml.
<service>
<role>STORM-LOGVIEWER</role>
<url>http://<hostname>:<port></url>
</service>
For Storm URLs, the mapping of Knox Gateway accessible URLs to direct Storm URLs is the following.
| Gateway | https://{gateway-host}:{gateway-port}/{gateway-path}/{cluster-name}/storm |
| Cluster | http://{storm-host}:{storm-port} |
For the log viewer the mapping is as follows
| Gateway | https://{gateway-host}:{gateway-port}/{gateway-path}/{cluster-name}/storm/logviewer |
| Cluster | http://{storm-logviewer-host}:{storm-logviewer-port} |
Some of the various calls that can be made and examples using curl are listed below.
# 0. Getting cluster configuration
curl -ikv -u guest:guest-password -X GET 'https://localhost:8443/gateway/sandbox/storm/api/v1/cluster/configuration'
# 1. Getting cluster summary information
curl -ikv -u guest:guest-password -X GET 'https://localhost:8443/gateway/sandbox/storm/api/v1/cluster/summary'
# 2. Getting supervisor summary information
curl -ikv -u guest:guest-password -X GET 'https://localhost:8443/gateway/sandbox/storm/api/v1/supervisor/summary'
# 3. topologies summary information
curl -ikv -u guest:guest-password -X GET 'https://localhost:8443/gateway/sandbox/storm/api/v1/topology/summary'
# 4. Getting specific topology information. Substitute {id} with the topology id.
curl -ikv -u guest:guest-password -X GET 'https://localhost:8443/gateway/sandbox/storm/api/v1/topology/{id}'
# 5. To get component level information. Substitute {id} with the topology id and {component} with the component id e.g. 'spout'
curl -ikv -u guest:guest-password -X GET 'https://localhost:8443/gateway/sandbox/storm/api/v1/topology/{id}/component/{component}'
The following POST operations all require a ‘x-csrf-token’ header along with other information that can be stored in a cookie file. In particular the ‘ring-session’ header and ‘JSESSIONID’.
# 6. To activate a topology. Substitute {id} with the topology id and {token-value} with the x-csrf-token value.
curl -ik -b ~/cookiejar.txt -c ~/cookiejar.txt -u guest:guest-password -H 'x-csrf-token:{token-value}' -X POST \
http://localhost:8744/api/v1/topology/{id}/activate
# 7. To de-activate a topology. Substitute {id} with the topology id and {token-value} with the x-csrf-token value.
curl -ik -b ~/cookiejar.txt -c ~/cookiejar.txt -u guest:guest-password -H 'x-csrf-token:{token-value}' -X POST \
http://localhost:8744/api/v1/topology/{id}/deactivate
# 8. To rebalance a topology. Substitute {id} with the topology id and {token-value} with the x-csrf-token value.
curl -ik -b ~/cookiejar.txt -c ~/cookiejar.txt -u guest:guest-password -H 'x-csrf-token:{token-value}' -X POST \
http://localhost:8744/api/v1/topology/{id}/rebalance/0
# 9. To kill a topology. Substitute {id} with the topology id and {token-value} with the x-csrf-token value.
curl -ik -b ~/cookiejar.txt -c ~/cookiejar.txt -u guest:guest-password -H 'x-csrf-token:{token-value}' -X POST \
http://localhost:8744/api/v1/topology/{id}/kill/0
Knox provides gateway functionality to Solr with support for versions 5.5+ and 6+. The Solr REST APIs allow the user to view the status of the collections, perform administrative actions and query collections.
See the Solr Quickstart (http://lucene.apache.org/solr/quickstart.html) section of the Solr documentation for examples of the Solr REST API.
Since Knox provides an abstraction over Solr and ZooKeeper, the use of the SolrJ CloudSolrClient is no longer supported. You should replace instances of CloudSolrClient with HttpSolrClient.
Note: Updates to Solr via Knox require a POST operation require the use of preemptive authentication which is not directly supported by the SolrJ API at this time.
To enable this functionality, a topology file needs to have the following configuration:
<service>
<role>SOLR</role>
<version>6.0.0</version>
<url>http://<solr-host>:<solr-port></url>
</service>
The default Solr port is 8983. Adjust the version specified to either ’5.5.0 or ‘6.0.0’.
For Solr URLs, the mapping of Knox Gateway accessible URLs to direct Solr URLs is the following.
| Gateway | https://{gateway-host}:{gateway-port}/{gateway-path}/{cluster-name}/solr |
| Cluster | http://{solr-host}:{solr-port}/solr |
Some of the various calls that can be made and examples using curl are listed below.
# 0. Query collection
curl -ikv -u guest:guest-password -X GET 'https://localhost:8443/gateway/sandbox/solr/select?q=*:*&wt=json'
# 1. Query cluster status
curl -ikv -u guest:guest-password -X POST 'https://localhost:8443/gateway/sandbox/solr/admin/collections?action=CLUSTERSTATUS'
Knox provides basic failover functionality for calls made to Solr Cloud when more than one Solr instance is installed in the cluster and registered with the same ZooKeeper ensemble. The HA functionality in this case fetches the Solr URL information from a ZooKeeper ensemble, so the user need only supply the necessary ZooKeeper configuration and not the Solr connection URLs.
To enable HA functionality for Solr Cloud in Knox the following configuration has to be added to the topology file.
<provider>
<role>ha</role>
<name>HaProvider</name>
<enabled>true</enabled>
<param>
<name>SOLR</name>
<value>maxFailoverAttempts=3;failoverSleep=1000;enabled=true;zookeeperEnsemble=machine1:2181,machine2:2181,machine3:2181</value>
</param>
</provider>
The role and name of the provider above must be as shown. The name in the ‘param’ section must match that of the service role name that is being configured for HA and the value in the ‘param’ section is the configuration for that particular service in HA mode. In this case the name is ‘SOLR’.
The various configuration parameters are described below:
maxFailoverAttempts - This is the maximum number of times a failover will be attempted. The failover strategy at this time is very simplistic in that the next URL in the list of URLs provided for the service is used and the one that failed is put at the bottom of the list. If the list is exhausted and the maximum number of attempts is not reached then the first URL will be tried again after the list is fetched again from ZooKeeper (a refresh of the list is done at this point)
failoverSleep - The amount of time in millis that the process will wait or sleep before attempting to failover.
enabled - Flag to turn the particular service on or off for HA.
zookeeperEnsemble - A comma separated list of host names (or IP addresses) of the zookeeper hosts that consist of the ensemble that the Solr servers register their information with.
And for the service configuration itself the URLs need NOT be added to the list. For example.
<service>
<role>SOLR</role>
<version>6.0.0</version>
</service>
Please note that there is no <url> tag specified here as the URLs for the Solr servers are obtained from ZooKeeper.
It is possible to override a few of the global configuration settings provided in gateway-site.xml at the service level. These overrides are specified as name/value pairs within the <service> elements of a particular service. The overridden settings apply only to that service.
The following table shows the common configuration settings available at the service level via service level parameters. Individual services may support additional service level parameters.
| Property | Description | Default |
|---|---|---|
| httpclient.maxConnections | The maximum number of connections that a single httpclient will maintain to a single host:port. | 32 |
| httpclient.connectionTimeout | The amount of time to wait when attempting a connection. The natural unit is milliseconds, but a ‘s’ or ‘m’ suffix may be used for seconds or minutes respectively. The default timeout is system dependent. | 20s |
| httpclient.socketTimeout | The amount of time to wait for data on a socket before aborting the connection. The natural unit is milliseconds, but a ‘s’ or ‘m’ suffix may be used for seconds or minutes respectively. The default timeout is system dependent but is likely to be indefinite. | 20s |
The example below demonstrates how these service level parameters are used.
<service>
<role>HIVE</role>
<param>
<name>httpclient.socketTimeout</name>
<value>180s</value>
</param>
</service>
Knox provides connectivity based failover functionality for service calls that can be made to more than one server instance in a cluster. To enable this functionality HaProvider configuration needs to be enabled for the service and the service itself needs to be configured with more than one URL in the topology file.
The default HA functionality works on a simple round robin algorithm, where the top of the list of URLs is always used to route all of a service’s REST calls until a connection error occurs. The top URL is then put at the bottom of the list and the next URL is attempted. This goes on until the setting of ‘maxFailoverAttempts’ is reached.
At present the following services can use this default High Availability functionality and have been tested for the same:
To enable HA functionality for a service in Knox the following configuration has to be added to the topology file.
<provider>
<role>ha</role>
<name>HaProvider</name>
<enabled>true</enabled>
<param>
<name>{SERVICE}</name>
<value>maxFailoverAttempts=3;failoverSleep=1000;enabled=true</value>
</param>
</provider>
The role and name of the provider above must be as shown. The name in the ‘param’ section i.e. {SERVICE} must match that of the service role name that is being configured for HA and the value in the ‘param’ section is the configuration for that particular service in HA mode. For example, the value of {SERVICE} can be ‘WEBHCAT’, ‘HBASE’ or ‘OOZIE’.
To configure multiple services in HA mode, additional ‘param’ sections can be added.
For example,
<provider>
<role>ha</role>
<name>HaProvider</name>
<enabled>true</enabled>
<param>
<name>OOZIE</name>
<value>maxFailoverAttempts=3;failoverSleep=1000;enabled=true</value>
</param>
<param>
<name>HBASE</name>
<value>maxFailoverAttempts=3;failoverSleep=1000;enabled=true</value>
</param>
<param>
<name>WEBHCAT</name>
<value>maxFailoverAttempts=3;failoverSleep=1000;enabled=true</value>
</param>
</provider>
The various configuration parameters are described below:
maxFailoverAttempts - This is the maximum number of times a failover will be attempted. The failover strategy at this time is very simplistic in that the next URL in the list of URLs provided for the service is used and the one that failed is put at the bottom of the list. If the list is exhausted and the maximum number of attempts is not reached then the first URL will be tried again.
failoverSleep - The amount of time in millis that the process will wait or sleep before attempting to failover.
enabled - Flag to turn the particular service on or off for HA.
And for the service configuration itself the additional URLs should be added to the list.
<service>
<role>{SERVICE}</role>
<url>http://host1:port1</url>
<url>http://host2:port2</url>
</service>
For example,
<service>
<role>OOZIE</role>
<url>http://sandbox1:11000/oozie</url>
<url>http://sandbox2:11000/oozie</url>
</service>
Knox provides gateway functionality for access to all Apache Avatica-based servers. The gateway can be used to provide authentication and encryption for clients to servers like the Apache Phoenix Query Server.
The Gateway can be configured for Avatica by modifying the topology XML file and providing a new service XML file.
In the topology XML file, add the following with the correct hostname:
<service>
<role>AVATICA</role>
<url>http://avatica:8765</url>
</service>
Your installation likely already contains the following service files. Ensure that they are present in your installation. In services/avatica/1.9.0/rewrite.xml:
<rules>
<rule dir="IN" name="AVATICA/avatica/inbound/root" pattern="*://*:*/**/avatica/">
<rewrite template="{$serviceUrl[AVATICA]}/"/>
</rule>
<rule dir="IN" name="AVATICA/avatica/inbound/path" pattern="*://*:*/**/avatica/{**}">
<rewrite template="{$serviceUrl[AVATICA]}/{**}"/>
</rule>
</rules>
And in services/avatica/1.9.0/service.xml:
<service role="AVATICA" name="avatica" version="1.9.0">
<policies>
<policy role="webappsec"/>
<policy role="authentication"/>
<policy role="rewrite"/>
<policy role="authorization"/>
</policies>
<routes>
<route path="/avatica">
<rewrite apply="AVATICA/avatica/inbound/root" to="request.url"/>
</route>
<route path="/avatica/**">
<rewrite apply="AVATICA/avatica/inbound/path" to="request.url"/>
</route>
</routes>
</service>
In most cases, users only need to modify the hostname of the Avatica server to instead be the Knox Gateway. To enable authentication, some of the Avatica property need to be added to the Properties object used when constructing the Connection or to the JDBC URL directly.
The JDBC URL can be modified like:
jdbc:avatica:remote:url=https://knox_gateway.domain:8443/gateway/sandbox/avatica;avatica_user=username;avatica_password=password;authentication=BASIC
Or, using the Properties class:
Properties props = new Properties();
props.setProperty("avatica_user", "username");
props.setProperty("avatica_password", "password");
props.setProperty("authentication", "BASIC");
DriverManager.getConnection(url, props);
Additionally, when the TLS certificate of the Knox Gateway is not trusted by your JVM installation, it will be necessary for you to pass in a custom truststore and truststore password to perform the necessary TLS handshake. This can be realized with the truststore and truststore_password properties using the same approaches as above.
Via the JDBC URL:
jdbc:avatica:remote:url=https://...;authentication=BASIC;truststore=/tmp/knox_truststore.jks;truststore_password=very_secret
Using Java code:
...
props.setProperty("truststore", "/tmp/knox_truststore.jks");
props.setProperty("truststore_password", "very_secret");
DriverManager.getConnection(url, props);
Knox provides proxied access to Livy server for submitting Spark jobs. The gateway can be used to provide authentication and encryption for clients to servers like Livy.
The Gateway can be configured for Livy by modifying the topology XML file and providing a new service XML file.
In the topology XML file, add the following with the correct hostname:
<service>
<role>LIVYSERVER</role>
<url>http://<livy-server>:8998</url>
</service>
Livy server will use proxyUser to run the Spark session. To avoid that a user can provide here any user (e.g. a more privileged), Knox will need to rewrite the JSON body to replace what so ever is the value of proxyUser is with the username of the authenticated user.
{
"driverMemory":"2G",
"executorCores":4,
"executorMemory":"8G",
"proxyUser":"bernhard",
"conf":{
"spark.master":"yarn-cluster",
"spark.jars.packages":"com.databricks:spark-csv_2.10:1.5.0"
}
}
The above is an example request body to be used to create a Spark session via Livy server and illustrates the “proxyUser” that requires rewrite.
ElasticSearch provides a REST API for communicating with ElasticSearch via JSON over HTTP. ElasticSearch uses X-Pack to do its own security (authentication and authorization). Therefore, the Knox Gateway is to forward the user credentials to ElasticSearch, and treats the ElasticSearch-authenticated user as “anonymous” to the backend service via a doas query param while Knox will authenticate to backend services as itself.
The Gateway can be configured for ElasticSearch by modifying the topology XML file and providing a new service XML file.
In the topology XML file, add the following new service named “ELASTICSEARCH” with the correct elasticsearch-rest-server hostname and port number (e.g., 9200):
<service>
<role>ELASTICSEARCH</role>
<url>http://<elasticsearch-rest-server>:9200/</url>
<name>elasticsearch</name>
</service>
After adding the above to a topology, you can make a cURL request similar to the following structures:
curl -i -k -u username:password -H "Accept: application/json" -X GET "https://{gateway-hostname}:{gateway-port}/gateway/{topology-name}/elasticsearch"
or
curl -i -k -u username:password -H "Accept: application/json" -X GET "https://{gateway-hostname}:{gateway-port}/gateway/{topology-name}/elasticsearch/"
The quotation marks around the URL, can be single quotes or double quotes on both sides, and can also be omitted (Note: This is true for all other ElasticSearch queries via Knox). Below is an example response:
HTTP/1.1 200 OK
Date: Wed, 23 May 2018 16:36:34 GMT
Content-Type: application/json; charset=UTF-8
Content-Length: 356
Server: Jetty(9.2.15.v20160210)
{"name":"w0A80p0","cluster_name":"elasticsearch","cluster_uuid":"poU7j48pSpu5qQONr64HLQ","version":{"number":"6.2.4","build_hash":"ccec39f","build_date":"2018-04-12T20:37:28.497551Z","build_snapshot":false,"lucene_version":"7.2.1","minimum_wire_compatibility_version":"5.6.0","minimum_index_compatibility_version":"5.0.0"},"tagline":"You Know, for Search"}
curl -i -k -u username:password -H "Content-Type: application/json" -X PUT "https://{gateway-hostname}:{gateway-port}/gateway/{topology-name}/elasticsearch/{index-name}" -d '{
"settings" : {
"index" : {
"number_of_shards" : {index-shards-number},
"number_of_replicas" : {index-replicas-number}
}
}
}'
Below is an example response:
HTTP/1.1 200 OK
Date: Wed, 23 May 2018 16:51:31 GMT
Content-Type: application/json; charset=UTF-8
Content-Length: 65
Server: Jetty(9.2.15.v20160210)
{"acknowledged":true,"shards_acknowledged":true,"index":"estest"}
For adding a “Hello Joe Smith” document:
curl -i -k -u username:password -H "Content-Type: application/json" -X PUT "https://{gateway-hostname}:{gateway-port}/gateway/{topology-name}/elasticsearch/{index-name}/{document-type-name}/{document-id}" -d '{
"title":"Hello Joe Smith"
}'
Below is an example response:
HTTP/1.1 201 Created
Date: Wed, 23 May 2018 17:00:17 GMT
Location: /estest/greeting/1
Content-Type: application/json; charset=UTF-8
Content-Length: 158
Server: Jetty(9.2.15.v20160210)
{"_index":"estest","_type":"greeting","_id":"1","_version":1,"result":"created","_shards":{"total":1,"successful":1,"failed":0},"_seq_no":0,"_primary_term":1}
curl -i -k -u username:password -X POST "https://{gateway-hostname}:{gateway-port}/gateway/{topology-name}/elasticsearch/{index-name}/_refresh"
Below is an example response:
HTTP/1.1 200 OK
Date: Wed, 23 May 2018 17:02:32 GMT
Content-Type: application/json; charset=UTF-8
Content-Length: 49
Server: Jetty(9.2.15.v20160210)
{"_shards":{"total":1,"successful":1,"failed":0}}
For changing the Person Joe Smith to Tom Smith:
curl -i -k -u username:password -H "Content-Type: application/json" -X PUT "https://{gateway-hostname}:{gateway-port}/gateway/{topology-name}/elasticsearch/{index-name}/{document-type-name}/{document-id}" -d '{
"title":"Hello Tom Smith"
}'
Below is an example response:
HTTP/1.1 200 OK
Date: Wed, 23 May 2018 17:09:59 GMT
Content-Type: application/json; charset=UTF-8
Content-Length: 158
Server: Jetty(9.2.15.v20160210)
{"_index":"estest","_type":"greeting","_id":"1","_version":2,"result":"updated","_shards":{"total":1,"successful":1,"failed":0},"_seq_no":1,"_primary_term":1}
For finding documents with “title”:“Hello” in a specified document-type:
curl -i -k -u username:password -H "Accept: application/json" -X GET "https://{gateway-hostname}:{gateway-port}/gateway/{topology-name}/elasticsearch/{index-name}/{document-type-name}/ _search?pretty=true;q=title:Hello"
Below is an example response:
HTTP/1.1 200 OK
Date: Wed, 23 May 2018 17:13:08 GMT
Content-Type: application/json; charset=UTF-8
Content-Length: 244
Server: Jetty(9.2.15.v20160210)
{"took":0,"timed_out":false,"_shards":{"total":1,"successful":1,"skipped":0,"failed":0},"hits":{"total":1,"max_score":0.2876821,"hits":[{"_index":"estest","_type":"greeting","_id":"1","_score":0.2876821,"_source":{"title":"Hello Tom Smith"}}]}}
curl -i -k -u username:password -X DELETE "https://{gateway-hostname}:{gateway-port}/gateway/{topology-name}/elasticsearch/{index-name}"
Below is an example response:
HTTP/1.1 200 OK
Date: Wed, 23 May 2018 17:20:19 GMT
Content-Type: application/json; charset=UTF-8
Content-Length: 21
Server: Jetty(9.2.15.v20160210)
{"acknowledged":true}
The gateway supports a Service Test API that can be used to test Knox’s ability to connect to each of the different Hadoop services via a simple HTTP GET request. To be able to access this API, one must add the following line into the topology for which you wish to run the service test.
<service>
<role>SERVICE-TEST</role>
</service>
After adding the above to a topology, you can make a cURL request with the following structure
curl -i -k "https://{gateway-hostname}:{gateway-port}/gateway/path/{topology-name}/service-test?username=guest&password=guest-password"
An alternate method of providing credentials:
curl -i -k -u guest:guest-password https://{gateway-hostname}:{gateway-port}/gateway/path/{topology-name}/service-test
Below is an example response. The gateway is also capable of returning XML if specified in the request’s “Accept” HTTP header.
{
"serviceTestWrapper": {
"Tests": {
"ServiceTest": [
{
"serviceName": "WEBHDFS",
"requestURL": "http://{gateway-host}:{gateway-port}/gateway/{topology-name}/webhdfs/v1/?op=LISTSTATUS",
"responseContent": "Content-Length:0,Content-Type: application/json;charset=utf-8",
"httpCode": 200,
"message": "Request sucessful."
},
{
"serviceName": "WEBHCAT",
"requestURL": "http://{gateway-host}:{gateway-port}/gateway/{topology-name}/templeton/v1/status",
"responseContent": "Content-Length:0,Content-Type: application/json;charset=utf-8",
"httpCode": 200,
"message": "Request sucessful."
},
{
"serviceName": "WEBHCAT",
"requestURL": "http://{gateway-host}:{gateway-port}/gateway/{topology-name}/templeton/v1/version",
"responseContent": "Content-Length:0,Content-Type: application/json;charset=utf-8",
"httpCode": 200,
"message": "Request sucessful."
},
{
"serviceName": "WEBHCAT",
"requestURL": "http://{gateway-host}:{gateway-port}/gateway/{topology-name}/templeton/v1/version/hive",
"responseContent": "Content-Length:0,Content-Type: application/json;charset=utf-8",
"httpCode": 200,
"message": "Request sucessful."
},
{
"serviceName": "WEBHCAT",
"requestURL": "http://{gateway-host}:{gateway-port}/gateway/{topology-name}/templeton/v1/version/hadoop",
"responseContent": "Content-Length:0,Content-Type: application/json;charset=utf-8",
"httpCode": 200,
"message": "Request sucessful."
},
{
"serviceName": "OOZIE",
"requestURL": "http://{gateway-host}:{gateway-port}/gateway/{topology-name}/oozie/v1/admin/build-version",
"responseContent": "Content-Length:0,Content-Type: application/json;charset=utf-8",
"httpCode": 200,
"message": "Request sucessful."
},
{
"serviceName": "OOZIE",
"requestURL": "http://{gateway-host}:{gateway-port}/gateway/{topology-name}/oozie/v1/admin/status",
"responseContent": "Content-Length:0,Content-Type: application/json;charset=utf-8",
"httpCode": 200,
"message": "Request sucessful."
},
{
"serviceName": "OOZIE",
"requestURL": "http://{gateway-host}:{gateway-port}/gateway/{topology-name}/oozie/versions",
"responseContent": "Content-Length:0,Content-Type: application/json;charset=utf-8",
"httpCode": 200,
"message": "Request sucessful."
},
{
"serviceName": "WEBHBASE",
"requestURL": "http://{gateway-host}:{gateway-port}/gateway/{topology-name}/hbase/version",
"responseContent": "Content-Length:0,Content-Type: application/json;charset=utf-8",
"httpCode": 200,
"message": "Request sucessful."
},
{
"serviceName": "WEBHBASE",
"requestURL": "http://{gateway-host}:{gateway-port}/gateway/{topology-name}/hbase/version/cluster",
"responseContent": "Content-Length:0,Content-Type: application/json;charset=utf-8",
"httpCode": 200,
"message": "Request sucessful."
},
{
"serviceName": "WEBHBASE",
"requestURL": "http://{gateway-host}:{gateway-port}/gateway/{topology-name}/hbase/status/cluster",
"responseContent": "Content-Length:0,Content-Type: application/json;charset=utf-8",
"httpCode": 200,
"message": "Request sucessful."
},
{
"serviceName": "WEBHBASE",
"requestURL": "http://{gateway-host}:{gateway-port}/gateway/{topology-name}/hbase",
"responseContent": "Content-Length:0,Content-Type: application/json;charset=utf-8",
"httpCode": 200,
"message": "Request sucessful."
},
{
"serviceName": "RESOURCEMANAGER",
"requestURL": "http://{gateway-host}:{gateway-port}/gateway/{topology-name}/resourcemanager/v1/{topology-name}/info",
"responseContent": "Content-Length:0,Content-Type: application/json;charset=utf-8",
"httpCode": 200,
"message": "Request sucessful."
},
{
"serviceName": "RESOURCEMANAGER",
"requestURL": "http://{gateway-host}:{gateway-port}/gateway/{topology-name}/resourcemanager/v1/{topology-name}/metrics",
"responseContent": "Content-Length:0,Content-Type: application/json;charset=utf-8",
"httpCode": 200,
"message": "Request sucessful."
},
{
"serviceName": "RESOURCEMANAGER",
"requestURL": "http://{gateway-host}:{gateway-port}/gateway/{topology-name}/resourcemanager/v1/{topology-name}/apps",
"responseContent": "Content-Length:0,Content-Type: application/json;charset=utf-8",
"httpCode": 200,
"message": "Request sucessful."
},
{
"serviceName": "FALCON",
"requestURL": "http://{gateway-host}:{gateway-port}/gateway/{topology-name}/falcon/api/admin/stack",
"responseContent": "Content-Length:0,Content-Type: application/json;charset=utf-8",
"httpCode": 200,
"message": "Request sucessful."
},
{
"serviceName": "FALCON",
"requestURL": "http://{gateway-host}:{gateway-port}/gateway/{topology-name}/falcon/api/admin/version",
"responseContent": "Content-Length:0,Content-Type: application/json;charset=utf-8",
"httpCode": 200,
"message": "Request sucessful."
},
{
"serviceName": "FALCON",
"requestURL": "http://{gateway-host}:{gateway-port}/gateway/{topology-name}/falcon/api/metadata/lineage/serialize",
"responseContent": "Content-Length:0,Content-Type: application/json;charset=utf-8",
"httpCode": 200,
"message": "Request sucessful."
},
{
"serviceName": "FALCON",
"requestURL": "http://{gateway-host}:{gateway-port}/gateway/{topology-name}/falcon/api/metadata/lineage/vertices/all",
"responseContent": "Content-Length:0,Content-Type: application/json;charset=utf-8",
"httpCode": 200,
"message": "Request sucessful."
},
{
"serviceName": "FALCON",
"requestURL": "http://{gateway-host}:{gateway-port}/gateway/{topology-name}/falcon/api/metadata/lineage/edges/all",
"responseContent": "Content-Length:0,Content-Type: application/json;charset=utf-8",
"httpCode": 200,
"message": "Request sucessful."
},
{
"serviceName": "STORM",
"requestURL": "http://{gateway-host}:{gateway-port}/gateway/{topology-name}/storm/api/v1/cluster/configuration",
"responseContent": "Content-Length:0,Content-Type: application/json;charset=utf-8",
"httpCode": 200,
"message": "Request sucessful."
},
{
"serviceName": "STORM",
"requestURL": "http://{gateway-host}:{gateway-port}/gateway/{topology-name}/storm/api/v1/cluster/summary",
"responseContent": "Content-Length:0,Content-Type: application/json;charset=utf-8",
"httpCode": 200,
"message": "Request sucessful."
},
{
"serviceName": "STORM",
"requestURL": "http://{gateway-host}:{gateway-port}/gateway/{topology-name}/storm/api/v1/supervisor/summary",
"responseContent": "Content-Length:0,Content-Type: application/json;charset=utf-8",
"httpCode": 200,
"message": "Request sucessful."
},
{
"serviceName": "STORM",
"requestURL": "http://{gateway-host}:{gateway-port}/gateway/{topology-name}/storm/api/v1/topology/summary",
"responseContent": "Content-Length:0,Content-Type: application/json;charset=utf-8",
"httpCode": 200,
"message": "Request sucessful."
}
]
},
"messages": {
"message": [
]
}
}
}
We can see that this service-test makes HTTP requests to each of the services through Knox using the specified topology. The test will only make calls to those services that have entries within the topology file.
URLs for each service are stored in {GATEWAY_HOME}/data/services/{service-name}/{service-version}/service.xml. Each <testURL> element represents a service resource that will be tested if the service is set up in the topology. You can add or remove these from the service.xml file. Just note if you add URLs there is no guarantee in the order they will be tested. All default URLs have been tested and work on various clusters. If a new URL is added and doesn’t respond in a way the user expects then it is up to the user to determine whether the URL is correct or not.
&password query parameter in the request.In the sections that follow, the integrations for proxying various UIs currently available out of the box with the gateway will be described. These sections will include examples that demonstrate how to access each of these services via the gateway.
These are the current Hadoop services with built-in support for their UIs.
This section assumes an environment setup similar to the one in the REST services section Service Details
The Name Node UI is available on the same host and port combination that WebHDFS is available on. As mentioned in the WebHDFS REST service configuration section, the values for the host and port can be obtained from the following properties in hdfs-site.xml
<property>
<name>dfs.namenode.http-address</name>
<value>sandbox.hortonworks.com:50070</value>
</property>
<property>
<name>dfs.https.namenode.https-address</name>
<value>sandbox.hortonworks.com:50470</value>
</property>
The values above need to be reflected in each topology descriptor file deployed to the gateway. The gateway by default includes a sample topology descriptor file {GATEWAY_HOME}/deployments/sandbox.xml. The values in this sample are configured to work with an installed Sandbox VM.
<service>
<role>HDFSUI</role>
<url>http://sandbox.hortonworks.com:50070</url>
</service>
In addition to the service configuration for HDFSUI, the REST service configuration for WEBHDFS is also required.
<service>
<role>NAMENODE</role>
<url>hdfs://sandbox.hortonworks.com:8020</url>
</service>
<service>
<role>WEBHDFS</role>
<url>http://sandbox.hortonworks.com:50070/webhdfs</url>
</service>
By default the gateway is configured to use the HTTP endpoint for WebHDFS in the Sandbox. This could alternatively be configured to use the HTTPS endpoint by providing the correct address.
For Name Node UI URLs, the mapping of Knox Gateway accessible HDFS UI URLs to direct HDFS UI URLs is:
| Gateway | https://{gateway-host}:{gateway-port}/{gateway-path}/{cluster-name}/hdfs |
| Cluster | http://{webhdfs-host}:50070/ |
For example to browse the file system using the NameNode UI the URL in a web browser would be:
http://sandbox.hortonworks.com:50070/explorer.html#
And using the gateway to access the same page the URL would be (where the gateway host:port is ‘localhost:8443’)
https://localhost:8443/gateway/sandbox/hdfs/explorer.html#
The Job History UI service can be configured in a topology by adding the following snippet. The values in this sample are configured to work with an installed Sandbox VM.
<service>
<role>JOBHISTORYUI</role>
<url>http://sandbox.hortonworks.com:19888</url>
</service>
The values for the host and port can be obtained from the following property in mapred-site.xml
<property>
<name>mapreduce.jobhistory.webapp.address</name>
<value>sandbox.hortonworks.com:19888</value>
</property>
For Job History UI URLs, the mapping of Knox Gateway accessible Job History UI URLs to direct Job History UI URLs is:
| Gateway | https://{gateway-host}:{gateway-port}/{gateway-path}/{cluster-name}/jobhistory |
| Cluster | http://{jobhistory-host}:19888/jobhistory |
The Oozie UI service can be configured in a topology by adding the following snippet. The values in this sample are configured to work with an installed Sandbox VM.
<service>
<role>OOZIEUI</role>
<url>http://sandbox.hortonworks.com:11000/oozie</url>
</service>
The value for the URL can be obtained from the following property in oozie-site.xml
<property>
<name>oozie.base.url</name>
<value>http://sandbox.hortonworks.com:11000/oozie</value>
</property>
For Oozie UI URLs, the mapping of Knox Gateway accessible Oozie UI URLs to direct Oozie UI URLs is:
| Gateway | https://{gateway-host}:{gateway-port}/{gateway-path}/{cluster-name}/oozie/ |
| Cluster | http://{oozie-host}:11000/oozie/ |
The HBase UI service can be configured in a topology by adding the following snippet. The values in this sample are configured to work with an installed Sandbox VM.
<service>
<role>HBASEUI</role>
<url>http://sandbox.hortonworks.com:16010</url>
</service>
The values for the host and port can be obtained from the following property in hbase-site.xml. Below the hostname of the HBase master is used since the bindAddress is 0.0.0.0
<property>
<name>hbase.master.info.bindAddress</name>
<value>0.0.0.0</value>
</property>
<property>
<name>hbase.master.info.port</name>
<value>16010</value>
</property>
For HBase UI URLs, the mapping of Knox Gateway accessible HBase UI URLs to direct HBase Master UI URLs is:
| Gateway | https://{gateway-host}:{gateway-port}/{gateway-path}/{cluster-name}/hbase/webui/ |
| Cluster | http://{hbase-master-host}:16010/ |
The YARN UI service can be configured in a topology by adding the following snippet. The values in this sample are configured to work with an installed Sandbox VM.
<service>
<role>YARNUI</role>
<url>http://sandbox.hortonworks.com:8088</url>
</service>
The values for the host and port can be obtained from the following property in mapred-site.xml
<property>
<name>yarn.resourcemanager.webapp.address</name>
<value>sandbox.hortonworks.com:8088</value>
</property>
For Resource Manager UI URLs, the mapping of Knox Gateway accessible Resource Manager UI URLs to direct Resource Manager UI URLs is:
| Gateway | https://{gateway-host}:{gateway-port}/{gateway-path}/{cluster-name}/yarn |
| Cluster | http://{resource-manager-host}:8088/cluster |
The Spark History UI service can be configured in a topology by adding the following snippet. The values in this sample are configured to work with an installed Sandbox VM.
<service>
<role>SPARKHISTORYUI</role>
<url>http://sandbox.hortonworks.com:18080/</url>
</service>
Please, note that for Spark versions older than 2.4.0 you need to set spark.ui.proxyBase to /{gateway-path}/{cluster-name}/sparkhistory (for more information, please refer to SPARK-24209).
Moreover, before Spark 2.3.1, there is a bug is Spark which prevents the UI to work properly when the proxy is accessed using a link which ends with “/” (SPARK-23644). So if the list of the applications is empty when you access the UI though the gateway, please check that there is a “/” at the end of the URL you are using.
For Spark History UI URLs, the mapping of Knox Gateway accessible Spark History UI URLs to direct Spark History UI URLs is:
| Gateway | https://{gateway-host}:{gateway-port}/{gateway-path}/{cluster-name}/sparkhistory |
| Cluster | http://{spark-history-host}:18080 |
Ambari UI has functionality around provisioning and managing services in a Hadoop cluster. This UI can now be used behind the Knox gateway.
To enable this functionality, a topology file needs to have the following configuration:
<service>
<role>AMBARIUI</role>
<url>http://<hostname>:<port></url>
</service>
<service>
<role>AMBARIWS</role>
<url>ws://<hostname>:<port></url>
</service>
The default Ambari http port is 8080. Also, please note that the UI service also requires the Ambari REST API service and Ambari Websocket service to be enabled to function properly. An example of a more complete topology is given below.
For Ambari UI URLs, the mapping of Knox Gateway accessible URLs to direct Ambari UI URLs is the following.
| Gateway | https://{gateway-host}:{gateway-port}/{gateway-path}/{cluster-name}/ambari/ |
| Cluster | http://{ambari-host}:{ambari-port}/} |
The Ambari UI service may require a separate topology file due to its requirements around authentication. Knox passes through authentication challenge and credentials to the service in this case.
<topology>
<gateway>
<provider>
<role>authentication</role>
<name>Anonymous</name>
<enabled>true</enabled>
</provider>
<provider>
<role>identity-assertion</role>
<name>Default</name>
<enabled>false</enabled>
</provider>
</gateway>
<service>
<role>AMBARI</role>
<url>http://localhost:8080</url>
</service>
<service>
<role>AMBARIUI</role>
<url>http://localhost:8080</url>
</service>
<service>
<role>AMBARIWS</role>
<url>ws://localhost:8080</url>
</service>
</topology>
Please look at JIRA issue [KNOX-705] for a known issue with this release.
The Ranger Admin console can now be used behind the Knox gateway.
To enable this functionality, a topology file needs to have the following configuration:
<service>
<role>RANGERUI</role>
<url>http://<hostname>:<port></url>
</service>
The default Ranger http port is 8060. Also, please note that the UI service also requires the Ranger REST API service to be enabled to function properly. An example of a more complete topology is given below.
For Ranger Admin console URLs, the mapping of Knox Gateway accessible URLs to direct Ranger Admin console URLs is the following.
| Gateway | https://{gateway-host}:{gateway-port}/{gateway-path}/{cluster-name}/ranger/ |
| Cluster | http://{ranger-host}:{ranger-port}/} |
The Ranger UI service may require a separate topology file due to its requirements around authentication. Knox passes through authentication challenge and credentials to the service in this case.
<topology>
<gateway>
<provider>
<role>authentication</role>
<name>Anonymous</name>
<enabled>true</enabled>
</provider>
<provider>
<role>identity-assertion</role>
<name>Default</name>
<enabled>false</enabled>
</provider>
</gateway>
<service>
<role>RANGER</role>
<url>http://localhost:8060</url>
</service>
<service>
<role>RANGERUI</role>
<url>http://localhost:8060</url>
</service>
</topology>
</service>
</topology>
The Atlas Rest API can now be used behind the Knox gateway. To enable this functionality, a topology file needs to have the following configuration.
<service>
<role>ATLAS-API</role>
<url>http://<ATLAS_HOST>:<ATLAS_PORT></url>
</service>
The default Atlas http port is 21000. Also, please note that the UI service also requires the Atlas REST API service to be enabled to function properly. An example of a more complete topology is given below.
Atlas Rest API URL Mapping For Atlas Rest URLs, the mapping of Knox Gateway accessible URLs to direct Atlas Rest URLs is the following.
| Gateway | https://{gateway-host}:{gateway-port}/{gateway-path}/{topology}/atlas/ |
| Cluster | http://{atlas-host}:{atlas-port}/} |
Access Atlas API using cULR call
curl -i -k -L -u admin:admin -X GET \
'https://knox-gateway:8443/gateway/{topology}/atlas/api/atlas/v2/types/typedefs?type=classification&_=1495442879421'
In addition to the Atlas REST API, from this release there is the ability to access some of the functionality via a web. The initial functionality is very limited and serves more as a starting point/placeholder. The details are below. Atlas UI URL
The URL mapping for the Atlas UI is:
| Gateway | https://{gateway-host}:{gateway-port}/{gateway-path}/{topology}/atlas/index.html |
<topology>
<gateway>
<provider>
<role>authentication</role>
<name>Anonymous</name>
<enabled>true</enabled>
</provider>
<provider>
<role>identity-assertion</role>
<name>Default</name>
<enabled>false</enabled>
</provider>
</gateway>
<service>
<role>ATLAS-API</role>
<url>http://<ATLAS_HOST>:<ATLAS_PORT></url>
</service>
<service>
<role>ATLAS</role>
<url>http://<ATLAS_HOST>:<ATLAS_PORT></url>
</service>
</topology>
Note: This feature will allow for ‘anonymous’ authentication. Essentially bypassing any LDAP or other authentication done by Knox and allow the proxied service to do the actual authentication.
Apache Knox can be used to proxy Zeppelin UI and also supports WebSocket protocol used by Zeppelin.
The URL mapping for the Zeppelin UI is:
| Gateway | https://{gateway-host}:{gateway-port}/{gateway-path}/{topology}/zeppelin/ |
By default WebSocket functionality is disabled, it needs to be enabled for Zeppelin UI to work properly, it can be enabled by changing the gateway.websocket.feature.enabled property to ‘true’ in <KNOX-HOME>/conf/gateway-site.xml file, for e.g.
<property>
<name>gateway.websocket.feature.enabled</name>
<value>true</value>
<description>Enable/Disable websocket feature.</description>
</property>
Example service definition for Zeppelin in topology file is as follows, note that both ZEPPELINWS and ZEPPELINUI service declarations are required.
<service>
<role>ZEPPELINWS</role>
<url>ws://<ZEPPELIN_HOST>:<ZEPPELIN_PORT>/ws</url>
</service>
<service>
<role>ZEPPELINUI</role>
<url>http://<ZEPPELIN_HOST>:<ZEPPELIN_PORT></url>
</service>
Knox also supports secure Zeppelin UIs, for secure UIs one needs to provision Zeppelin certificate into Knox truststore.
You can use the Apache Knox Gateway to provide authentication access security for your NiFi services.
The Gateway can be configured for Nifi by modifying the topology XML file.
In the topology XML file, add the following with the correct hostname and port:
<service>
<role>NIFI</role>
<url><NIFI_HTTP_SCHEME>://<NIFI_HOST>:<NIFI_HTTP_SCHEME_PORT></url>
<param name="useTwoWaySsl" value="true"/>
</service>
Note the setting of the useTwoWaySsl param above. Nifi requires mutual authentication via SSL and this param tells the dispatch to present a client cert to the server.
The above is an example request body to be used to create a Spark session via Livy server and illustrates the “proxyUser” that requires rewrite.
The Admin UI is a web application hosted by Knox, which provides the ability to manage provider configurations, descriptors, and topologies.
As an authoring facility, it eliminates the need for ssh/scp access to the Knox host(s) to effect topology changes.
Furthermore, using the Admin UI simplifies the management of topologies in Knox HA deployments by eliminating the need to copy files to multiple Knox hosts.
The URL mapping for the Knox Admin UI is:
| Gateway | https://{gateway-host}:{gateway-port}/{gateway-path}/manager/admin-ui/ |
The admin UI is deployed using the manager topology. The out-of-box authentication mechanism is KNOXSSO, backed by the demo LDAP server. Only someone in the admin role can access the UI functionality.
Initially, the Admin UI presents the types of resources which can be managed: Provider Configurations, Descriptors, and Topologies.
Selecting a resource type yields a listing of the existing resources of that type in the adjacent column, and selecting an individual resource presents the details of that selected resource.
For the provider configuration and descriptor resources types, the ![]() icon next to the resource list header is the trigger for the respective facility for creating a new resource of that type.
icon next to the resource list header is the trigger for the respective facility for creating a new resource of that type.
Modification options, including deletion, are available from the detail view for an individual resource.
The Admin UI lists the provider configurations currently deployed to Knox.
By choosing a particular provider configuration from the list, its details can be viewed and edited.
The provider configuration can also be deleted (as long as there are no referencing descriptors).
By default, there is a provider configuration named default-providers.
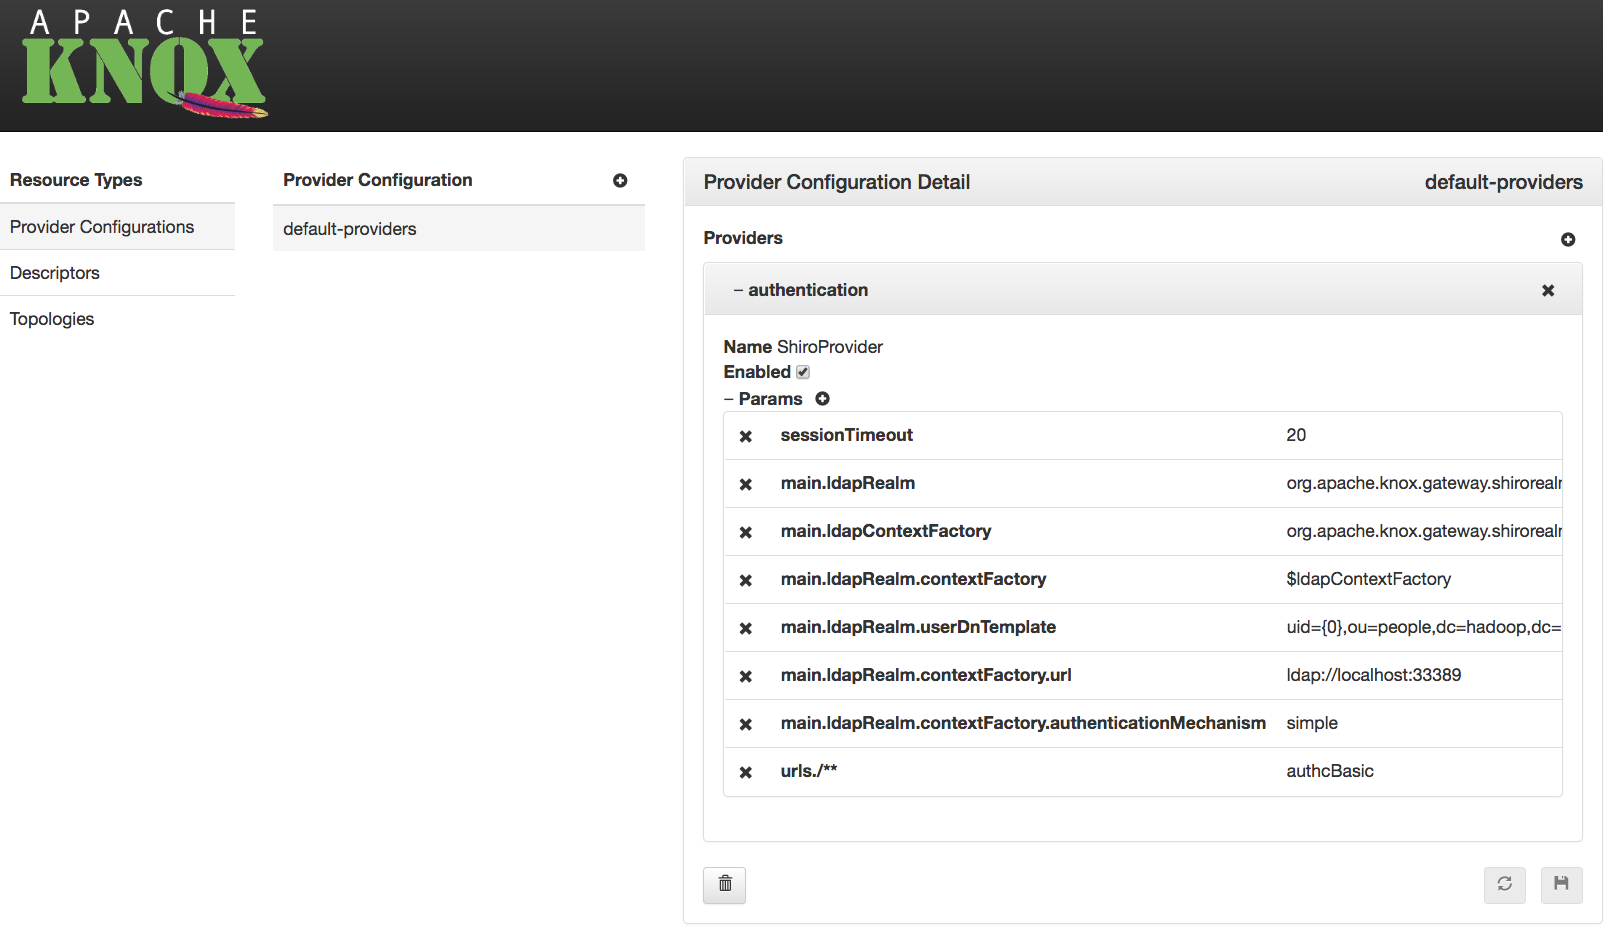
For each provider in a given provider configuration, the attributes can be modified:
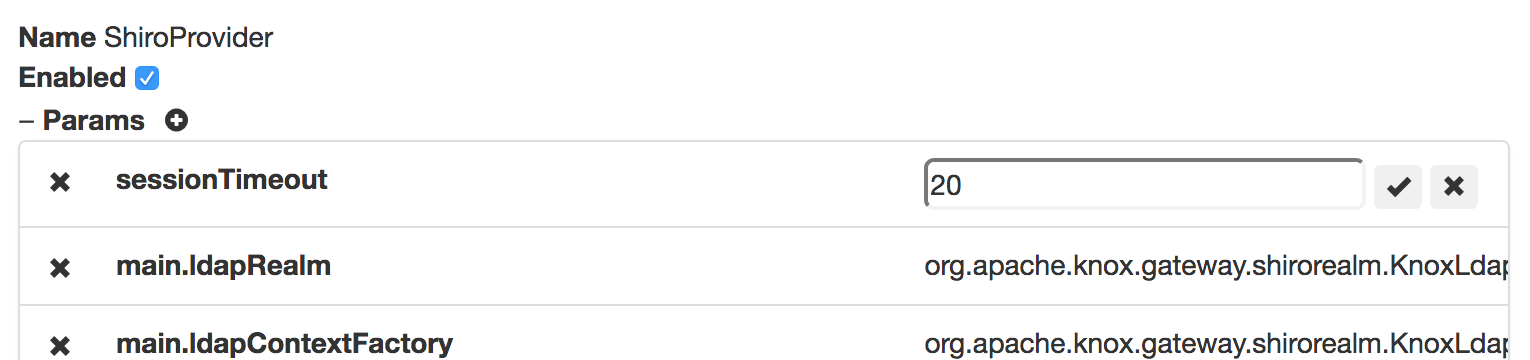
To persist changes, the ![]() button must be clicked. To revert unsaved changes, click the
button must be clicked. To revert unsaved changes, click the ![]() button or simply choose another resource.
button or simply choose another resource.
The Admin UI provides the ability to define new provider configurations, which can subsequently be referenced by one or more descriptors.
These provider configurations can be created based on the functionality needed, rather than requiring intimate knowledge of the various provider names and their respective parameter names.
A provider configuration is a named set of providers. The wizard allows an administrator to specify the name, and add providers to it.
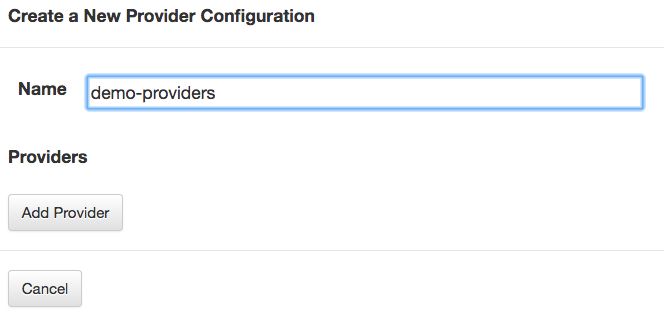
To add a provider, first a category must be chosen.
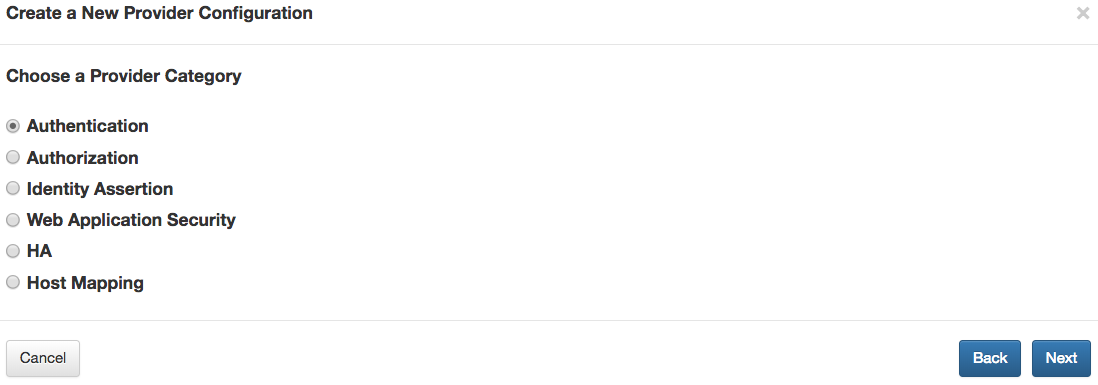
After choosing a category, the type within that category must be selected.
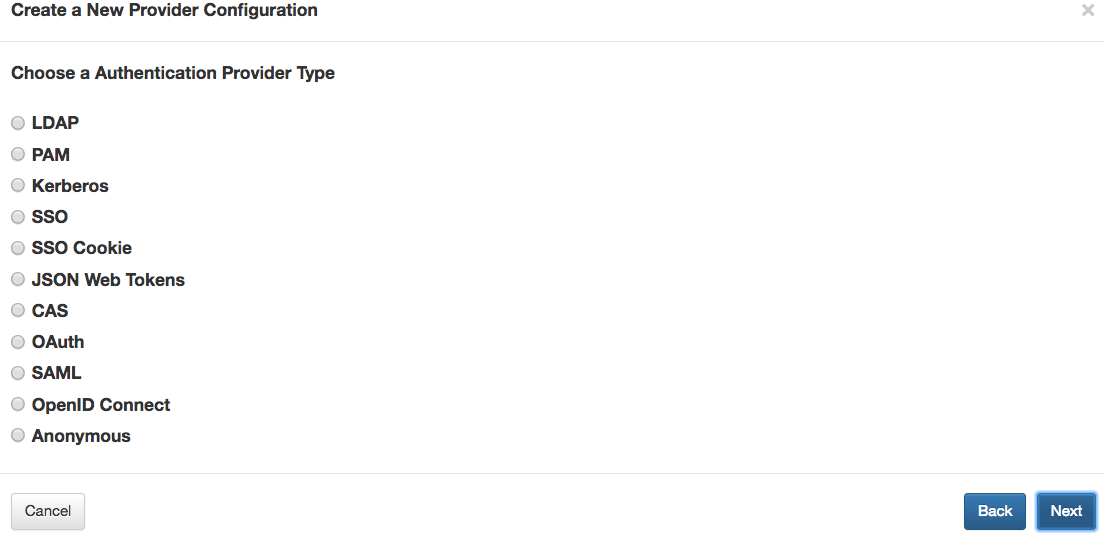
Finally, for the selected type, the type-specific parameter values can be specified.
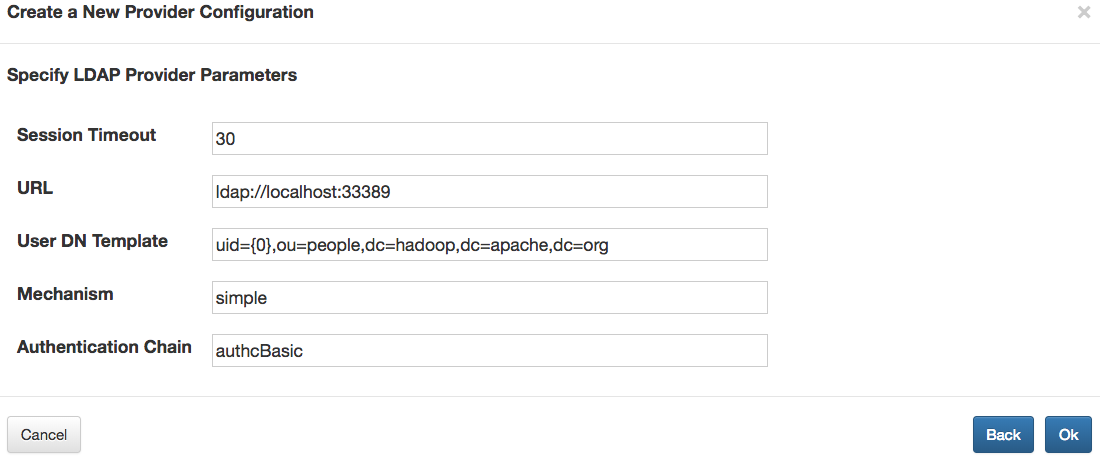
After adding a provider, others can be added similarly by way of the Add Provider button.
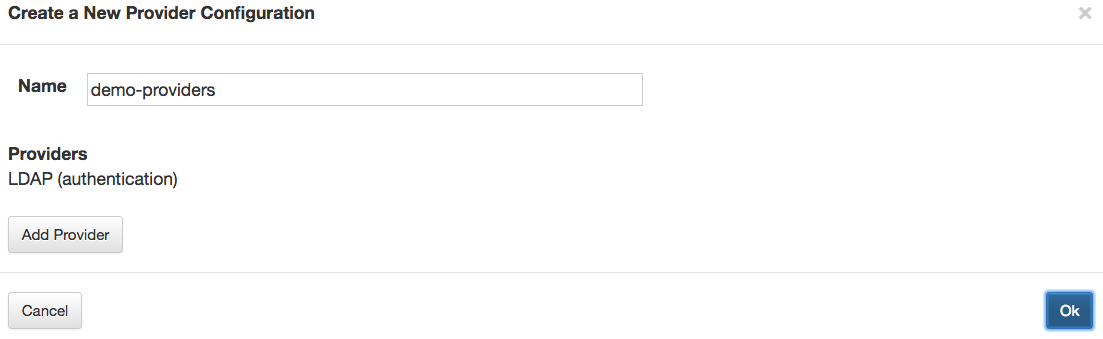
The wizard for some provider types, such as the HA provider, behave a little differently than the other provider types.
For example, when you choose the HA provider category, you subsequently choose a service role (e.g., WEBHDFS), and specify the parameter values for that service role’s entry in the HA provider.
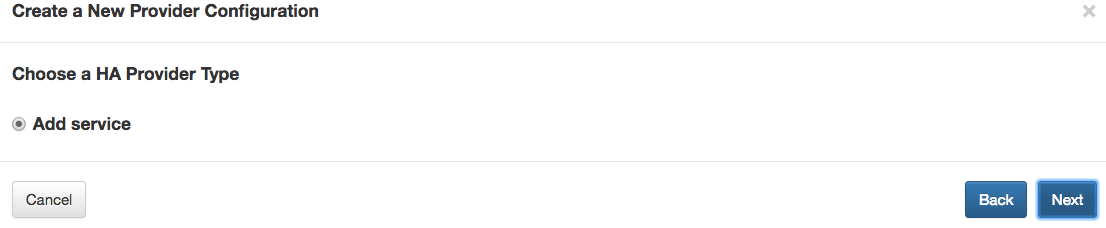
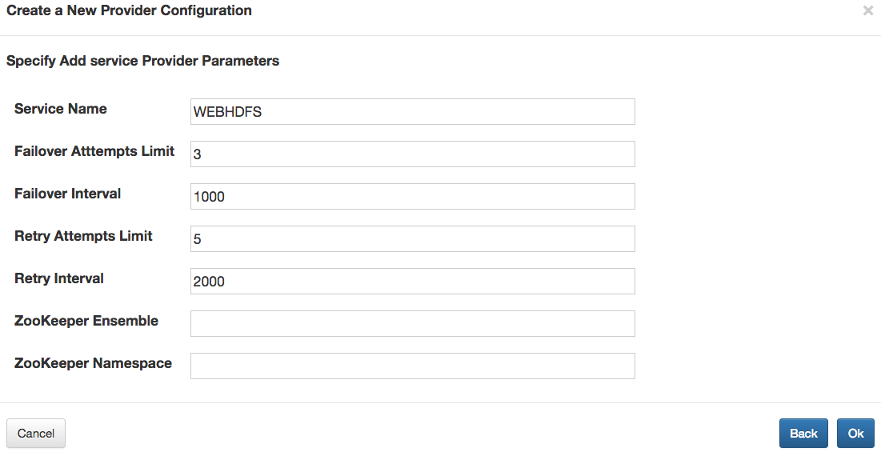
If multiple services are configured in this way, the result is still a single HA provider, which contains all of the service role configurations.
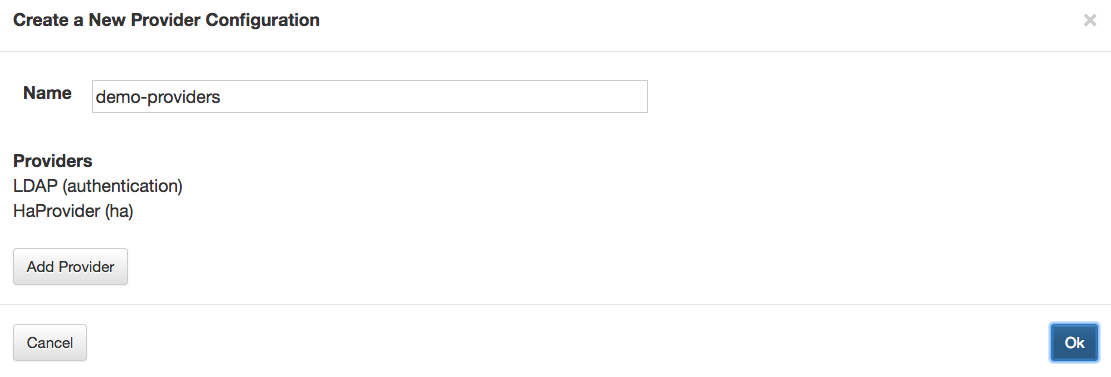
After adding all the desired providers to the new configuration, choosing  persists it.

A descriptor is essentially a named set of service roles to be proxied with a provider configuration reference. The Admin UI lists the descriptors currently deployed to Knox.
By choosing a particular descriptor from the list, its details can be viewed and edited. The provider configuration can also be deleted.
Modifications to descriptors will result in topology changes. When a descriptor is saved or deleted, the corresponding topology is [re]generated or deleted/undeployed respectively.
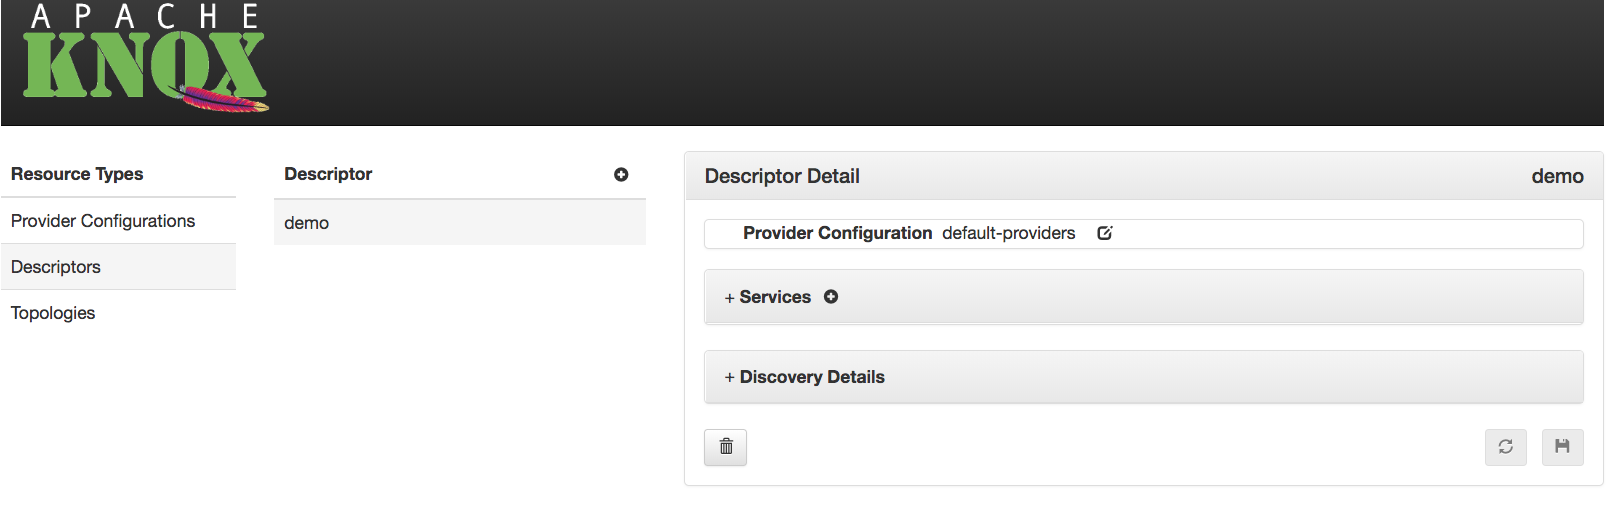

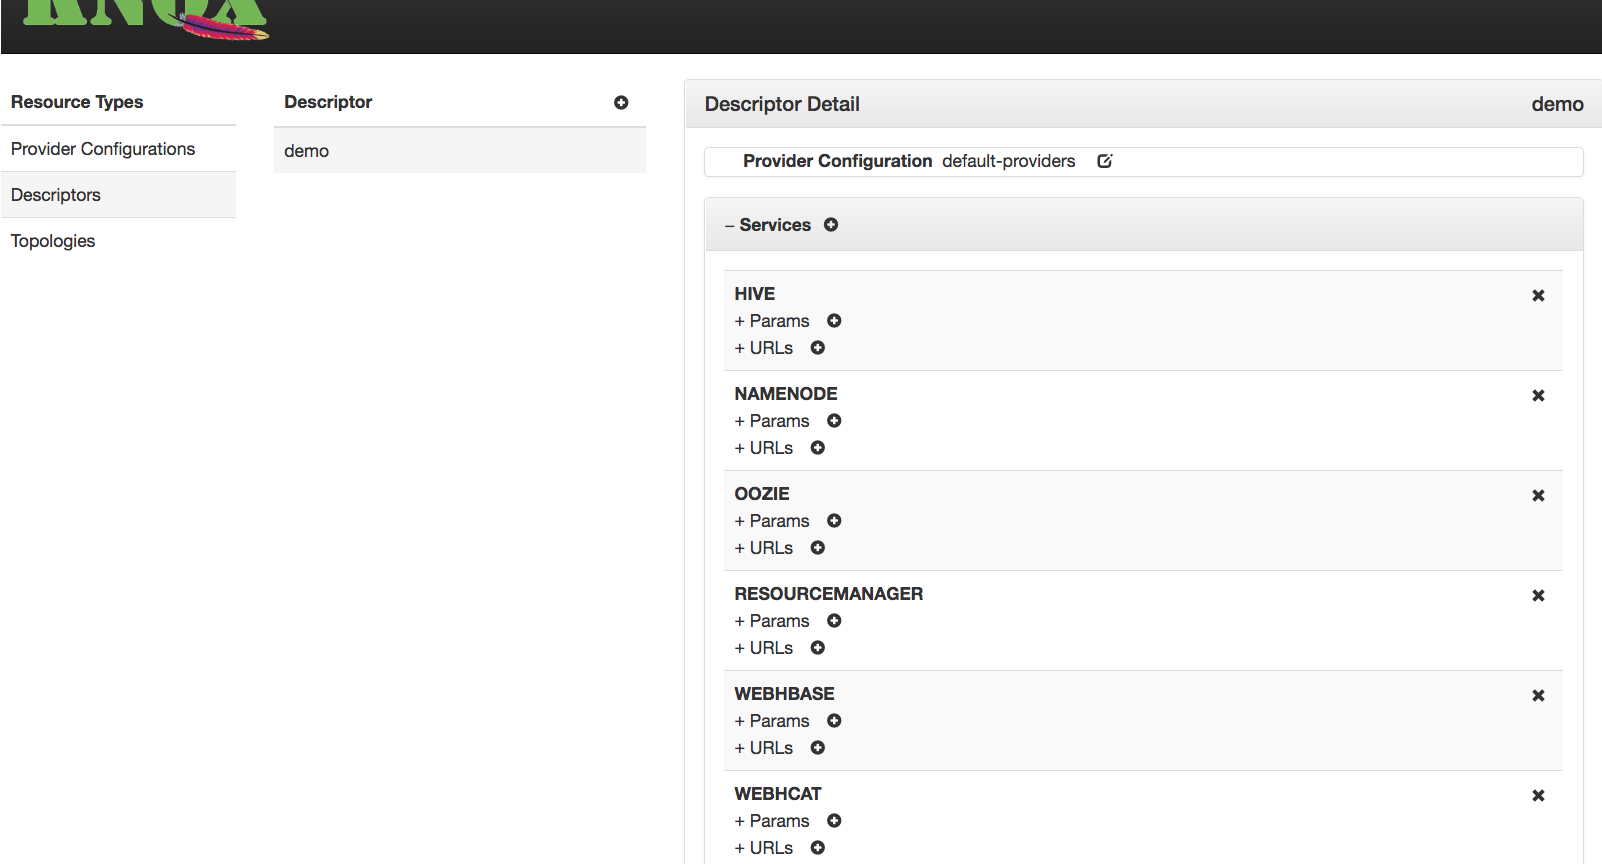
The Admin UI provides the ability to define new descriptors, which result in the generation and deployment of corresponding topologies.
The new descriptor dialog provides the ability to specify the name, which will also be the name of the resulting topology. It also allows one or more supported service roles to be selected for inclusion.
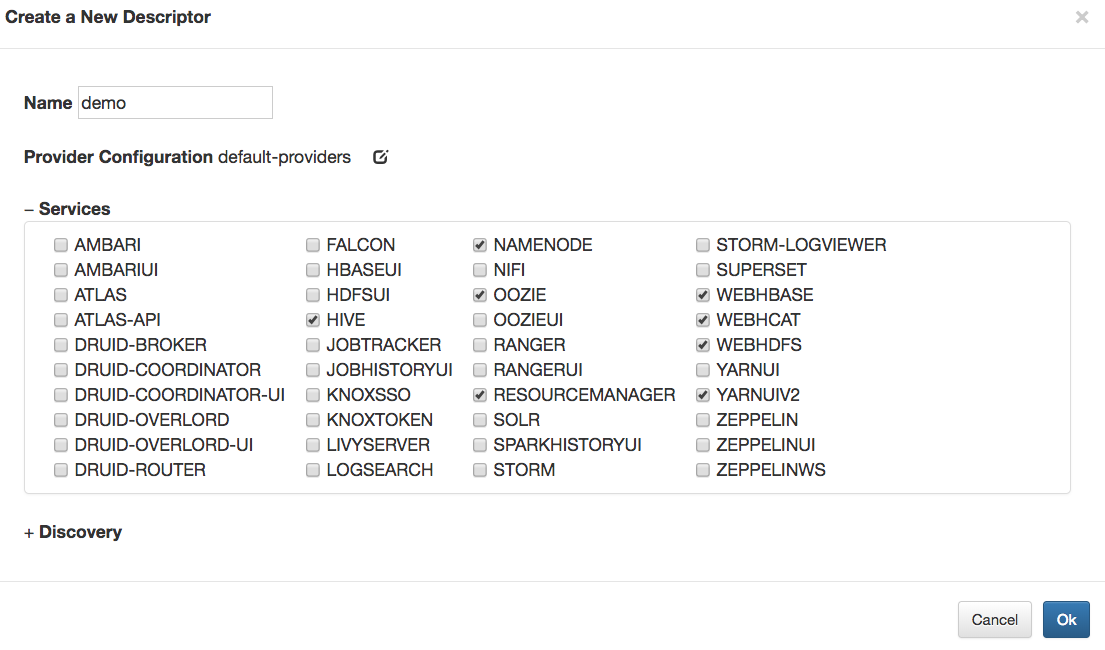
The provider configuration reference can entered manually, or the provider configuration selector can be used, to specify the name of an existing provider configuration.
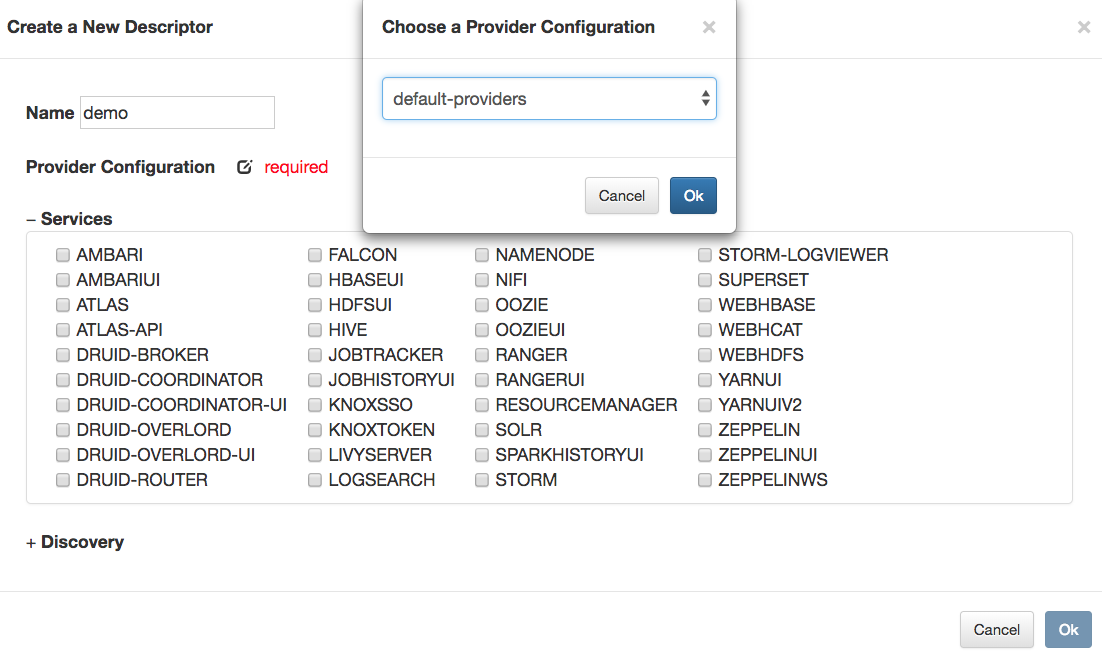
Optionally, discovery details can also be specified to direct Knox to discover the endpoints for the declared service roles from the Ambari-managed target cluster.
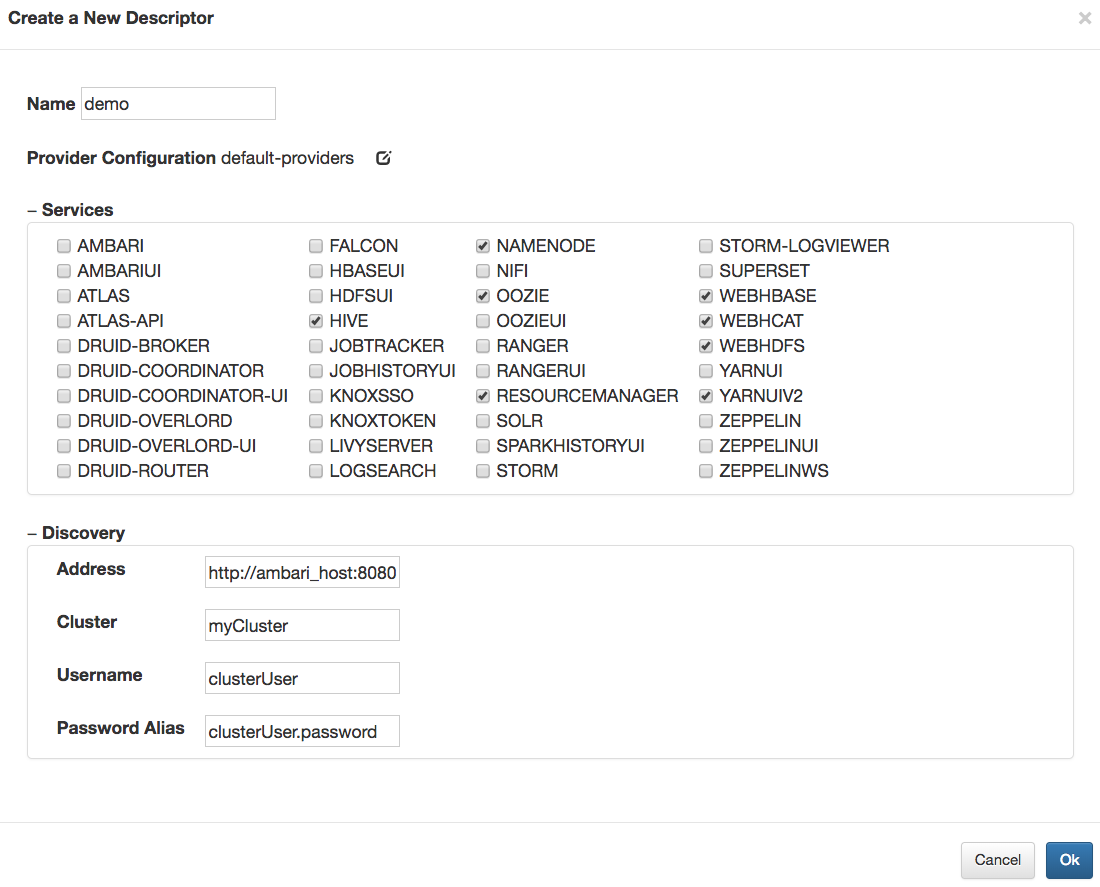
Choosing results in the persistence of the descriptor, and subsequently, the generation and deployment of the associated topology.
Descriptors are a means to declaratively specify which services should be proxied by a particular topology, allowing Knox to interrogate Ambari to determine the endpoint URLs for those declared services. The Service Discovery options tell Knox how to connect to the desired Ambari cluster to perform this endpoint discovery.
Address
This property specifies the address of the Ambari instance managing the cluster hosting the services whose endpoints are to be discovered.
Cluster
This property specifies from which of the clusters, among those being managed by the specified Ambari instance, the service endpoints should be determined.
Username
This is the identity of the Ambari user (assigned at least the Cluster User role), which will be used to get service configuration details from Ambari.
Password Alias
This is the Knox alias whose value is the password associated with the specified username.
This alias must have been defined prior to specifying it in a descriptor, or else the service discovery will fail for authentication reasons.

The Admin UI allows an administrator to view, modify, duplicate and delete topologies which are currently deployed to the Knox instance. Changes to a topology results in the [re]deployment of that topology, and deleting a topology results in its undeployment.
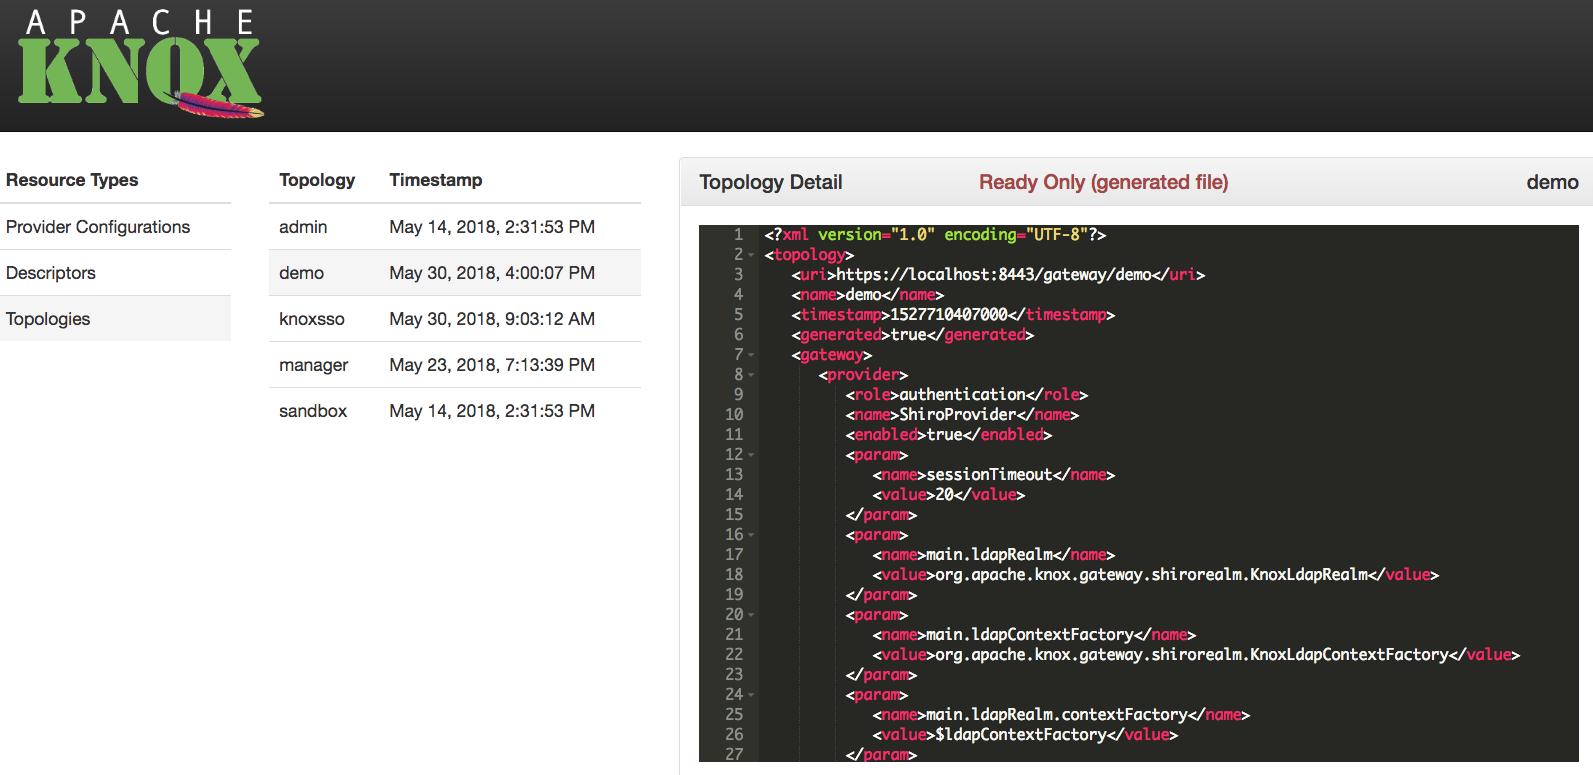
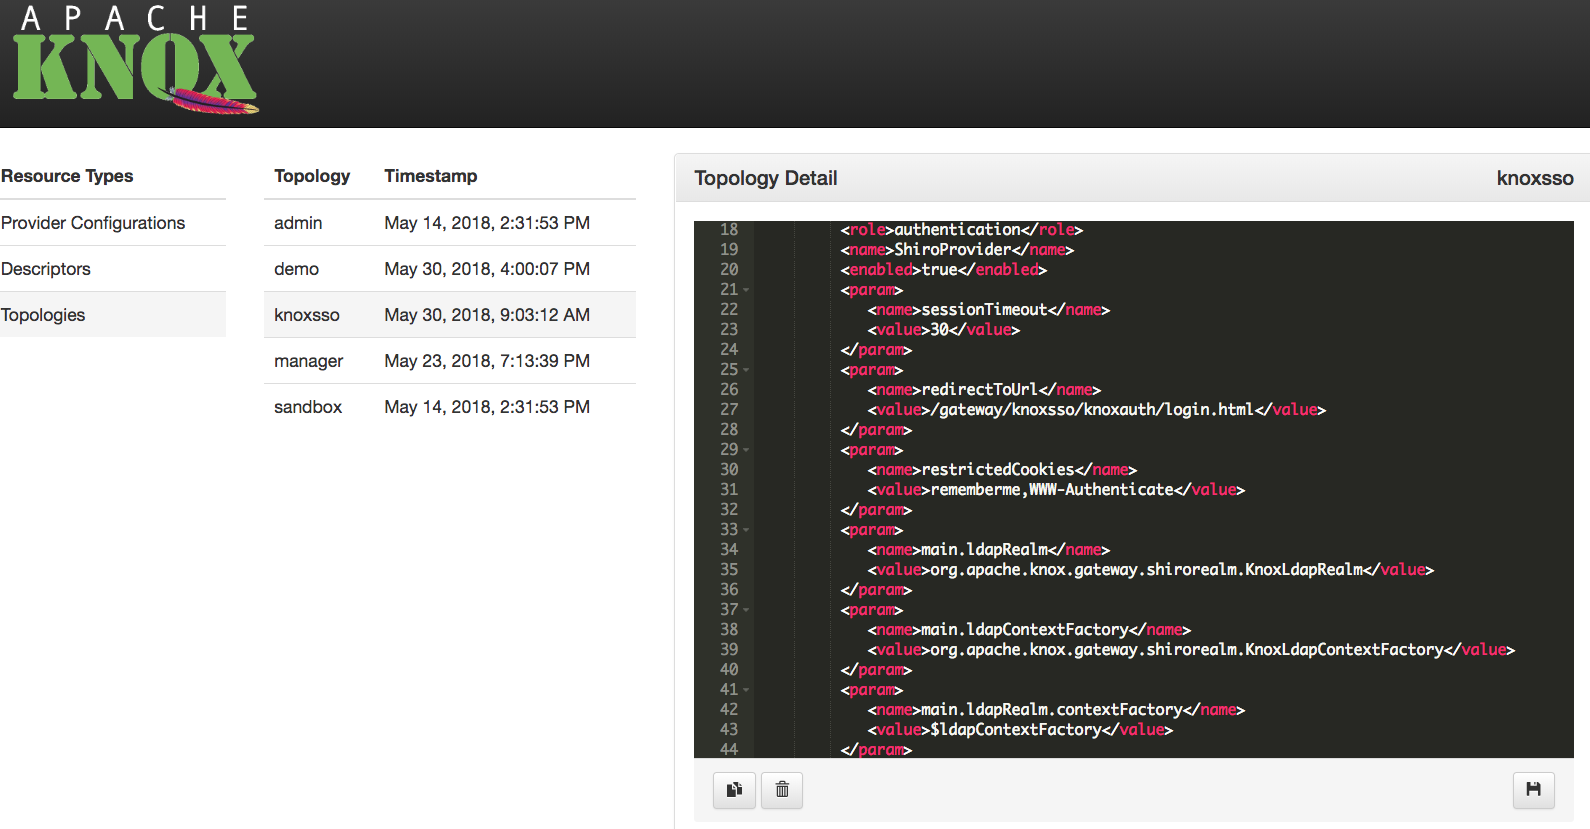
Topologies which are generated from descriptors are treated as read-only in the Admin UI. This is to avoid the potential confusion resulting from an administrator directly editing a generated topology only to have those changes overwritten by a regeneration of that same topology because the source descriptor or provider configuration changed.
If the Knox instance which is hosting the Admin UI is configured for remote configuration monitoring, then provider configuration and descriptor changes will be persisted in the configured ZooKeeper ensemble. Then, every Knox instance which is also configured to monitor configuration in this same ZooKeeper will apply those changes, and [re]generate/[re]deploy the affected topologies. In this way, Knox HA deployments can be managed by making changes once, and from any of the Knox instances.
With one exception there are no known size limits for requests or responses payloads that pass through the gateway. The exception involves POST or PUT request payload sizes for Oozie in a Kerberos secured Hadoop cluster. In this one case there is currently a 4Kb payload size limit for the first request made to the Hadoop cluster. This is a result of how the gateway negotiates a trust relationship between itself and the cluster via SPNEGO. There is an undocumented configuration setting to modify this limit’s value if required. In the future this will be made more easily configurable and at that time it will be documented.
Groups that are acquired via Shiro Group Lookup and/or Identity Assertion Group Principal Mapping are not propagated to the Hadoop services. Therefore, groups used for Service Level Authorization policy may not match those acquired within the cluster via GroupMappingServiceProvider plugins.
Consumption of messages via Knox at this time is not supported. The Confluent Kafka REST Proxy that Knox relies upon is stateful when used for consumption of messages.
When things aren’t working the first thing you need to do is examine the diagnostic logs. Depending upon how you are running the gateway these diagnostic logs will be output to different locations.
When the gateway is run this way the diagnostic output is written directly to the console. If you want to capture that output you will need to redirect the console output to a file using OS specific techniques.
java -jar bin/gateway.jar > gateway.log
When the gateway is run this way the diagnostic output is written to {GATEWAY_HOME}/log/knox.out and {GATEWAY_HOME}/log/knox.err. Typically only knox.out will have content.
The log4j.properties files {GATEWAY_HOME}/conf can be used to change the granularity of the logging done by Knox. The Knox server must be restarted in order for these changes to take effect. There are various useful loggers pre-populated but commented out.
log4j.logger.org.apache.knox.gateway=DEBUG # Use this logger to increase the debugging of Apache Knox itself.
log4j.logger.org.apache.shiro=DEBUG # Use this logger to increase the debugging of Apache Shiro.
log4j.logger.org.apache.http=DEBUG # Use this logger to increase the debugging of Apache HTTP components.
log4j.logger.org.apache.http.client=DEBUG # Use this logger to increase the debugging of Apache HTTP client component.
log4j.logger.org.apache.http.headers=DEBUG # Use this logger to increase the debugging of Apache HTTP header.
log4j.logger.org.apache.http.wire=DEBUG # Use this logger to increase the debugging of Apache HTTP wire traffic.
If the gateway cannot contact the configured LDAP server you will see errors in the gateway diagnostic output.
13/11/15 16:30:17 DEBUG authc.BasicHttpAuthenticationFilter: Attempting to execute login with headers [Basic Z3Vlc3Q6Z3Vlc3QtcGFzc3dvcmQ=]
13/11/15 16:30:17 DEBUG ldap.JndiLdapRealm: Authenticating user 'guest' through LDAP
13/11/15 16:30:17 DEBUG ldap.JndiLdapContextFactory: Initializing LDAP context using URL [ldap://localhost:33389] and principal [uid=guest,ou=people,dc=hadoop,dc=apache,dc=org] with pooling disabled
13/11/15 16:30:17 DEBUG servlet.SimpleCookie: Added HttpServletResponse Cookie [rememberMe=deleteMe; Path=/gateway/vaultservice; Max-Age=0; Expires=Thu, 14-Nov-2013 21:30:17 GMT]
13/11/15 16:30:17 DEBUG authc.BasicHttpAuthenticationFilter: Authentication required: sending 401 Authentication challenge response.
The client should see something along the lines of:
HTTP/1.1 401 Unauthorized
WWW-Authenticate: BASIC realm="application"
Content-Length: 0
Server: Jetty(8.1.12.v20130726)
Resolving this will require ensuring that the LDAP server is running and that connection information is correct. The LDAP server connection information is configured in the cluster’s topology file (e.g. {GATEWAY_HOME}/deployments/sandbox.xml).
If the gateway cannot contact one of the services in the configured Hadoop cluster you will see errors in the gateway diagnostic output.
13/11/18 18:49:45 WARN knox.gateway: Connection exception dispatching request: http://localhost:50070/webhdfs/v1/?user.name=guest&op=LISTSTATUS org.apache.http.conn.HttpHostConnectException: Connection to http://localhost:50070 refused
org.apache.http.conn.HttpHostConnectException: Connection to http://localhost:50070 refused
at org.apache.http.impl.conn.DefaultClientConnectionOperator.openConnection(DefaultClientConnectionOperator.java:190)
at org.apache.http.impl.conn.ManagedClientConnectionImpl.open(ManagedClientConnectionImpl.java:294)
at org.apache.http.impl.client.DefaultRequestDirector.tryConnect(DefaultRequestDirector.java:645)
at org.apache.http.impl.client.DefaultRequestDirector.execute(DefaultRequestDirector.java:480)
at org.apache.http.impl.client.AbstractHttpClient.execute(AbstractHttpClient.java:906)
at org.apache.http.impl.client.AbstractHttpClient.execute(AbstractHttpClient.java:805)
at org.apache.http.impl.client.AbstractHttpClient.execute(AbstractHttpClient.java:784)
at org.apache.knox.gateway.dispatch.HttpClientDispatch.executeRequest(HttpClientDispatch.java:99)
The resulting behavior on the client will differ by client. For the client DSL executing the {GATEWAY_HOME}/samples/ExampleWebHdfsLs.groovy the output will look like this.
Caught: org.apache.knox.gateway.shell.HadoopException: org.apache.knox.gateway.shell.ErrorResponse: HTTP/1.1 500 Server Error
org.apache.knox.gateway.shell.HadoopException: org.apache.knox.gateway.shell.ErrorResponse: HTTP/1.1 500 Server Error
at org.apache.knox.gateway.shell.AbstractRequest.now(AbstractRequest.java:72)
at org.apache.knox.gateway.shell.AbstractRequest$now.call(Unknown Source)
at ExampleWebHdfsLs.run(ExampleWebHdfsLs.groovy:28)
When executing commands requests via cURL the output might look similar to the following example.
Set-Cookie: JSESSIONID=16xwhpuxjr8251ufg22f8pqo85;Path=/gateway/sandbox;Secure
Content-Type: text/html;charset=ISO-8859-1
Cache-Control: must-revalidate,no-cache,no-store
Content-Length: 21856
Server: Jetty(8.1.12.v20130726)
<html>
<head>
<meta http-equiv="Content-Type" content="text/html; charset=ISO-8859-1"/>
<title>Error 500 Server Error</title>
</head>
<body><h2>HTTP ERROR 500</h2>
Resolving this will require ensuring that the Hadoop services are running and that connection information is correct. Basic Hadoop connectivity can be evaluated using cURL as described elsewhere. Otherwise the Hadoop cluster connection information is configured in the cluster’s topology file (e.g. {GATEWAY_HOME}/deployments/sandbox.xml).
When Knox is configured to accept requests over SSL and is presented with a request over plain HTTP, the client is presented with an error such as seen in the following:
curl -i -k -u guest:guest-password -X GET 'http://localhost:8443/gateway/sandbox/webhdfs/v1/?op=LISTSTATUS'
the following error is returned
curl: (52) Empty reply from server
This is the default behavior for Jetty SSL listener. While the credentials to the default authentication provider continue to be username and password, we do not want to encourage sending these in clear text. Since preemptively sending BASIC credentials is a common pattern with REST APIs it would be unwise to redirect to a HTTPS listener thus allowing clear text passwords.
To resolve this issue, we have two options:
When you are experiencing connectivity issue it can be helpful to “bypass” the gateway and invoke the Hadoop REST APIs directly. This can easily be done using the cURL command line utility or many other REST/HTTP clients. Exactly how to use cURL depends on the configuration of your Hadoop cluster. In general however you will use a command line the one that follows.
curl -ikv -X GET 'http://namenode-host:50070/webhdfs/v1/?op=LISTSTATUS'
If you are using Sandbox the WebHDFS or NameNode port will be mapped to localhost so this command can be used.
curl -ikv -X GET 'http://localhost:50070/webhdfs/v1/?op=LISTSTATUS'
If you are using a cluster secured with Kerberos you will need to have used kinit to authenticate to the KDC. Then the command below should verify that WebHDFS in the Hadoop cluster is accessible.
curl -ikv --negotiate -u : -X 'http://localhost:50070/webhdfs/v1/?op=LISTSTATUS'
The following log information is available when you enable debug level logging for shiro. This can be done within the conf/log4j.properties file. Not the “Password not correct for user” message.
13/11/15 16:37:15 DEBUG authc.BasicHttpAuthenticationFilter: Attempting to execute login with headers [Basic Z3Vlc3Q6Z3Vlc3QtcGFzc3dvcmQw]
13/11/15 16:37:15 DEBUG ldap.JndiLdapRealm: Authenticating user 'guest' through LDAP
13/11/15 16:37:15 DEBUG ldap.JndiLdapContextFactory: Initializing LDAP context using URL [ldap://localhost:33389] and principal [uid=guest,ou=people,dc=hadoop,dc=apache,dc=org] with pooling disabled
2013-11-15 16:37:15,899 INFO Password not correct for user 'uid=guest,ou=people,dc=hadoop,dc=apache,dc=org'
2013-11-15 16:37:15,899 INFO Authenticator org.apache.directory.server.core.authn.SimpleAuthenticator@354c78e3 failed to authenticate: BindContext for DN 'uid=guest,ou=people,dc=hadoop,dc=apache,dc=org', credentials <0x67 0x75 0x65 0x73 0x74 0x2D 0x70 0x61 0x73 0x73 0x77 0x6F 0x72 0x64 0x30 >
2013-11-15 16:37:15,899 INFO Cannot bind to the server
13/11/15 16:37:15 DEBUG servlet.SimpleCookie: Added HttpServletResponse Cookie [rememberMe=deleteMe; Path=/gateway/vaultservice; Max-Age=0; Expires=Thu, 14-Nov-2013 21:37:15 GMT]
13/11/15 16:37:15 DEBUG authc.BasicHttpAuthenticationFilter: Authentication required: sending 401 Authentication challenge response.
The client will likely see something along the lines of:
HTTP/1.1 401 Unauthorized
WWW-Authenticate: BASIC realm="application"
Content-Length: 0
Server: Jetty(8.1.12.v20130726)
If your authentication to Knox fails and you believe you’re using correct credentials, you could try to verify the connectivity and credentials using ldapsearch, assuming you are using LDAP directory for authentication.
Assuming you are using the default values that came out of box with Knox, your ldapsearch command would be like the following
ldapsearch -h localhost -p 33389 -D "uid=guest,ou=people,dc=hadoop,dc=apache,dc=org" -w guest-password -b "uid=guest,ou=people,dc=hadoop,dc=apache,dc=org" "objectclass=*"
This should produce output like the following
# extended LDIF
LDAPv3
base <uid=guest,ou=people,dc=hadoop,dc=apache,dc=org> with scope subtree
filter: objectclass=*
requesting: ALL
# guest, people, hadoop.apache.org
dn: uid=guest,ou=people,dc=hadoop,dc=apache,dc=org
objectClass: organizationalPerson
objectClass: person
objectClass: inetOrgPerson
objectClass: top
uid: guest
cn: Guest
sn: User
userpassword:: Z3Vlc3QtcGFzc3dvcmQ=
# search result
search: 2
result: 0 Success
# numResponses: 2
# numEntries: 1
In a more general form the ldapsearch command would be
ldapsearch -h {HOST} -p {PORT} -D {DN of binding user} -w {bind password} -b {DN of binding user} "objectclass=*}
The deployments/sandbox.xml topology file has the host mapping feature enabled. This is required due to the way networking is setup in the Sandbox VM. Specifically the VM’s internal hostname is sandbox.hortonworks.com. Since this hostname cannot be resolved to the actual VM Knox needs to map that hostname to something resolvable.
If for example host mapping is disabled but the Sandbox VM is still used you will see an error in the diagnostic output similar to the below.
13/11/18 19:11:35 WARN knox.gateway: Connection exception dispatching request: http://sandbox.hortonworks.com:50075/webhdfs/v1/user/guest/example/README?op=CREATE&namenoderpcaddress=sandbox.hortonworks.com:8020&user.name=guest&overwrite=false java.net.UnknownHostException: sandbox.hortonworks.com
java.net.UnknownHostException: sandbox.hortonworks.com
at java.net.Inet6AddressImpl.lookupAllHostAddr(Native Method)
On the other hand if you are migrating from the Sandbox based configuration to a cluster you have deployment you may see a similar error. However in this case you may need to disable host mapping. This can be done by modifying the topology file (e.g. deployments/sandbox.xml) for the cluster.
...
<provider>
<role>hostmap</role>
<name>static</name>
<enabled>false</enabled>
<param><name>localhost</name><value>sandbox,sandbox.hortonworks.com</value></param>
</provider>
....
If you see error like the following in your console while submitting a Job using groovy shell, it is likely that the authenticated user does not have a home directory on HDFS.
Caught: org.apache.knox.gateway.shell.HadoopException: org.apache.knox.gateway.shell.ErrorResponse: HTTP/1.1 403 Forbidden
org.apache.knox.gateway.shell.HadoopException: org.apache.knox.gateway.shell.ErrorResponse: HTTP/1.1 403 Forbidden
You would also see this error if you try file operation on the home directory of the authenticating user.
The error would look a little different as shown below if you are attempting to the operation with cURL.
{"RemoteException":{"exception":"AccessControlException","javaClassName":"org.apache.hadoop.security.AccessControlException","message":"Permission denied: user=tom, access=WRITE, inode=\"/user\":hdfs:hdfs:drwxr-xr-x"}}*
Create the home directory for the user on HDFS. The home directory is typically of the form /user/{userid} and should be owned by the user. user ‘hdfs’ can create such a directory and make the user owner of the directory.
If the Hadoop cluster is not secured with Kerberos, the user submitting a job need not have an OS account on the Hadoop NodeManagers.
If the Hadoop cluster is secured with Kerberos, the user submitting the job should have an OS account on Hadoop NodeManagers.
In either case if the user does not have such OS account, his file permissions are based on user ownership of files or “other” permission in “ugo” posix permission. The user does not get any file permission as a member of any group if you are using default hadoop.security.group.mapping.
TODO: add sample error message from running test on secure cluster with missing OS account
If you experience problems running the HBase samples with the Sandbox VM it may be necessary to restart HBase and the HBASE REST API. This can sometimes occur with the Sandbox VM is restarted from a saved state. If the client hangs after emitting the last line in the sample output below you are most likely affected.
System version : {...}
Cluster version : 0.96.0.2.0.6.0-76-hadoop2
Status : {...}
Creating table 'test_table'...
HBase and the HBASE REST API can be restarted using the following commands on the Hadoop Sandbox VM. You will need to ssh into the VM in order to run these commands.
sudo -u hbase /usr/lib/hbase/bin/hbase-daemon.sh stop master
sudo -u hbase /usr/lib/hbase/bin/hbase-daemon.sh start master
sudo -u hbase /usr/lib/hbase/bin/hbase-daemon.sh restart rest
Clients that do not trust the certificate presented by the server will behave in different ways. A browser will typically warn you of the inability to trust the received certificate and give you an opportunity to add an exception for the particular certificate. Curl will present you with the follow message and instructions for turning of certificate verification:
curl performs SSL certificate verification by default, using a "bundle"
of Certificate Authority (CA) public keys (CA certs). If the default
bundle file isn't adequate, you can specify an alternate file
using the --cacert option.
If this HTTPS server uses a certificate signed by a CA represented
the bundle, the certificate verification probably failed due to a
problem with the certificate (it might be expired, or the name might
not match the domain name in the URL).
If you'd like to turn off curl's verification of the certificate, use
the -k (or --insecure) option.
Calls from Knox to Secure Hadoop Cluster fails, with SPNego authentication problems, if there was a TGT for Knox in disk cache when Knox was started.
You are likely to run into this situation on developer machines where the developer could have kinited for some testing.
Work Around: clear TGT of Knox from disk cache (calling kdestroy would do it), before starting Knox
Bugs can be filed using Jira. Please include the results of this command below in the Environment section. Also include the version of Hadoop being used in the same section.
cd {GATEWAY_HOME}
java -jar bin/gateway.jar -version
Apache Knox Gateway includes cryptographic software. The country in which you currently reside may have restrictions on the import, possession, use, and/or re-export to another country, of encryption software. BEFORE using any encryption software, please check your country’s laws, regulations and policies concerning the import, possession, or use, and re-export of encryption software, to see if this is permitted. See http://www.wassenaar.org for more information.
The U.S. Government Department of Commerce, Bureau of Industry and Security (BIS), has classified this software as Export Commodity Control Number (ECCN) 5D002.C.1, which includes information security software using or performing cryptographic functions with asymmetric algorithms. The form and manner of this Apache Software Foundation distribution makes it eligible for export under the License Exception ENC Technology Software Unrestricted (TSU) exception (see the BIS Export Administration Regulations, Section 740.13) for both object code and source code.
The following provides more details on the included cryptographic software:
Apache Knox, Apache Knox Gateway, Apache, the Apache feather logo and the Apache Knox Gateway project logos are trademarks of The Apache Software Foundation. All other marks mentioned may be trademarks or registered trademarks of their respective owners.
Apache Knox uses the standard Apache license.
Apache Knox uses the standard Apache privacy policy.
Information about your use of this website is collected using server access logs and a tracking cookie. The collected information consists of the following:
Part of this information is gathered using a tracking cookie set by the Google Analytics service. Google’s policy for the use of this information is described in their privacy policy. See your browser’s documentation for instructions on how to disable the cookie if you prefer not to share this data with Google.
We use the gathered information to help us make our site more useful to visitors and to better understand how and when our site is used. We do not track or collect personally identifiable information or associate gathered data with any personally identifying information from other sources.
By using this website, you consent to the collection of this data in the manner and for the purpose described above.